my dad's coconut cream pie!

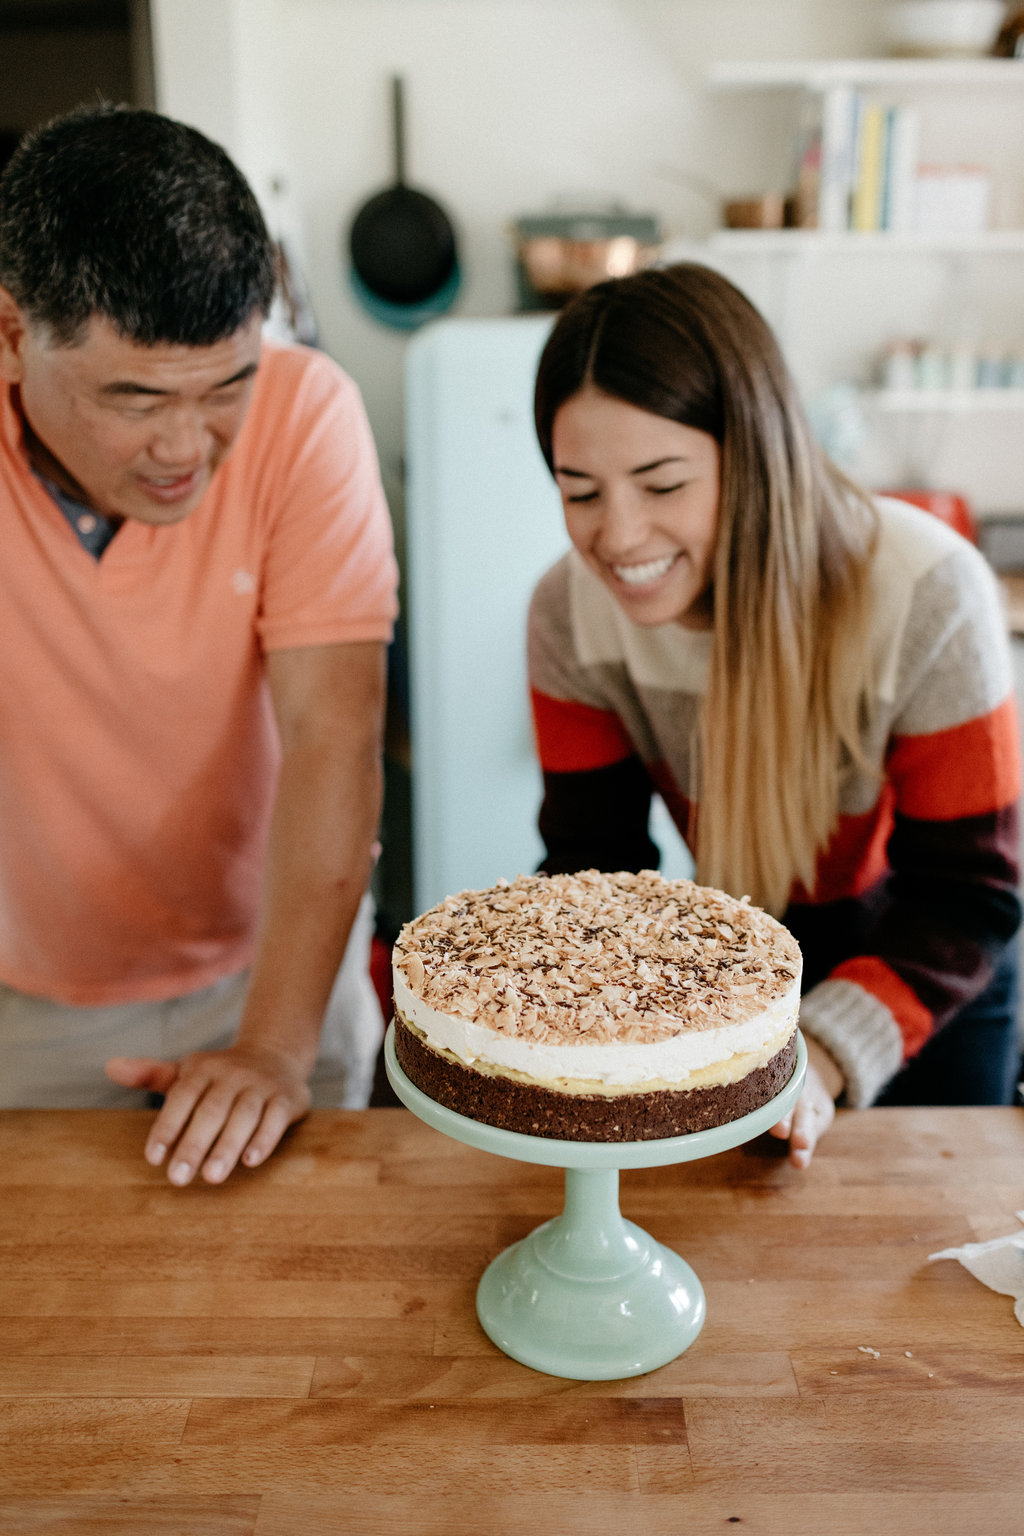
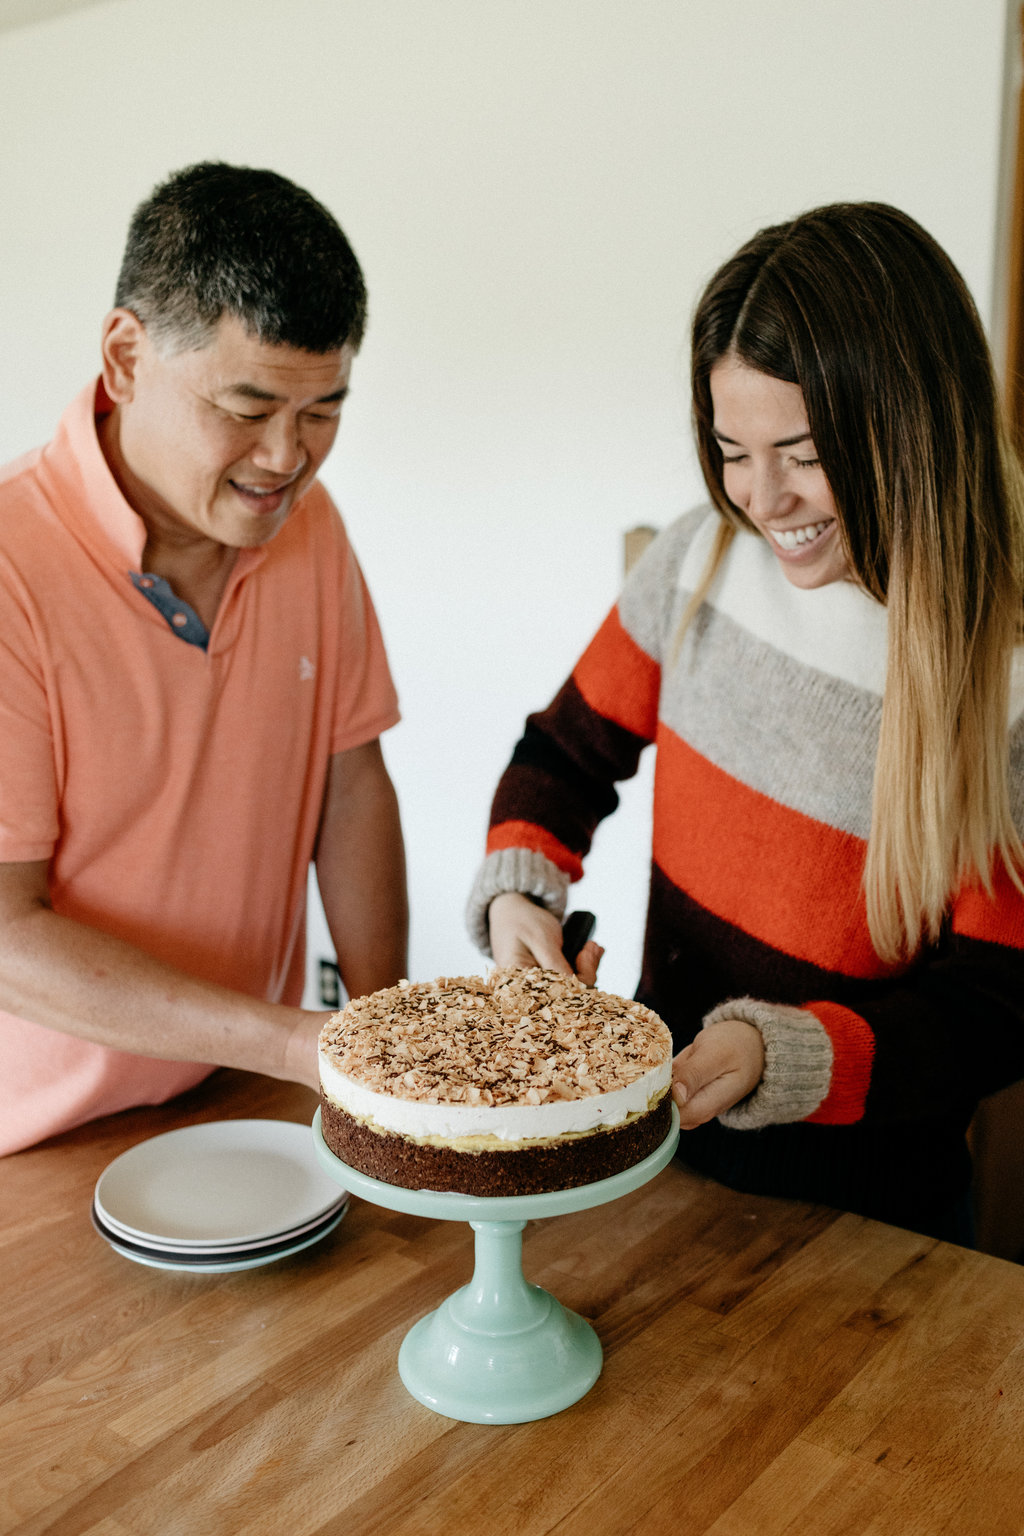
A few years ago, my dad, who has always been more of an eater/human garbage disposal than a cook, casually started mentioning his “famous coconut cream pie.” I would get text message pictures on pi day of this pie, or he would just throw it into everyday conversation about dessert, and one time when our family convened in Los Angeles he had brought an entire pie on the airplane from Chicago. This coconut cream pie thing all seemed to happened out of nowhere, I don't remember him making it when I was little, it just became his "thing" all of a sudden! And I don’t know how it became famous or if it actually is famous, I think he just started calling it that one day?!?? I asked him about it once and he named someone from work who thought it was famous or something… so he went with it. Stoopie and I eventually just shrugged it off and went with it because why not??

And then a lot of things became clear when I made the connection that Eggboy, who is also nary a cook, has his one pie that he makes and, on good years, considers to be very famous. And then I thought: Am I, as a deeply loyal member of #teamcake (well, until very recently), forcing all of the pie-loving humans in my family to step out of their comfort zones and make their own pies? And then I thought: 🙄🙄🙄 I should shut up and not make this about me. 

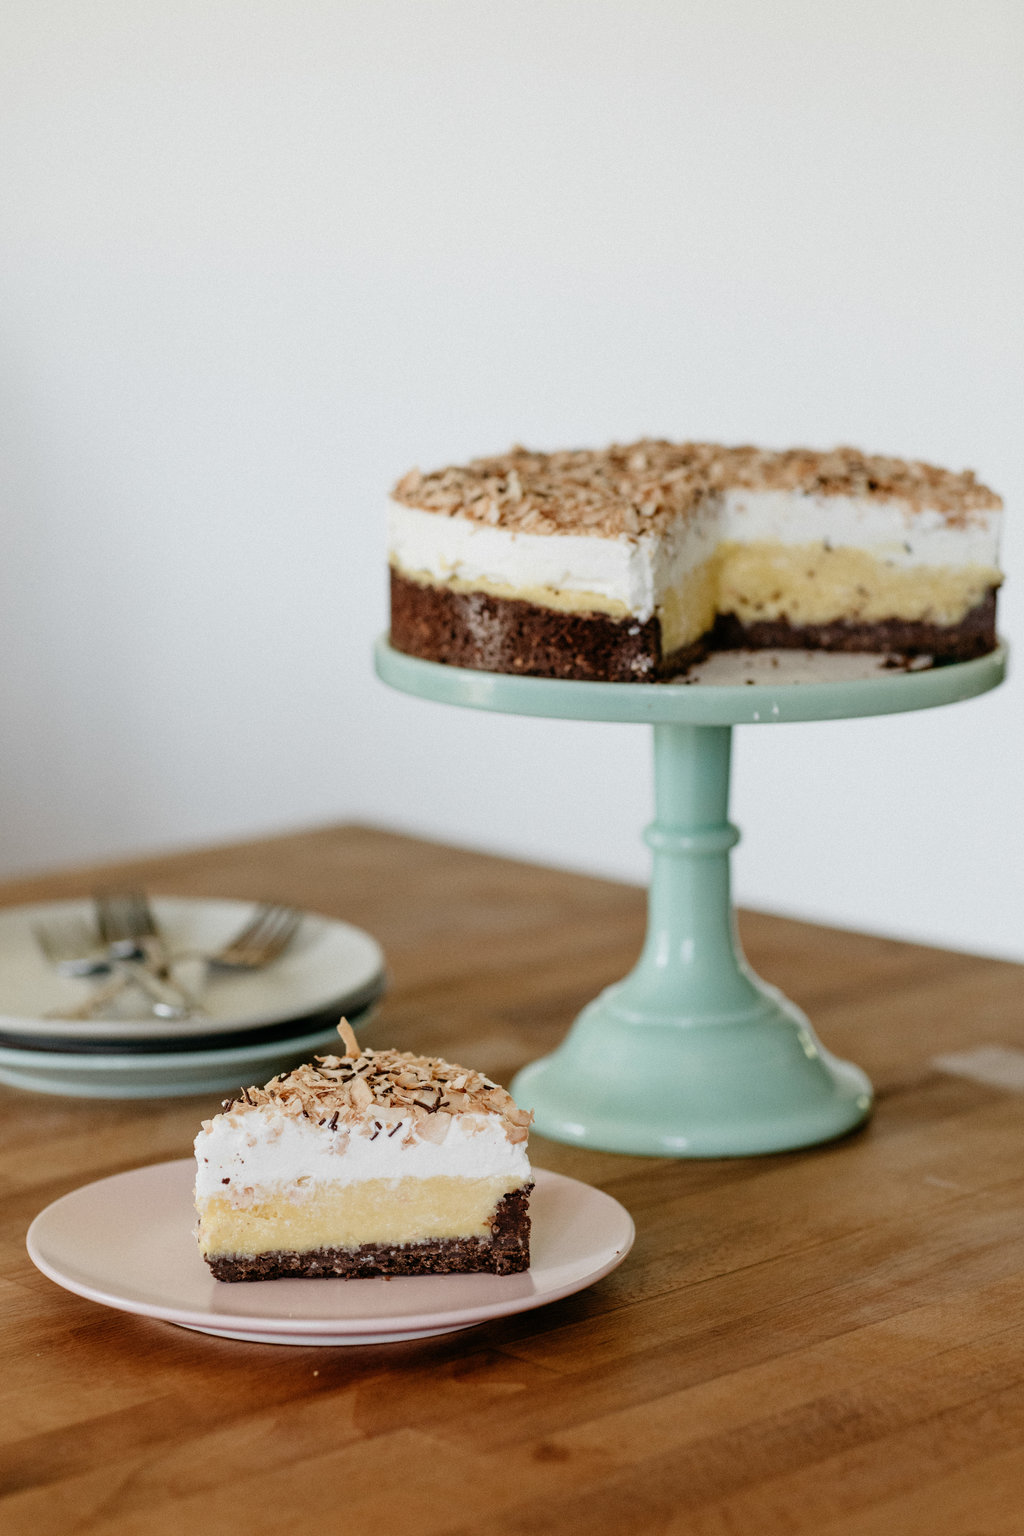
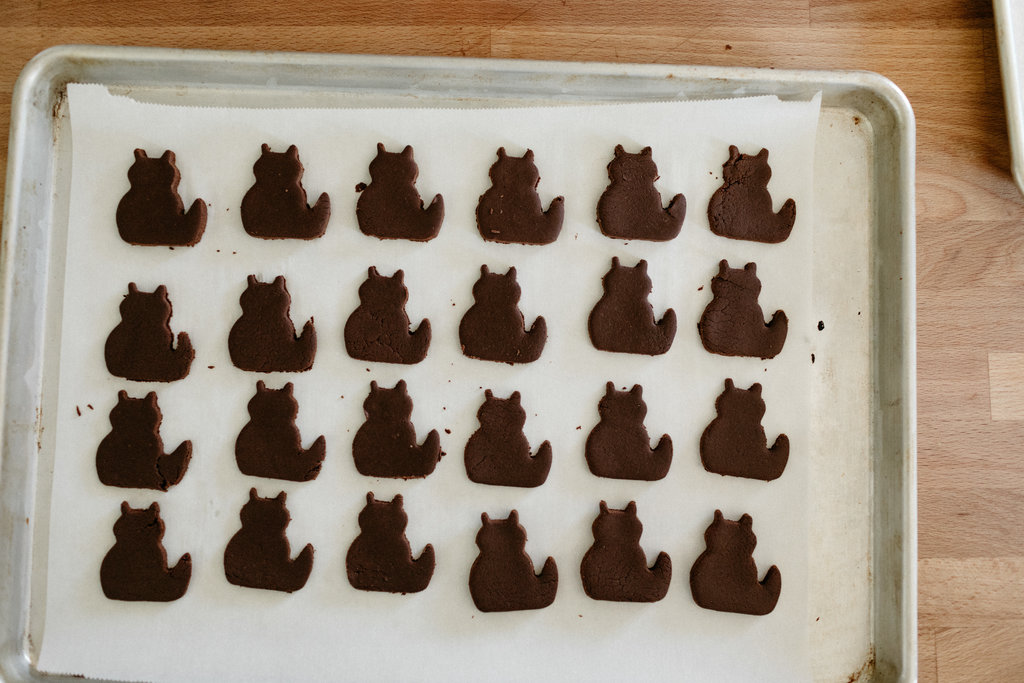
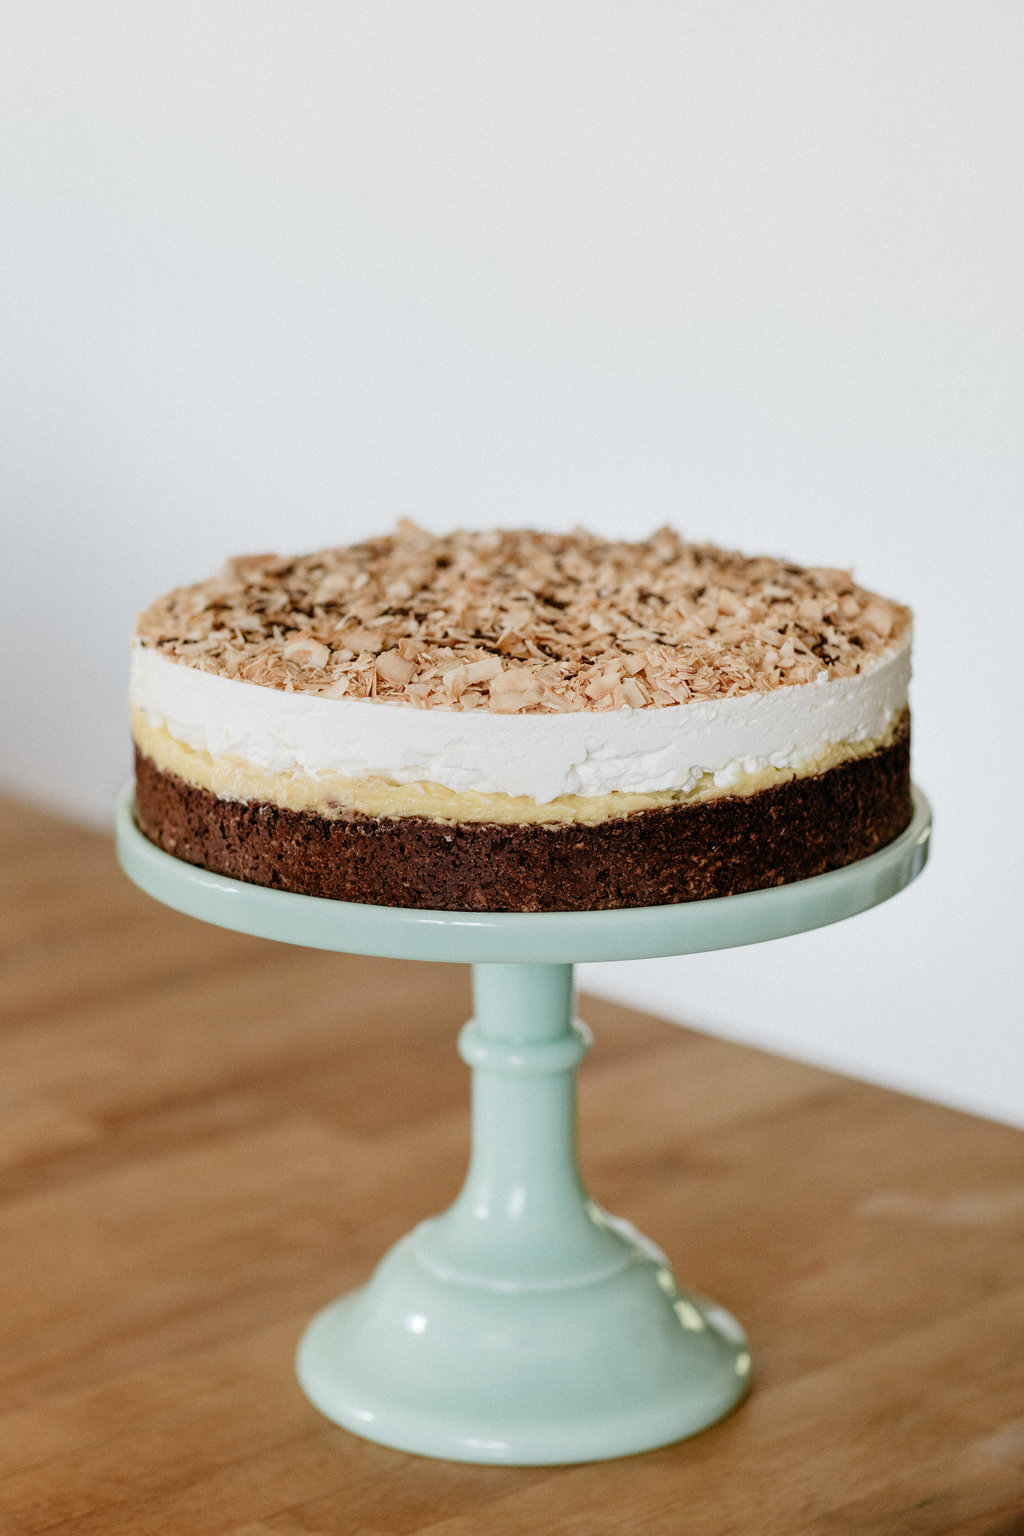
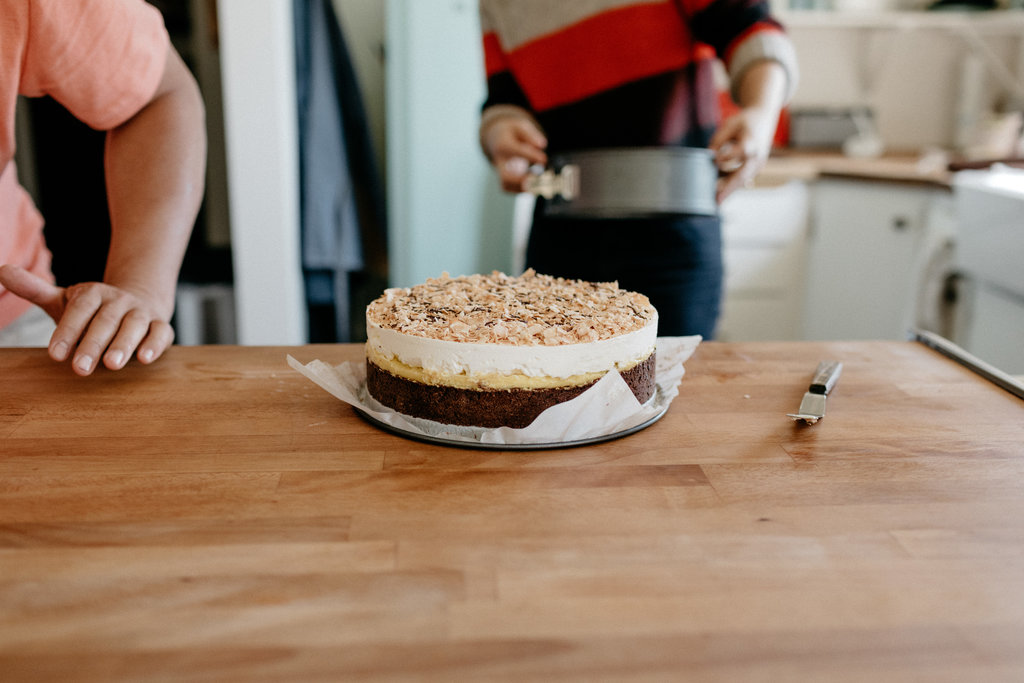
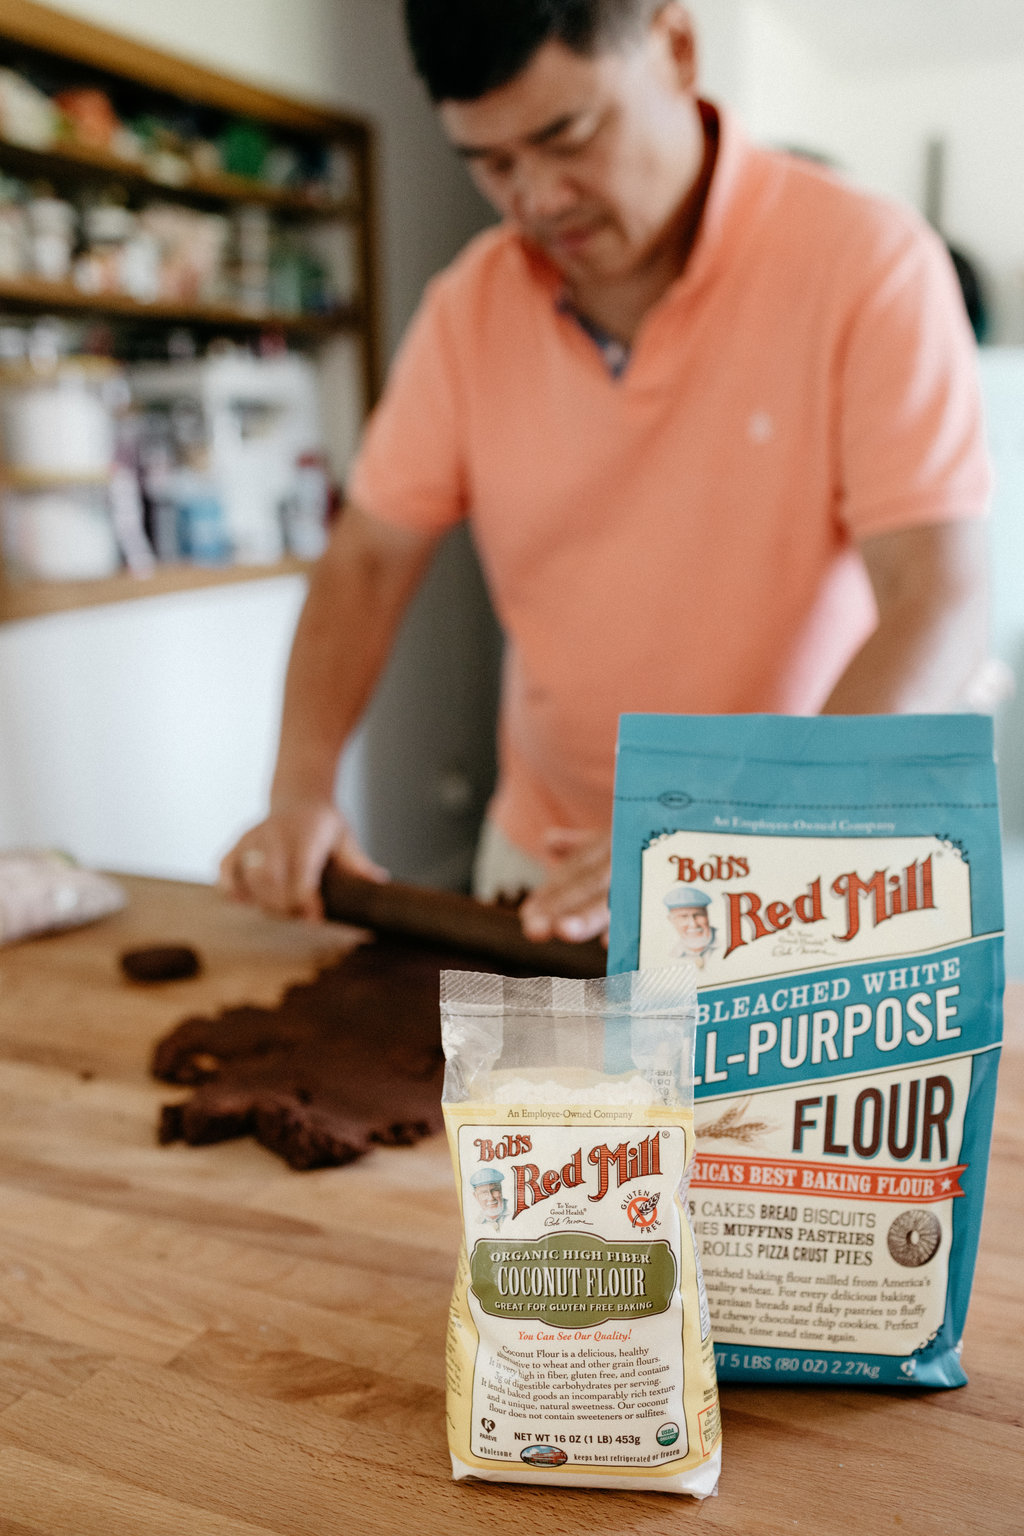
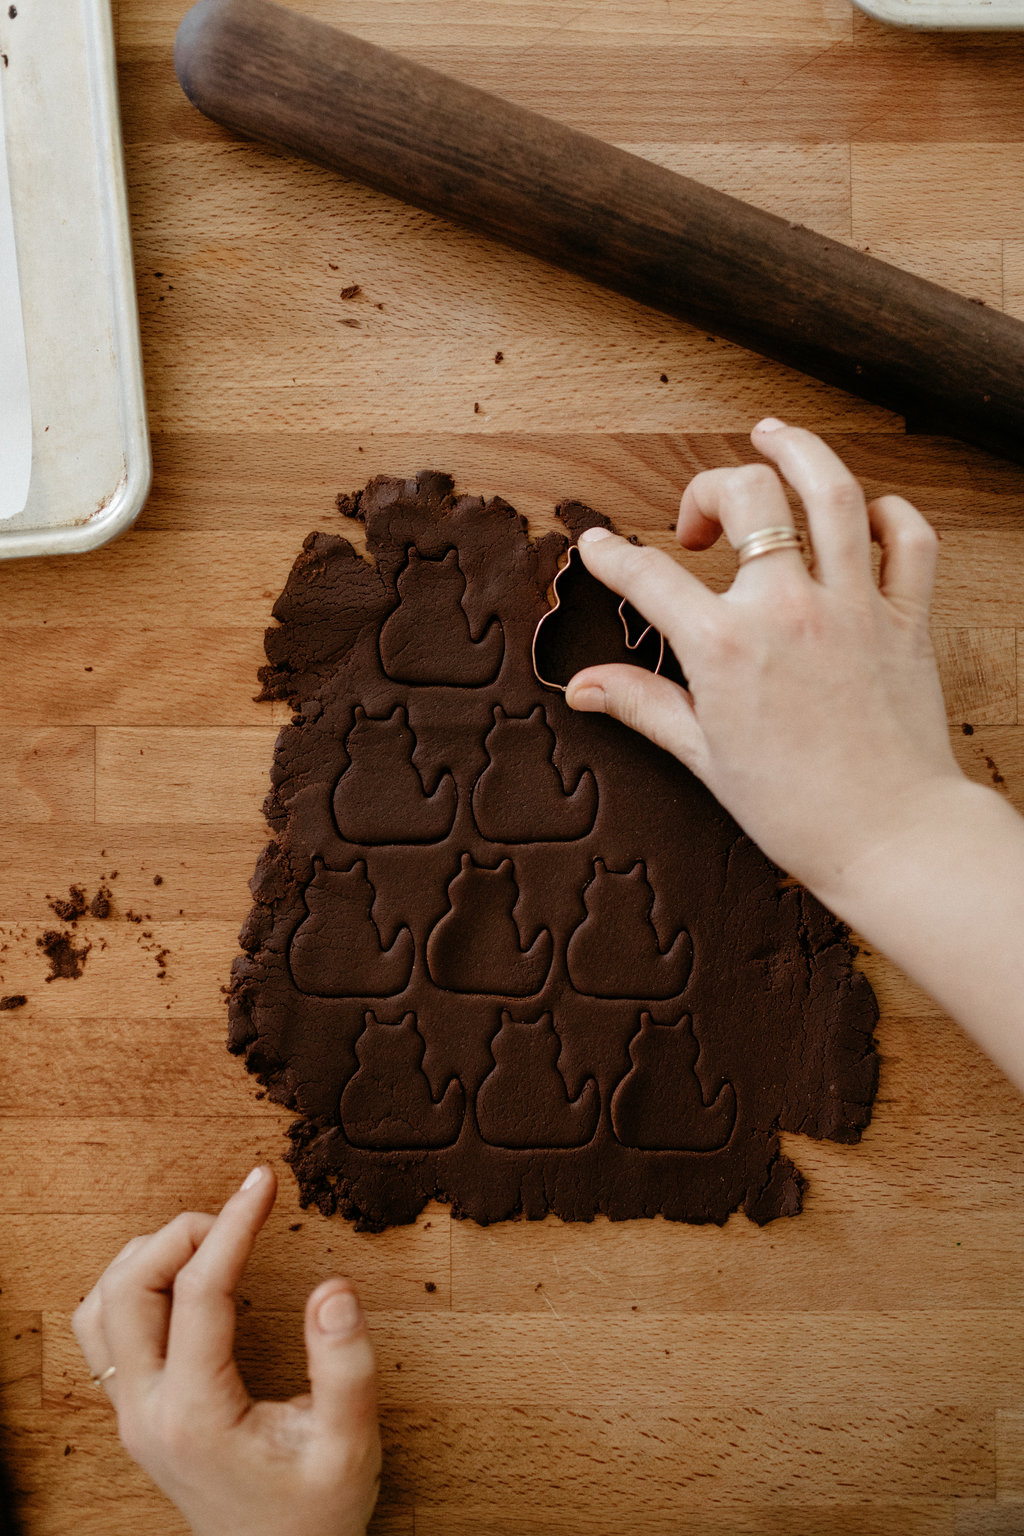
So then I decided that I shouldn’t dwell on the origins of this pie and whether or not it actually is famous and instead I should learn how to make it. So! I texted my dad for the recipe and he sent back a picture of a printout of a Martha Stewart recipe from 2010 that had some very important annotations in the margins. Martha’s recipe was your typical pudding pie, made with a chocolate cookie crust and topped with whipped cream and toasted coconut. But, as my dad had penciled in, it should be made with 80 chocolate cats (referring to the Trader Joe's cookies), not the 30 wafers that it called for, and it should be made in a springform pan, not a pie pan. And the pudding should be made in a medium saucepan, not a small saucepan. Idk if there is an exact reason for the cats other than that they’re cute and you get to call for “80 cats” in an ingredient list which is fun, but the reason for the springform pan is so that you can see the whipped cream on the sides. And I like the look, it’s so geometrically pleasing! 

I took the recipe for a test run before my dad’s visit, and because our nearest Trader Joe’s is a million miles away, I went the old fashioned route, ordered a plump lil cat cookie cutter online, and made my cats. And because I was making them from scratch, I thought why not make the cats themselves coconutty?? So I threw in some of bob's red mill coconut flour, and this completed their journey to becoming coconut cocoa coco cats. (Coco is one of our farm cats who usually gets out shined by Sven because she is less of a dog cat, but she’s great and plump like these cookies and I named her!) I wanted to make these cocoa cocos with just coconut flour but it turns out that coconut flour is mainly a flavor enhancer, as opposed to a substitute for all-purpose flour. Too much coconut flour will make dense grainy cats, so you just need a little of it to get good flavor! And because they’re plumper than Trader Joe’s cats, you only need about 40 of them. 

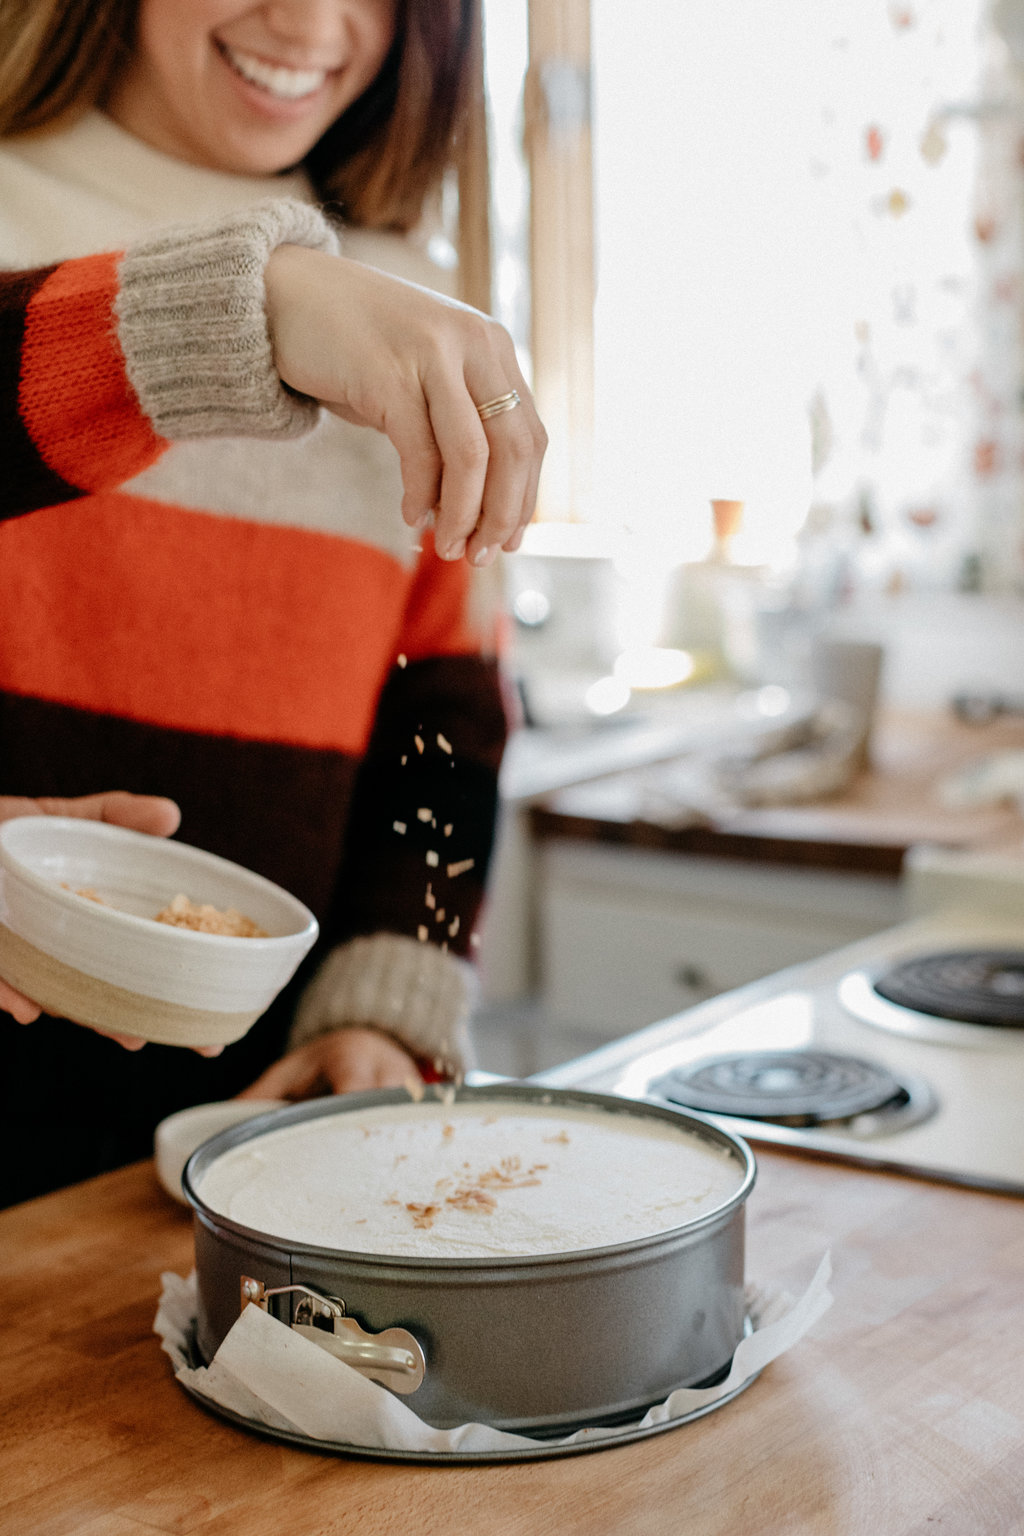
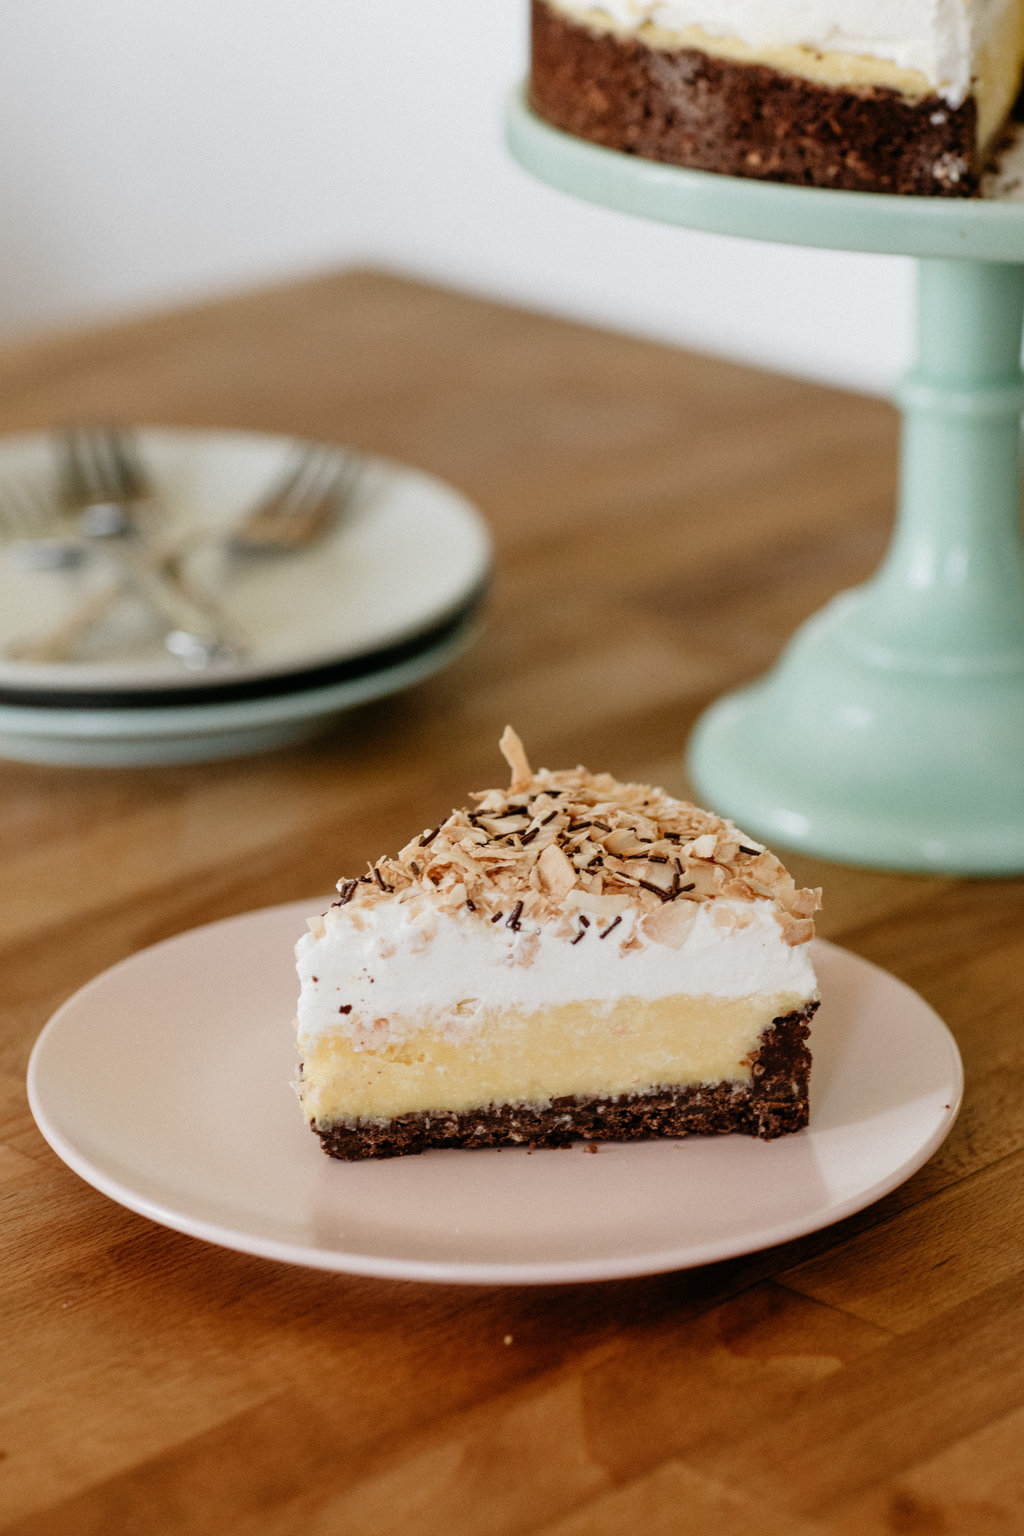
I think the only other change I made from my dad’s/Martha’s recipe was to use unsweetened coconut, since it’s easier to control the sweetness that way and since I love the look of the toasted flakes on top. I think pops agreed! I tried to get away with skipping the step where you bake the crust because I typically like a denser moister cookie crust, but he would hear none of that. It had to be crispy like a cookie, he said. And once I stopped being lazy and added that baking step back in, I saw what he meant. Overall I think our pie kicked butt!! It's got a big thick crust (we love crust in this family!!!!), a pudding that is just sweet enough, tons of whipped cream, and a great rustic yet clean aesthetic. It’s definitely worthy of being famous. Right?! Right.

You know what your Thanksgiving dessert table needs? This. And you know what can be made ahead of time?? This!

coconut cream pie

makes one 9" pie

ingredients

For the cats:

1 1/2 c (190g) bob’s red mill all-purpose flour
7 tb (50g) bob’s red mill coconut flour
1 c (80g) unsweetened cocoa powder, plus more for dusting
1 tsp kosher salt
1/4 tsp baking soda
1 c (225g) unsalted butter, at room temperature
3/4 c (150g) sugar
1 tsp vanilla extract
1/4 tsp coconut extract

For the crust:

5 tb (63g) unrefined coconut oil
1/8 tsp kosher salt
1/3 c (27g) unsweetened shredded coconut

For the filling:

2 3/4 c (660g) whole milk
4 large yolks
2/3 c (132g) sugar
1/3 c (43g) cornstarch
2 tsp vanilla bean
3/4 tsp kosher salt
1 1/4 c (100g) unsweetened shredded coconut

For the topping:

1 1/2 c (360g) heavy whipping cream
1/2 c (40g) unsweetened coconut flakes
Shaved chocolate or chocolate sprinkles

clues

to make the cats: preheat the oven to 325ºf. line two baking sheets with parchment paper.


in a small bowl, whisk together the flour, coconut flour, cocoa powder, salt, and baking soda. in a stand mixer fitted with a paddle attachment cream together the butter and sugar until light and fluffy. mix in the vanilla extract and coconut extract. with the mixer running on low speed, add the flour mixture and beat until just combined. it will still be a bit crumbly. pour the mixture onto a work surface and give it a few kneads to bring it all together. (at this point you can wrap it in plastic wrap and refrigerate for an hour, up to overnight, but I find that the dough is stiff enough that this isn't totally necessary).
on a work surface, roll out the dough to 1/4" thickness, dusting with cocoa powder if the dough is sticky, and cut out small cats or 1 1/2" circles. transfer them to the baking sheets, 1" apart (using a small offset spatula helps with this step). re-roll the scraps and cut out more rounds. 


bake the cookies until the tops are no longer shiny, about 12 minutes. let cool on the pan. Cookies can be made up to a couple of days in advance and stored at room temperature.

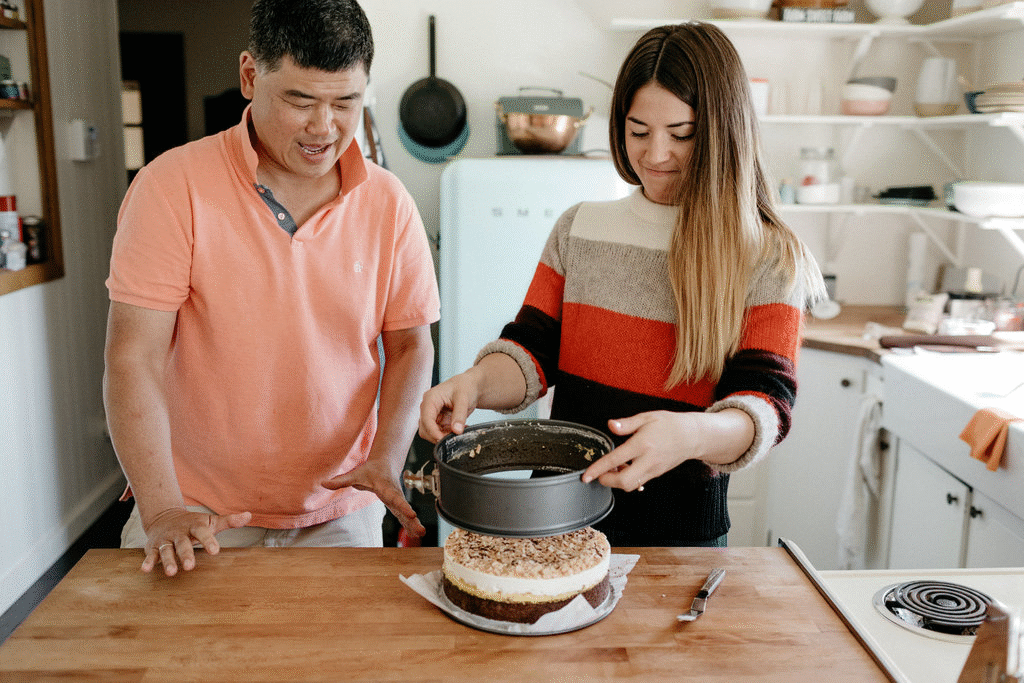
To make the crust: Preheat the oven to 325ºf. Line the bottom of a 9” springform pan with parchment and set it aside. In a food processor, combine 40 of your ugliest cats (you'll have some leftover and since those are staying in tact you want them to be the pretty ones) with the coconut oil and salt and pulse until the mixture is sandy and starts to clump together. Add the coconut and pulse just a couple more times to get it evenly distributed. Press the mixture firmly into the bottom of the pan, pressing it up against the sides to give it a 1-1 1/2” tall crust and bake until set, 25 minutes. Let it cool. 

To make the filling: In a medium saucepan, whisk together the milk, egg yolks, sugar, cornstarch, vanilla, and salt. Cook over medium high, whisking constantly, until thickened. Stir in the shredded coconut and pour into the cooled crust. Refrigerate for 2 hours, until set. (This can be done up to 2 days in advance; keep covered in the refrigerator.)

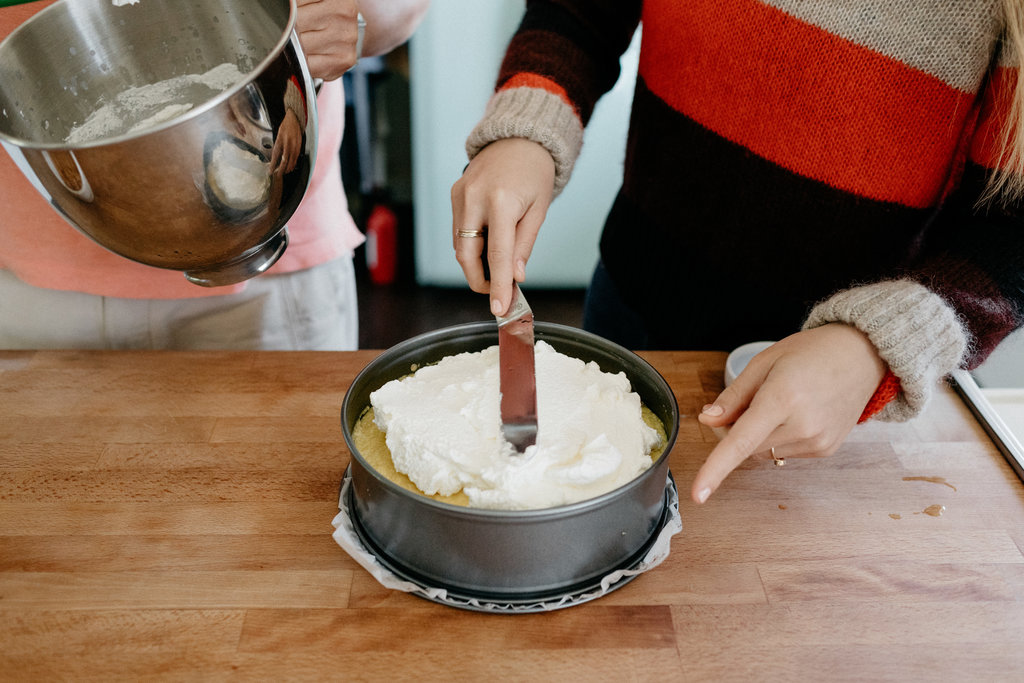
To make the topping: With an electric mixer or in a stand mixer fitted with a whisk attachment, beat the heavy cream to stiff peaks. Spread it on the pie. Toast the flaked coconut in a dry skillet over medium heat, stirring often, until golden brown. Let it cool and sprinkle it on the pie. Top with shaved chocolate or chocolate sprinkles and refrigerate until ready to serve. When you’re ready to take it out of the pan, run a small offset spatula around the edge and carefully remove the sides. Enjoy! 
 

-yeh!

Thanks to bob's red mill for sponsoring this post!

marzipan challah hedgehogs

Yogurt book is submitted and I have officially trained myself to never be able to cook with yogurt without feeling like I should be watching Pretty Little Liars and vice versa. In the same way that I wrote Molly on the Range with Sia going on full blast in the wee hours of the morning, I had nothing but PLL on while testing these recipes and I timed it pretty well because I only have about six episodes left in the whole series. I have no idea what’s going on but I do know that Aria’s hair and eyebrows just get better and better. 

In these last few weeks I kept having these moments when I’d drive all the way across town to the Super Target, the closest grocery that sells whole milk Greek yogurt that doesn’t have pectin in it, place four tubs in my cart and do a little cheer to the tune of this is my last Greek yogurt run until my deadline!! Only to have six more failed yogurt loaves come out of the oven before having to do that all over again. Luckily Classical Minnesota Public Radio really brings it and has made my long yogurt runs extra enjoyable. And also luckily, I finally made a really good yogurt loaf and am just generally extremely excited for all of the yogurt recipes in this little book!!! 

I am pretty sure it’s coming out in March but once I know more about release deets I’ll be sure to talk your ears off about it. 

Now it’s time to cook through some recipes that I’ve been wanting to make these past few weeks but couldn’t because I had yogurt chicken and yogurt pita to test. 

This week I’m helping Alana test the beef stew recipe for her book and I’m gonna eat it while it snows outside (!!!!!!). Then we’re going to take our holiday card picture, then we’re gonna put up our Chrismukkah bush, and then I’m going to practice my cookie swap cookies because I’ve got a cookie swap title to defend.

But how was your Halloween??? Did you dress up? We had very chill costumes. This whole time I was planning to be cookie salad but then I kept stressing out about the chocolate from the cookies getting on my clothes and wasn’t really sure what I would do until I woke up Saturday morning and decided to go as the little girl who walked in on her dad’s BBC interview. I dug up my yellow sweater, put on some pig tails, reached into my Quin Candy lollipop stash and taped that professor’s face on a paint stick. Eggboy went as Luke from Gilmore Girls so all he had to do was wear his hat backwards, carry a coffee carafe, and yell at you for using your cell phone. We went to Sheila and Dave’s annual party and Dave wore a banana suit and a bandana and was banana’s foster wallace, lolol.  

Here is a challah recipe that I’ve been so excited about since I first made it back in March at Nosh Berlin: marzipan stuffed challah hedgehogs! Or, as I learned there, they would be Challah Igel, auf Deutsch. They are doughy little challah rolls with a sweet almond filling and glaze on top that can either be a yarmulke or… fur…? Quills? Spiky bits. Sorry, I don’t know hedgehog anatomy. The slivered almond topping gives them a nice crunch, and these hedgehogs in fact have two lives: 

  1. When they first cool down just enough to hold their glaze and you have a fresh plump treat that’s perfect with a spot of tea.
  2. The next day when they’re no longer fresh and you’re like “what am I supposed to do with all of these dead hedgehogs?” And you make bread pudding. Zomg these hedgehogs make the best bread pudding ever. So almondy, so soft. It almost might behoove you to just make a double batch to ensure that you’ll have enough to make bread pudding. This is the basic bread pudding recipe that I use, and it wouldn’t hurt to add a small splash of almond extract in with the milk.

I’m posting these guys today as another nod to my German friends in celebration of the release of Molly’s Kitchen and also because they’d be a great holiday treat! And if you haven’t started planning your holiday menus yet what are you even doing???


marzipan challah hedgehogs

makes 14 rolls

ingredients

for the challah:

2 1/4 tsp active dry yeast

3/4 c warm water (105º-110ºf)

1/4 c (50g) + 1 tsp sugar

1 tsp kosher salt

3 1/4 c (413g) all-purpose flour, plus more for dusting

2 large eggs

1/3 c (67g) flavorless oil, like canola or vegetable


for the filling:

1/4 c (57g) unsalted butter, room temperature

3/4 c (150g) sugar

1/8 tsp kosher salt

1 large egg, separated

1/4 tsp almond extract

1 1/2 c (168g) almond flour


Black sesame seeds, for decorating


for the glaze:

1 1/2 c (180g) powered sugar

1/2 tsp almond extract

5-6 tsp whole milk


Slivered almonds, for decorating

clues

To make the challah dough, in a medium bowl, combine the yeast, warm water, and 1 teaspoon sugar and give it a little stir. Let it sit for about 5 minutes, until it becomes foamy on top.

Meanwhile, in a large bowl or the bowl of stand mixer fitted with a dough hook, mix together the salt, flour, and remaining sugar. In a separate medium bowl, whisk together the eggs and oil.

When the yeast is foamy, add it to the dry mixture immediately followed by the egg mixture and stir to combine. Knead, either by hand on a floured surface or with a dough hook for 7-10 minutes, adding more flour as necessary (but resist any urge to add too much!), until you have a smooth and slightly sticky dough.

Transfer the dough to an oiled bowl, cover it with plastic wrap and let it sit at room temperature until it has doubled in size, about 2 hours.

Meanwhile, make the marzipan filling. In a medium bowl, mix together the butter and sugar with a wooden spoon or rubber spatula until combined. Mix in the salt and egg white (reserve the egg yolk for the egg wash), and then add the almond extract, and stir in the almond flour.

Line two baking sheets with parchment paper and preheat the oven to 375ºF.

When the dough has risen, turn it out onto a clean surface (dust with a little flour if it’s too sticky) and divide into 14 balls. Fill each ball with a heaping tablespoon of filling and seal it well to shut. Place the balls seem side down on the baking sheets, spaced evenly apart. Let rise for 30 more minutes. In a small bowl beat the reserved egg yolk with a splash of water and, working with three rolls at a time, brush the egg wash onto the rolls, use scissors to make two 1/2” cuts on one side for ears, and tweezers to stick on two black sesame seeds for eyes. (If you wait too long after brushing on the egg wash, it will dry and the sesame seeds won’t stick, so that’s why you don’t want to work with no more than three rolls at a time.)

Bake until golden brown, begin checking for doneness at 20 minutes.

Let cool and then make the glaze. In a small bowl, mix together the powdered sugar, almond extract, and 5 teaspoons milk. If it’s too thick to spread, add additional milk, a couple of drops at a time, until it's spreadable. Working one at a time, spread a circle of glaze onto the rolls and then top with overlapping rows of slivered almonds.

Enjoy!


-yeh!

classic tater tot hotdish

These last couple of post-harvest, post-travel weeks have been but a dream, filled with hockey games and cat belly rubs and house concerts and Sunday meatballs. Eggboy has been power washing all of the tractors and combines so that they can get tucked in for their winter slumber and I’ve been finishing up my yogurt book and studying Hebrew! So far I think I know about half of the alphabet, or at least enough to know that it’s going to be a very long time before I can read the Instagram captions of my Israeli food blog friends. Because the vowels! Where did all of the vowels go??? From my limited understanding, modern written Hebrew doesn’t have vowels, so, like, “pizza” would be “pzz.” I appreciate the minimalist nature of this but I am also anxious to be able to read Al Hashulchan and this one Janna Gur book that I have that’s only in Hebrew, and I see a long road ahead of me. Regardless, I’m having a bunch of fun learning it and the classes are giving me more ways to get rid of the 12,000 scones and things that I’m having to test for yogurt book.

Now that yogurt book deadline is very near, I’ve begun thinking about all of the projects that I’d like to do after it’s turned in. Like make potstickers and kubbeh and maybe start a soup and bread club, and maybe do Facebook lives??? Do we like those? Do you watch those? Oh and (!) did I tell you this, we are in the beginning stages of planning to build a house or remodel our current one. We don’t know what the heck we’re doing so if you have links to posts that are basically like house building for idiots plz send. 

It occurred to me recently that I’ve never posted a classic hotdish. I just went straight to Chinese hotdishes and miniature hotdishes, but there’s a reason that the classic is a classic and that’s because it’s delicious and comforting, and for the lucky people who grew up with it here in the upper Midwest, as nostalgic as can be. 

To review, a hotdish is: a meat, a vegetable, creamed soup, and a starch. Hotdishes make up a subset of casseroles that are a very hearty meal in a pan. They're like creamy meat pies that are everything you could ever want when it's cold, and they're also great make-ahead meals. The battle for most classic hotdish usually comes down to wild rice versus tater tot, and because I have a kick butt recipe for wild rice hotdish that I’ll be posting a little bit later, in time for you to make it with all of your Thanksgiving turkey leftovers, we’re starting here with tater tot. 

The flavors are not fancy, they are meat, potatoes, and very basic soup seasoning. But they are cozy and lovable, like your oldest fleece pullovers. This is what you need for your winter hibernation. The fanciest we’re getting here is in making our own homemade creamed soup, because mum would text me some very sassy bitmojis if ever she caught wind of me buying canned creamed soup. But it’s easy, just make a roux! The hardest part is arranging the tater tots in perfect rows and columns that would have made egggrandma proud. Wait no the hardest part is waiting for it to cool so you don’t burn your mouth (but we have ketchup to help with that)!

It’s supposed to snow on Thursday, so I suggest you pickup some tots. 


classic tater tot hotdish

serves 8

ingredients

1/2 c (113g) unsalted butter, divided

2 carrots, finely chopped 

2 stalks of celery, finely chopped

1 large onion, divided and finely chopped

Kosher salt

3/4 cup (95g) all-purpose flour

3 c (715g) whole milk 

2 tb chicken, vegetable, or beef soup mix (i prefer the orrington farms brand, but something similar, like a bouillon cube or better than bouillon or a homemade bouillon will work)

Black pepper

2 1/4 pounds ground beef (I typically go for around 85% lean)

9 oz frozen peas or corn

1 1/2 pound tater tots


If you’re feeling wild: a few handfuls of shredded cheese, for topping

If you’re feeling fancy: fresh chopped parsley, for topping

If you’re feeling like you and I should be bffs: ketchup, for serving

clues

Preheat the oven to 400ºf. First, make the creamed soup: in a large pot, melt 6 tablespoons of butter over medium high heat. Add the carrots, celery, half of the onion, and a pinch of salt and cook, stirring, until soft, about 12-15 minutes. Stir in the flour and cook for another minute. Stir in half of the milk and cook, stirring, until thickened. Stir in the remaining milk and cook, stirring, until very thick. Add the soup mix, a bunch of turns of black pepper, and a teaspoon of salt. Taste and adjust seasoning as desired. Pour into a heat safe bowl and set aside. Wipe out your pot and set it back over medium high heat. Melt the remaining 2 tablespoons of butter and add the remaining half of the onion and a pinch of salt. Cook, stirring, until soft, about 5-7 minutes. Add the ground beef and cook, breaking up with a wooden spoon, until browned. Season with salt and pepper. Stir in the peas or corn. Using a slotted spoon to drain the juices, transfer half of the beef mixture to a 4-quart casserole dish and spread it out evenly. Layer on half of the soup mixture, and then the other half of the beef, and the other half of the soup. Cover with perfect rows and columns of tater tots. Sprinkle with another pinch of salt and pepper, top with cheese, if desired, and bake until the tots are golden brown and crispy on top, about 45 minutes. Let cool slightly, top with parsley if desired, and serve with ketchup.

To make ahead: complete the steps up through topping with tater tots (and cheese, if using). Let cool, wrap in plastic wrap, and refrigerate or freeze until ready to cook. It'll last 2 days in the refrigerator and 3 months in the freezer. If reheating from the fridge, proceed as directed but add on a few more minutes in the oven to ensure that it’s heated through. To reheat from frozen, cover with foil and bake at 350º for an hour, and then uncover and then increase the heat to 400º and bake for another 20-30 minutes, until tots are golden brown and the innards are heated through. 


-yeh!

p.s. vegetarian friends!! i have the tastiest hotdish cooking up for you (it is also vegan). it's quite different from this one but if you're looking for a straight up vegetarian version of this classic tater tot hotdish, jenny has cooked up one idea and it's north dakotan husband approved!

pictured: casserole dish, ketchup dish

hawaij apple pie with cardamom whipped cream

it's a video!! 👇🏼👇🏼👇🏼👇🏼 (and turn the sound on, it's my pops playin!) 

I have some personal news… I make pie now. 

Which is awkward since my whole life is basically a display of loyalty to #teamcake. I even wrote a whole thing in my book about kondo-punting homemade pie dough out of my life and didn’t even feel bad. 

But now here I am in 5778 and I not only make pies but I also post near daily pictures of Sven, a cat. Which is weird because I come from a long line of dog people and so genetically I am a dog person. I just can’t help it with the fluffy ball of glee that is Sven and with the pies, well, I suddenly just can’t get enough of them. (What’s next? You think I’ll eat a banana?) I think this pie thing actually started when Erin posted a few pie videos last year. That is when the crimping thing suddenly made sense and seemed like something that would actually be fun and not miserable to do. I had just gotten home from my book/#teamcake pride tour where a bunch of you urged me to just give pie making another chance, one of you even brought me a jar of lard about it, and from there I slowly started ruling out the idea of never making a homemade pie crust again. 

I also couldn’t really stop thinking about a few bites of peach and apple pie that Sarah fed me like two years ago while she was testing recipes for her book and grew this desire to not have to drive all the way down to the cities anytime I wanted a Sarah-quality pie. 

So I took a seat in back, reached across the aisle to #teampie, and began my research. I sat with a stack of all of my favorite baking books and flipped to the very shiny, untouched pages with the pies. It felt like going down an unexplored aisle of the grocery store but I was ready to just rip the band-aid off. Here were some takeaways:

1. At first I resented the fact that when the pie comes out of the oven you can’t level off the top and have a few scrap snacks, as you would a cake. But then! I learned the satisfaction of egg washing the pie dough scraps, salting the bejeezus out of them, and then baking them into little crackers. I even made some cat shapes. 

2. I have become such a rabid pie maker that I won’t even turn the heat on in our house for fear that the crust will get too warm. Have you any long underwear recommendations?

3. You can really pile those apples into the crust since they bake down quite a bit. But, as I learned in Stella’s book, it’s important not to over-bake them, lest they get mushy and prevent you from getting a clean slice. Baking until the apples are 195ºf is what Stella recommends and that ensures that the apples are fully cooked but still retain their structure. 

4. All-butter pie crust (Pâte Brisée) recipes are all pretty much the same and consist of 1 1/4 c flour, a bit of salt and sugar, 1/2 c butter, and 3-4 tb water. There are a lot of small variations out there, like adding an egg or some dairy. I found that I prefer subbing a tablespoon of the water for a tablespoon of vinegar, as vinegar helps prevent the development of gluten, which will result in an even flakier crust. I also like using Land O Lakes® European Style Unsalted Butter here which has a fat content that is 3% higher than American butter and more fat = more flavor. 

5. A good pie has a thick golden crisp crust and innards that sing with flavor. It’s important that when you’re rolling out the dough you don’t make it too big and that when you’re trimming the edges you don’t trim off too much because you want that crust to be as thick as possible. Sarah suggests baking on a pizza stone to help the bottom crust get crispy, which is great because I like letting my pizza stone live in my oven. And as for the innards, I like amping up the apple flavor with a bottle of boiled cider that’s been in my cabinet for forever and Hawaij, which as we discussed a few falls ago, is what happens when pumpkin spice goes swimming in cardamom. It is so very good. (You can order boiled cider here but if you just can’t wait, omitting it will not be the end of the world. And you can make Hawaij with this quick lil recipe.) This baby is topped with cardamom whipped cream which only makes the Hawaij more… Hawaij-y and the whole situation more celebratory. 


6. I’m sorry, I am not sure what kind of apples are growing on our trees out back (they might be McIntosh??) but they are not too sweet, pretty crisp, and great for baking since they hold up and taste good. Here’s some literature on apple pie apples in case you don’t have a tree in your yard

Ok I can’t actually get over how satisfying pie making is and I have a feeling that I’m about to start making up for lost time as a cake snob. Molding pie crust is just so soothing. Let the crispy fall air roll in, put on the Sufjan, and omg, let me crimp the edges. That’s my favorite part. And can we just take a moment to enjoy giving it that little hug at the end to make sure his crust stays on the pie pan rims?? I don’t plan on getting into all of those fancy pie crust art productions that I see around the internet but I do plan on latticing through the winter and beyond. 

Hello, #teampie!!!! 
 

it's another vid!! 👆🏼👆🏼👆🏼👆🏼👆🏼


hawaij apple pie with cardamom whipped cream

makes one 9-inch pie

Ingredients

Filling

8 apples (1000g), washed and dried
Juice of 1 lemon
1 c (200g) dark brown sugar
2 tsp Hawaij
1/4 tsp cinnamon
3 tb cornstarch
3/4 tsp kosher salt
1 tsp vanilla extract
2 tb boiled cider 

Crust

1 tb apple cider vinegar
6 tb water
2 1/2 c (318g) all-purpose flour, plus more for dusting
1 tb sugar
1 tsp kosher salt
1 c Land O Lakes® European Style Super Premium Unsalted Butter, cold and cubed

Assembly

2 tb Land O Lakes® European Style Super Premium Unsalted Butter
1 egg, lightly beaten
1 1/2 tb turbinado sugar
Flaky salt, optional

Cardamom Whip

1 c Land O Lakes® Heavy Whipping Cream
1/4 c powdered sugar
1/4 tsp ground cardamom
 

Clues

Chop the apples into 1/4” slices, place them in a large bowl, and toss with the lemon juice. Add the brown sugar, hawaij, cinnamon, cornstarch, and salt and mix to combine. Mix in the vanilla and boiled cider. Cover the mixture and let it sit at room temperature for an hour or so (while you make the pie dough). 

To make the dough, combine the cider vinegar and water in a measuring cup and stick it in the fridge (or the freezer even) to get really cold. In a large bowl or food processor, combine the flour, sugar, and salt. Add the butter and either use your hands to toss it with the flour and pinch the butter into flat sheets or pulse in the food processor, incorporating the butter so that about 75% of the mixture is mealy. The rest of the mixture should have some slightly larger, pea-sized bits of butter. Drizzle in the vinegar and water and mix with your hands or continue to pulse in the food processor just until the mixture comes together to form a dough. If it seems dry or is having a hard time coming together, add a bit more water a few drops at a time until it comes together. Turn it out onto a clean surface, using your hands to press on any stray crumbs, and divide the dough in half. Pat the halves into discs, wrap with plastic wrap, and refrigerate for 30 minutes. 

Adjust a rack to the lower third of the oven (with a pizza stone if you have one) and preheat the oven to 400ºf. On a floured surface roll out one of the discs to a circle just larger than 12 inches. Place it in a 9” pie plate and refrigerate it for 15 minutes. Meanwhile you can roll out your top crust. For a basic top crust roll out the remaining dough disc on a floured surface until it’s a little larger than 10”. For a lattice crust, divide the remaining dough disc into two and roll out two 10” circles. Cut the circles into 2” strips. 

Fill the pie crust with the apples (it will seem like a lot but they bake down!) and pour the juices over it. Chop the 2 tablespoons of butter into small pats and distribute it all over the top. For a basic crust, place the top crust over the pie, pinch the edges to seal, trim any stray bits with kitchen sheers and then fold the edges over and crimp. Cut 4 slits in the top. For a lattice crust, refer to the video above for how to assemble. Pinch the edges to seal, trim, fold the edges over, and crimp. Give the edges a little hug to make sure they are sitting snuggly on the rim of the pie pan otherwise they could fall off in the oven. 

Freeze the pie for 15 minutes. Brush it with egg wash, sprinkle with turbinado sugar and flaky salt, if desired, and then place it on a baking sheet and bake until the internal temperature reaches 195ºf. Begin checking for doneness at 45 minutes. Let it cool slightly.

To make the cardamom whip, combine the heavy cream, powdered sugar, and cardamom in a large bowl or stand mixer fitted with a whisk attachment. Beat on medium high to stiff peaks. 

Serve pie with a large dollop of cardamom whip and enjoy! 


Thank you so much to Land O’Lakes for providing me with the butter and heavy cream for all of my pie baking adventures and for sponsoring this post. Their European style butter is so gosh darn good and rich and perfect for pie crust.

Additional thanks to Eggboy for his videography and to pops, Jim Stephenson, Patrick Godon, and Cedille Records for the soundtrack on that first vid!