spring

rhubarb short ribs

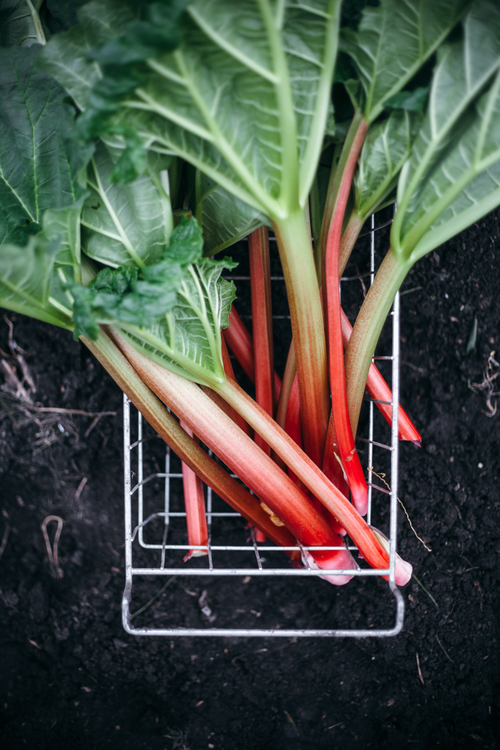
ok show of hands, how many of you did your homework and pickled rhubarb last weekend? it's ok if you totally slacked, this short rib recipe actually tastes its best when you take the full 48 hours to make it, which, coincidentally is the minimum amount of time that you want to have your pickles go for. so get started today for a badass supper on sunday. or! spend a week mentally preparing and then go for it, just in time for father's day. cause dad's love meat!!!! and if your dad is anything like my dad he also un-ironically likes the color of rhubarb (pink).

(aside)

pops, why are you wearing a pink shirt??

pops: pink is my favorite color!

pops, why is your collar popped?

pops: it keeps my neck warm!

…was a real conversation that we had in the early 2000s, right around a time when pink popped collars were making their rounds in the preppy crowds of suburban american high schools. but pops doesn’t have an eye on trends, he’s just logical in his fashion choices and undoubtedly literally thought, “pink’s nice, warm necks are also nice, ok time to start my day!” before he cleared his entire wardrobe to make way for 70 different bernie sanders t-shirts, he had a large quantity of ahead-of-his-time millennial pink garments.

(end aside) 

so my dad likes pink! which is part of my explanation for when you ask why we're sprinkling our father's day meat with hot pink pickles. the other part is that we have shit tons of rhubarb and rhubarb with short ribs, it turns out, is the chrissy teigen and john legend of braised meat land. 

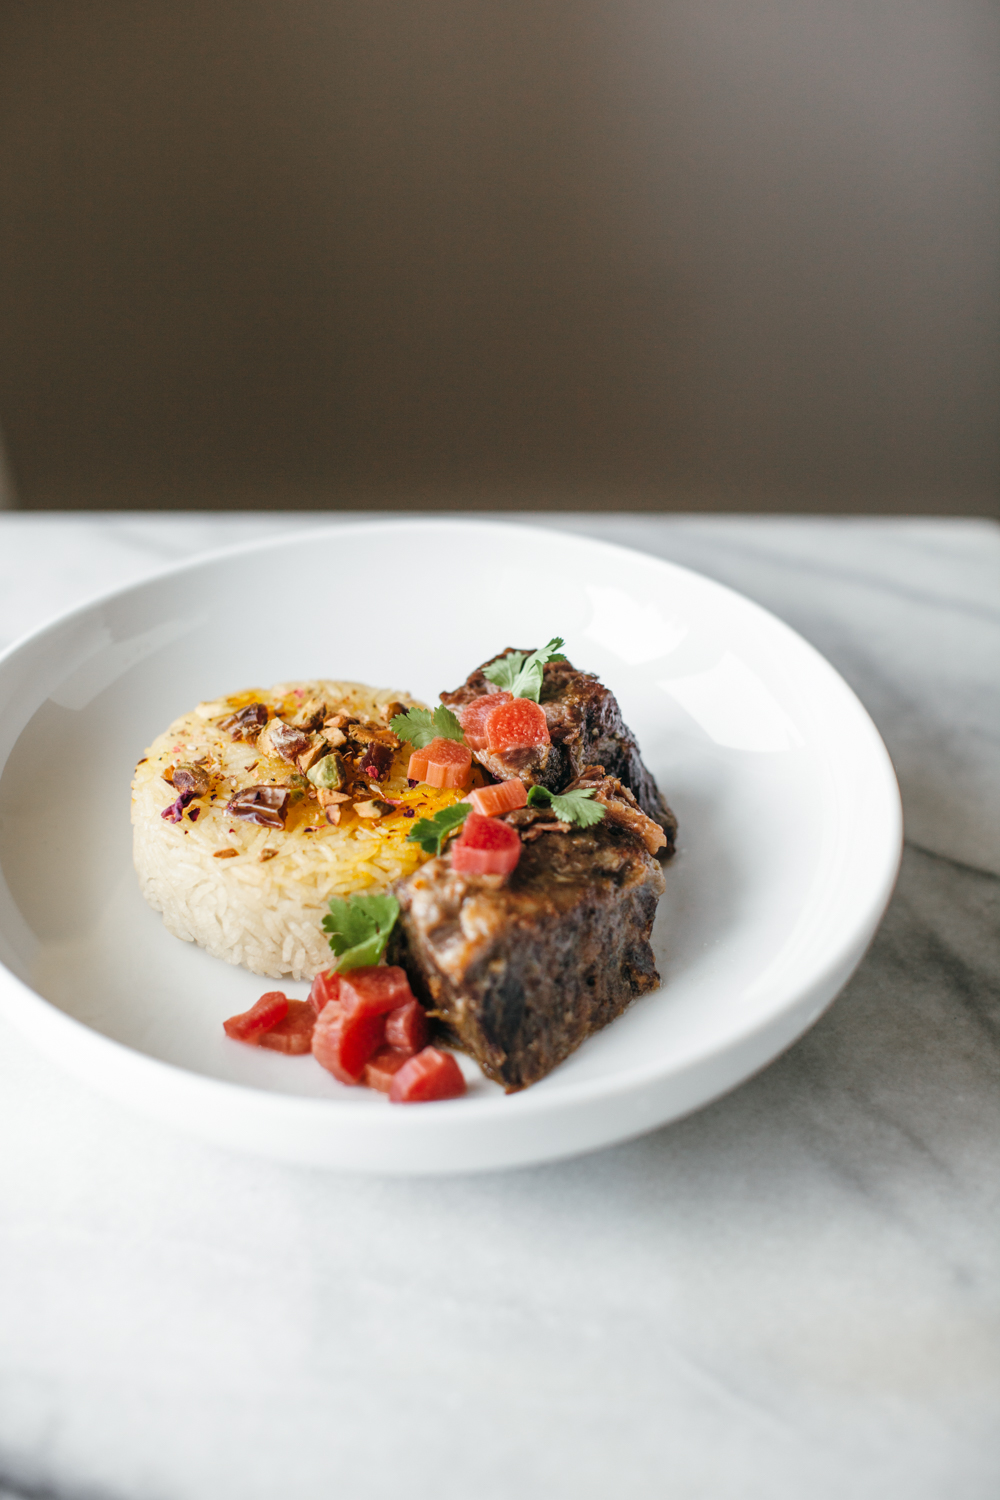
this recipe is heavily inspired by the pomegranate molasses braised lamb that i just about died over at zahav last month. they're a multi day production where you cure, braise, rest, reheat, inhale, exhale, and the only smells that really come close to as good all are freshly baked challah and santal 26. these short ribs pull sweet and sourness from a sticky rhubarb jam situation and then get some additional sweetness from their bed of onions that over time get caramelized down to almost an onion jam. the amount of flavor is a lil absurd. to the point where i had to actually pump the breaks a bit with the braising liquid by watering down my chicken stock. but paired with crispy persian rice and a bright pink sour rhubarb pickle, you basically have a perfect dinner. it's actually the dinner i had on my birthday right before eggboy’s cake!

i've done all this with bone-in and boneless short ribs. boneless was easy to pick up in town, while bone-in i had to call around about and then special order which yielded some gnarly grocery store phone holding music. i didn't necessarily find that the flavor (in this recipe at least) was sacrificed by having boneless, so i'll say that you should go with whatever route you'd like since i'm already asking a lot of you by requiring 48 hours for this thing.

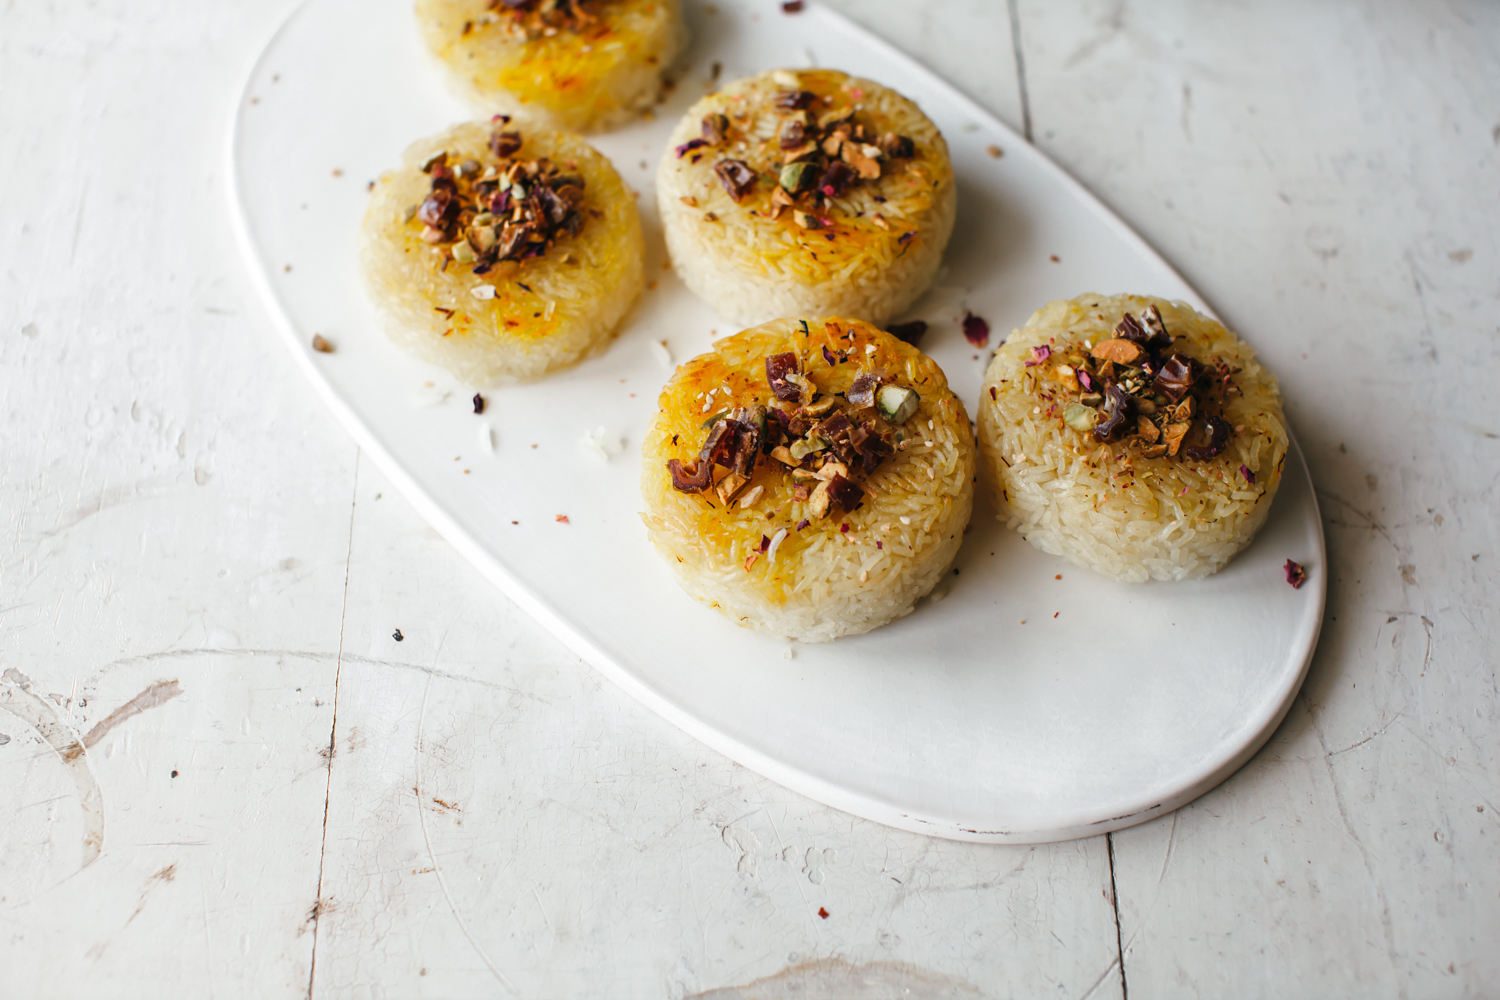
the tahdig (crispy persian rice) is a great companion to this!! if you’ve never had it, there are great directions here. it’s just really delicious good rice with a crispy saffrony shell that, when all mixed up with short rib juices, adds some nice texture to the perfect bite. (i made minis in little cocottes and simply cut the cooking times down by a few minutes.) we also had these short ribs in tortillas one night with fresh herbs and a pile of pickled shredded carrots and it was mad good too. you really can’t go wrong. at all. which is what i like about short ribs. they taste so good even if you’re out of shape in the meat department and have to google dumb things like how to cut them. 
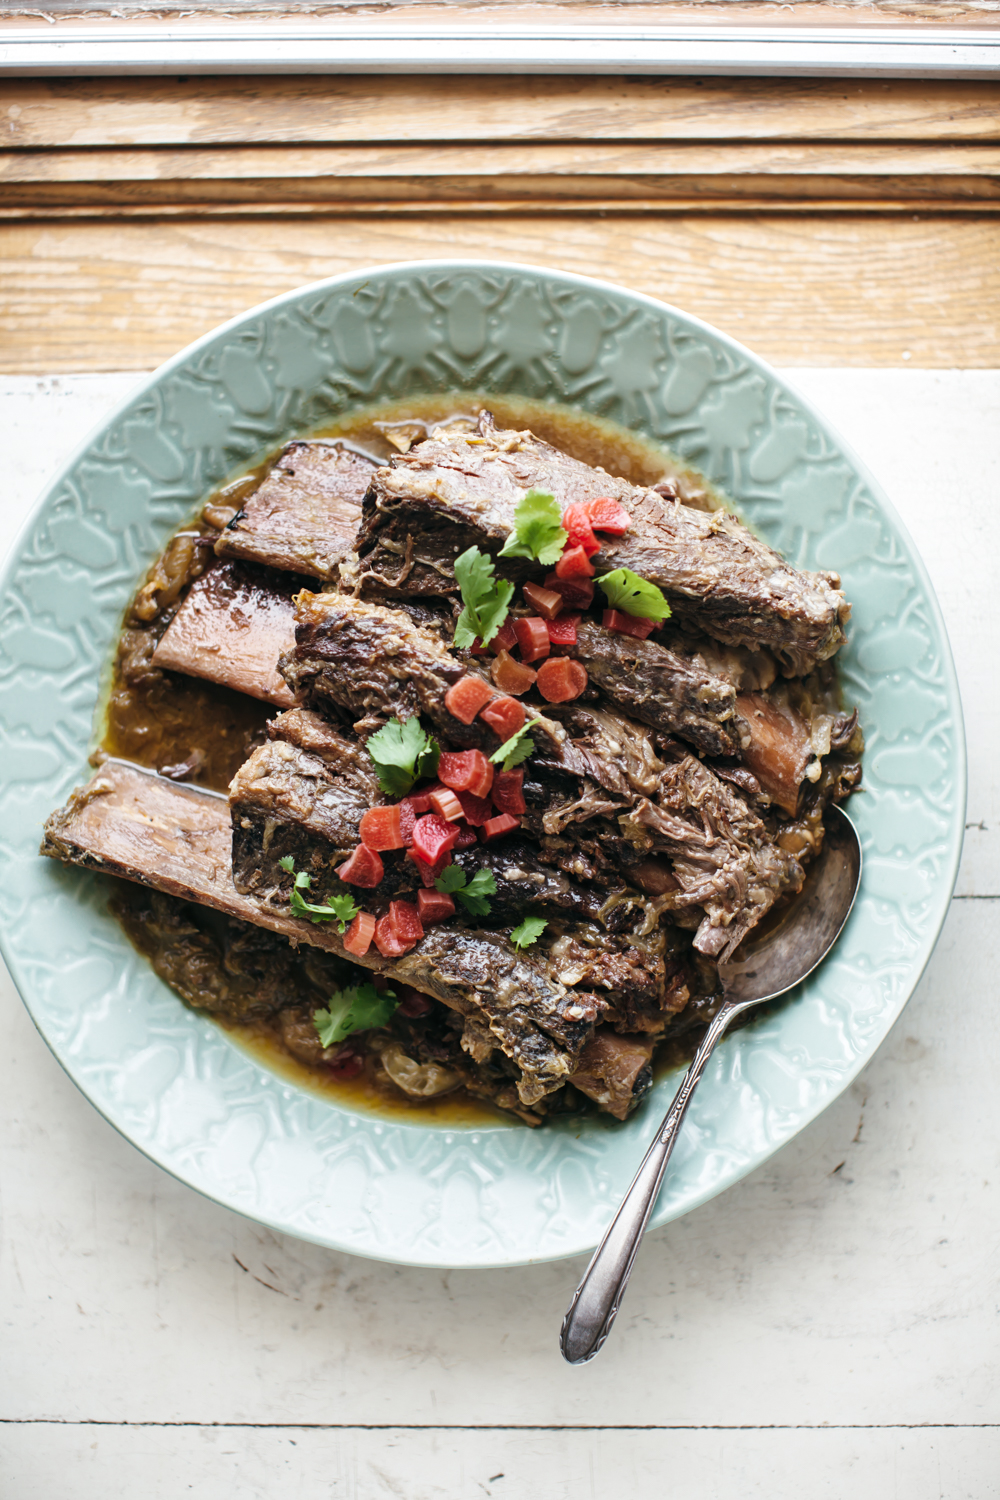

rhubarb short ribs

serves 6

ingredients

Kosher salt

1/2 c + 2 tb (125g) sugar

1 tsp fennel seeds

1/2 tsp ground allspice

Black pepper

5 pounds bone-in short ribs or 4-4 1/2 pounds boneless short ribs

4 c (500g) rhubarb, chopped and divided

juice of 1/2 lemon

2 large yellow onions, thinly sliced

1 head of garlic, peeled, cloves smashed

2 tb olive oil

about 2-3 c chicken stock 

about 2-3 c water


for serving:

pickled rhubarb

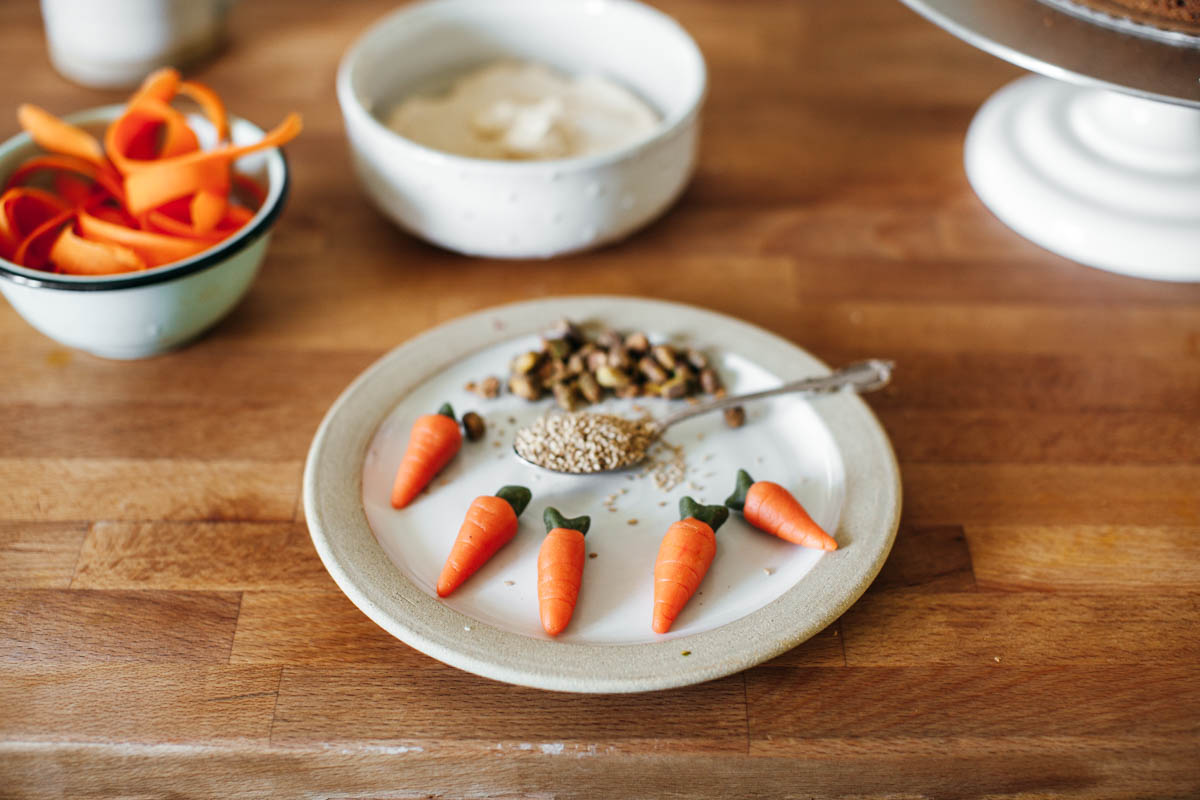
tahdig (optional: top with crushed pistachios, chopped dates, and rose petals or ana)

clues

day one: in a small bowl combine 2 tb salt, 2 tb sugar, the fennel, allspice, and a bunch of turns of pepper. rub it all over the short ribs and place them in a big pan. cover with plastic wrap and refrigerate overnight. 

(get your pickled rhubarb going)

make the rhubarb sauce (this can be made on day 1 or day 2): combine 2 c (250g) of the chopped rhubarb, the remaining 1/2 c (100g) sugar, and a good pinch of salt in a saucepan and heat over medium high heat, stirring often. when the rhubarb softens and collapses into a purée, reduce the heat to medium and continue to cook, stirring often, until it reduces to 2/3 c (200g). this should take around 25-35 minutes. stir in the lemon juice, let cool, cover, and refrigerate until further notice.

day two: preheat the oven to 475ºf. place the onions, garlic, and remaining 2c (250g) chopped rhubarb in a roasting pan and toss with the olive oil. if you’re using the same roasting pan that you cured the short ribs in, give the pan a little rinse first to get rid of any excess salt. place the short ribs on top of the onion mixture and roast uncovered for 20 minutes, until browned. 

take it out of the oven and reduce the oven’s heat to 325ºf. pour in the rhubarb sauce and then add the stock and water until it comes halfway up on the short ribs. i do this by pouring in one cup of stock, and then one cup of water, and then another cup of stock, and another cup of water, etc., and stopping once i reach the halfway mark. (you could also just dilute your stock before pouring it in but then you run the risk of having leftover diluted stock.) cover with foil and then bake for 5-6 hours, until the meat is very soft and falls off the bone (if you're going with boneless use your imagination to imagine if they would fall off the bone or not). taste it, add more salt if you feel like it needs it. at this point you *could* give in and eat it, but it’ll be better if you let it sit over night. so let it cool, cover it, and stick it in the fridge.

(oh also on day two, you can get your tahdig rice soaking)

day three: preheat the oven to 350ºf. scrape off the layer of fat that’s accumulated on your short ribs and discard it. cover the pan and bake for 30 minutes, or until heated through. 

make your tahdig. 

slice your pickled rhubarb.

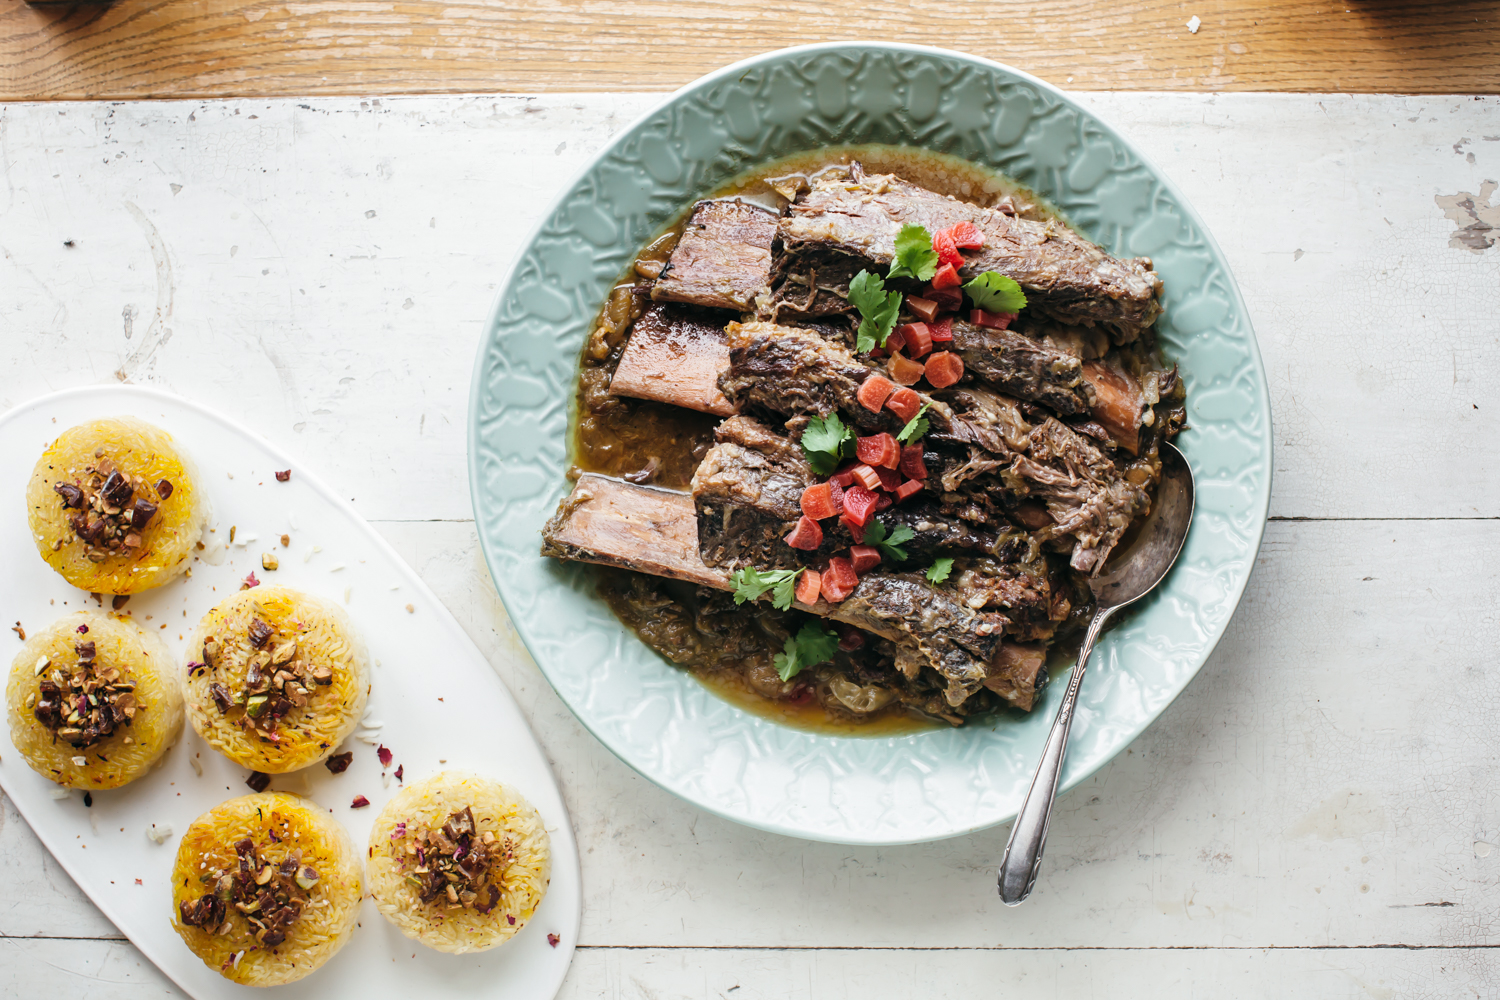
slice and serve your short ribs, spooning some of the juices on top. top with pickled rhubarb (and fresh herbs for greenery if you'd like), serve with tahdig!

leftovers can be frozen! 


-yeh!

mini rhubarb princess cakes

our house right now is covered with decorations that fall into one of five categories that altogether make up the theme for eggsister’s bridal shower next weekend:

-cute objects from the woods

-tea parties

-floral things

-scandinavia

-things that are supposed to look like they fall into one of the above categories but because eggboy and i have limited crafting skills they create a category all on their own

we’re actually really proud of our work so far though and have our trusty hot glue gun to thank but we still have a lot of decorations to make before the big day. we’ve been referring to my friend melissa’s book, scandinavian gatherings, for inspiration because it has a whole chapter on creating a woodland tea party, complete with teacup terrarium and mushroom felt garland tutorials. so kewt. i’ve been looking forward to throwing this party since i got the book last year so when eggsister got engaged and i connected the dots that eggsister likes tea and the woods and is scandinavian, i got very (!!!) excited!! since she also loves all things floral, we’re going to be making flower crowns. i’ve been lightly stressed about this because navigating real flowers is even more intimidating than buttercream flowers and i don’t know the protocol for ordering them. is it appropriate to just say: i want a lot of different colored flowers, i don’t know the difference between a petunia and a daisy? maybe we should simply pipe buttercream flower crowns to our heads? that’s got to have some moisturizing benefits…

i can’t tell you the other big activity that we have planned because it’s a surprise. but i can tell you that it is not a game where you guess the date of the bride and groom’s first smooch and it is not the thing where you sit in a circle and watch the bride open presents. it’s way more violent than that. i’ll tell you next week!

the menu is obviously filled with lots of pretty colored tea cakes and crustless tea sandwiches. i’ve got petits fours in the making and little sandwich picks with tiny clay mushrooms on the end, and eggboy is making tiered plates out of tree stumps from the yard. since princess cakes are scandinavian and adorable, i thought they would be perfect for this occasion. i love making mini princess cakes (well, since this whole thing they’ve been referred to as “boobie cakes” in our house.) and i figured that if ikea sells them in freezer section, then i too can make them ahead and keep them in our freezer until sunday. fingers crossed that this works.

our rhubarb patch is currently bursting at the seams so rather than the traditional raspberry jam i’ve gone with a basic rhubarb jam which adds a nice springy sour note. i also made one batch that subbed the almond flour for hazelnut flour, which was great. ooh i bet pistachio flour would also be great! the fun with princess cakes is endless. honestly how could it not be when there is all of that marzipan?


mini rhubarb princess cakes

makes 20 mini cakes

ingredients

for the cake:

1 1/4 c (150g) all-purpose flour

3/4 c (84g) almond flour

1/2 tsp kosher salt

1 tsp baking powder

1/4 tsp baking soda 

1/2 c (113g) unsalted butter, softened

3/4 c (145g) sugar

1 large egg

1 tsp vanilla extract

1/4 tsp almond extract

1/2 c (112g) buttermilk


for the assembly:

1 c (227g) heavy cream

1/2 c (60g) powdered sugar

a pinch of kosher salt


1/4 c (90g) rhubarb jam, store bought or homemade (Recipe below)


13 oz (370g) marzipan

food coloring

Powdered sugar, for dusting

clues

for the cake:

preheat the oven to 350°f. line a quarter sheet pan with parchment and set aside.

combine the flours, salt, baking powder, and baking soda in a medium bowl.

In a separate large bowl, use an electric or stand mixer to beat the butter with the sugar until light and fluffy, about 3-5 minutes. add the egg, vanilla, and almond and beat well. add 1/3 of the the dry ingredients to the butter mixture and mix until just combined. then add 1/3 of the buttermilk. repeat with another third of each, and then the final third, mixing until just combined.

spread the batter out evenly in the quarter sheet pan and bake until a toothpick inserted into the center comes out clean. begin checking for doneness at 18 minutes.

let the cake cool fully in the pan (the cake can be made in advance and frozen) and then use a biscuit cutter to cut into 20 2" circles.

for the assembly.

make whipped cream by beating the heavy cream, sugar, and salt to stiff peaks.

spread each cake circle with a layer of jam, and top with a small mound of whipped cream. stick in the freezer while you prep the marzipan.

prep the marzipan by kneading food coloring into the marzipan, dusting your work surface with powdered sugar if it’s sticky. knead a majority of it with blue or green, and then color a small ball of it with pink for the roses and leave another small ball uncolored for the petals. roll the marzipan out to 1/8" thick. cut out a large circle, and then press it down around each of cakes, trimming off edges and re-rolling scraps. 

make little marzipan roses with pink marzipan by making little flat snakes and rolling them up in a swirl, add little petals, and place on top of the cakes.

serve immediately or refrigerate for up to a day or two until serving. enjoy!


rhubarb jam

ingredients

2 c (250g) chopped rhubarb

1/2 c (100g) sugar

a pinch of kosher salt

1/4 tsp vanilla extract

1/4 tsp rosewater, optional

juice of 1/2 lemon

clues

in a saucepan, combine the rhubarb, sugar, salt, vanilla, and rosewater (if using). cook over medium heat until the mixture gets bubbly and then reduce the mixture over medium heat until thick and sticky, stirring often, about half an hour. stir in lemon juice, let cool and store in the fridge. 


-yeh!

deep dish pizza and some other stuff!

happy pizza friday everyone! i've been glued in my kitchen, testing up a storm (and secretly binge watching unreal and wet hot american summer) all week that it wasn't until eggpop relayed through eggboy that he was sick of reading about carrot cake that i realized i needed to deliver some pizza to you in time to make it for pizza friday. (actually in most time zones you don't have time but there is always saturday and rule #56 of friday pizza night is that if you forget to have it on a friday, you can defo have it on a saturday.)

first some updates from the test kitchen this week:

-wow, my bagel shaping truly sucks! i had my first try at bagel making that was unsupervised by a bagel teacher and they didn’t rise and looked like what i imagine amoebas look like. they tasted like very thick dumpling wrappers though, which i obviously wasn’t mad about, so even though they were a failure they were still tasty. I have a hunch that the reason they didn’t rise was because we turned on our air conditioning this week and I also got impatient when we were late for a party. This is the recipe that I used and it’s the one that bagel teacher dave loves, so I plan to try it again soon with more patience and less a/c. 

-we made lox for our bagels because we received some of the season’s first salmon from alaska (thanks copper river)! i went with a pretty basic cure of salt, brown sugar, and pepper. I don’t think I used enough of it though because it just wasn’t salty enough, or maybe I should add more flavorings. There’s a very citrusy lox recipe in the Huckleberry book that I’d like to try. I’m going to Alaska next month to catch some fishies, so I’ll try it then.

-I’m working on butter cakes. I made approximately one thousand of them over #MDW (this hashtag caught me by surprise) along with a spreadsheet of all of the vanilla butter cake measurements that I could find. My goal is to make a very reliably moist* butter cake, one that’s as reliably moist as oil cakes. And after a conversation with Alana today who swore up and down that she’s never had a dry butter cake, I realized that maybe my moisture tolerance is on the high end, or rather my dryness tolerance is low end, (or that I'm getting the vocabulary wrong altogether and that what I actually want is a soft cake). Dry cakes are right up there with under salted food and death as my greatest fears. So right now I’m working on a part butter, part oil cake, and I’ve made some great ones but they collapse just slightly when they come out of the oven, which can mean that there’s too much liquid. So little by little (when some more birthdays come up, that is... Do you live in Grand Forks and have a birthday coming up? Please email hello@mynameisyeh.com) I’ll decrease the liquid in the recipe until it doesn’t collapse and then see if it’s just as moist.

*the word “moist” is ok now.

-Because bagels and lox weren’t enough multi-day recipes to test in one week (well, because i procrastinated last week), short ribs also appeared on the schedule this week. Oh hell yeah! I spent six days making rhubarb short ribs to the sound of wet hot american summer, and I have a great feeling about this recipe. Very excited. Jazz hands. Confetti emoji. Makes up for the bagel failure. Luckily you can freeze braised meats pretty easily so we did not explode.

furthermore:

unglued camp registration opens on monday!!! and i'm going to be the lunch lady again!! i cannot wait. camp director ashley did a hilarious job with the f.a.q.s so go read them even if you don’t plan to register (but ummm you should plan to register because we’re going to eat hotdish and make cake and dance in banana costumes). thanks zach for these camp photos from last year!

ok let’s talk about pizza:

in the battle of chicago pizza versus new york pizza, i would have a really hard time choosing sides. i would probably cheer from the new york side of the stadium for the first half and then switch jerseys and cheer from the chicago side for the second half, although i’d probably get kicked out of the new york side before halftime anyway since my chicago accent is so strong. the only true difference between my love for the two types is that i could probably eat new york pizza every single day for six meals a day while my capacity for chicago pizza tops out at once, maybe twice, a month. i think of new york pizza more of like an open faced grilled cheese (that then becomes close faced when you do the right thing and fold it in half) and chicago pizza as a thick buttery pie that is weird not to eat with a fork and knife. it’s the perfect special occasion food when your special occasion falls on a friday, and no amount of meditating can produce the patience required for people who say that chicago pizza “isn’t really pizza.” you people, delete your account.

my mom sent us four lou malnati’s pizzas over the holidays which was one of the best gifts ever in the whole wide world, and we were just starting to run low when shelly’s book, vegetarian heartland, showed up at our door. i had carrot cake batter all over my hands so i intended to just to do a quick flip-through before transferring it to my coffee table, where i keep all of my new cookbooks that i need to go through, but then i couldn’t stop and my quick flip-through turned into a very long combing through with post-its and lists and a sudden desire to start a cookbook club just so that i could try a lot of these recipes at once. the recipes are so original and midwesty, i’m in love. when i got to the page with the chicago deep dish pizza i immediately changed around my schedule so i could make it that friday.

i’ve always considered chicago pizza to be like bagels in that they’re one of those things that are best left up to the experts, like lou and gino. and since i tend to get back to chicago at least a few times a year, i’ve been ok with that. but after having some bagel success (and before this week's bagel failure), i was feeling kind of encouraged so i gave it a try and i was really happy that i did because shelly’s pizza is the bee’s knees bomb dot com!!! The crust is bready and soft, different than the crispy flaky lou mal’s crust but so so good and buttery and not too difficult to make. I loaded ours up with thinly sliced peppers and onions and a bit of spinach for health, and then instead of baking the second one we froze it for a rainy day. I can't wait for that day.


chicago-style deep-dish loaded veggie pizza

serves 8

from shelly westerhausen's vegetarian heartland

ingredients

One 1 1/4-oz [7-g] packet active dry yeast

1 tsp sugar plus 1 Tb

1 1/4 c [300 ml] warm water (110° to 115°F/43° to 45°C)

1/2 c [110 g] unsalted butter

3 1/2 c [490 g] all-purpose flour

1/2 c [70 g] coarse cornmeal, plus more for sprinkling

1 tsp fine sea salt

1 lb [455 g] mozzarella cheese, shredded

Optional toppings: thinly sliced green bell pepper, thinly sliced onion, diced cherry tomatoes, sliced button mushrooms, pitted black olives, pineapple chunks, sliced marinated artichoke hearts

1 recipe Basic Tomato Sauce (recipe below) or 3 c [720 ml] store-bought sauce

clues

In a small bowl, stir together the yeast, 1 tsp of the sugar, and 1/4 cup [60 ml] of the warm water and let stand until foamy, about 5 minutes.

In a small saucepan over medium heat, combine the remaining 1 cup [240 ml] water and the butter and cook until the butter melts, about 2 minutes.

In the bowl of a stand mixer fitted with the paddle attachment, mix together the flour, cornmeal, salt, and the remaining 1 Tbsp sugar on medium-low speed until combined, about 20 seconds. With the mixer on medium-low speed, slowly add the butter mixture and the yeast mixture and mix until combined. Remove the paddle and attach the dough hook. Knead on medium-high speed until an elastic dough forms, about 5 minutes.

Oil a large bowl. Transfer the dough to the bowl, cover with a kitchen towel, and let rise in a warm spot until doubled, about 11/2 hours.

Line two 9-in [23-cm] springform pans or two 9-in [23-cm] cake pans that are 2 in [5 cm] deep with aluminum foil and sprinkle with cornmeal.

Punch down the dough and transfer it to a floured surface. Divide it into two equal pieces and form into balls. Using a rolling pin, roll out the dough balls into 12-in [30.5-cm] rounds. Transfer the rounds to the prepared pans and press firmly against bottom and sides to keep it in place. Cover again with kitchen towels and refrigerate until completely chilled, about 1 hour.

Preheat the oven to 425°F [220°C].

For each pizza, sprinkle half of the mozzarella over the bottom of the dough, spreading it evenly. Cover with up to 1/2 cup [75 g] of toppings and then drizzle half of the tomato sauce over the toppings.

Bake until the sauce is bubbly, 25 to 30 minutes. Remove from the oven and let cool for 5 minutes before serving. Cut into wedges and serve. Don’t be afraid to use a knife and fork for these pizza slices!


basic tomato sauce

makes 3 cups

ingredients

1 Tb extra-virgin olive oil

1 yellow onion, diced

2 garlic cloves, minced

1/4 c [60 ml] red wine (optional)

2 tsp dried Italian herbs or 2 Tb chopped fresh Italian herbs (such as oregano, basil, or thyme)

One 28-oz [794-g] can whole tomatoes

1 tsp sugar (optional)

1/8 tsp red pepper flakes (optional)

Fine sea salt and freshly ground black pepper

clues

In a large skillet over medium heat, warm the olive oil. Add the onion and sauté until translucent, about 5 minutes. Add the garlic and sauté until fragrant, about 30 seconds. Add the wine (if using) and herbs and turn the heat to high. Let the wine simmer until almost all the liquid is evaporated, 1 to 3 minutes. Add the tomatoes, sugar (if using), and red pepper flakes (if using). Using your hands or a knife, break apart the tomatoes. Simmer until the sauce thickens and has reached the desired consistency, 8 to 12 minutes. Remove from the heat and season with salt and pepper. Store in an airtight container in the refrigerator for up to 3 days.


-yeh!

carrot cake with hawaij and tahini caramel frosting

It’s my birthday! Yay! More importantly, however, my pops is turning 60 tomorrow. Sixty! His hair is still heavier on the pepper than the salt, and he wears a Bernie Sanders t-shirt every day. And the other day he told me with a spring in his step that he plans to work for at least like 20 more years, which made me really happy because one downside about living in Winterfell is that I can’t go to his concerts whenever I please. So I’m feeling pretty good that he has 20 years of that klezmer section in Mahler one left in him. 

His true superhero power though is that he’s like a human garbage disposal in that he eats everything, in monstrous quantities (even if it’s years past the expiration date), and he loves all of  the food. With the exception of goat cheese. One thing in particular that he couldn’t shut up about recently was a carrot cake from the Blue Door Farm Stand, near where he lives. The cake is huge and filled with nuts and my dad just foams at the mouth about it. So this year for my birthday, but more importantly his, I’ve gained an understanding of carrot cake.

When I worked at the town bakery, I dreaded making carrot cake because it required using the food processor, the stand mixer, piping bags to make the little carrots, and (ugh) the can opener to open up the can of pineapple. H8 can openers. But carrot cake is good, and the process of making it is pretty unique, so it was time I got to know it. 

The first thing that aided my understanding of it was the idea that “carrot cake is ultimately a spice cake.” The carrots aren’t meant to be front and center, and Allison confirms this in her non-negotiables of carrot cake, which you all should read right now. It sets the world straight on pineapple, coconut, and raisins. Which I agree with, because a raisin’s place in my kitchen is *exclusively* on ants on a log, and also because I like the idea of achieving the best possible cake with the least amount of ingredients. Pineapple and coconut are for another time and another cake, for now we’re sticking with carrots, spices, cream cheese frosting, and cake. 

I began my testing process with my go-to vanilla cake:

1 3/4 c sugar

2 1/2 c flour

1 1/2 tsp each: salt, baking powder, baking soda

2 large eggs

1 c buttermilk

1/2 c oil

1 tb vanilla

3/4 c water

Combine dry, combine wet, combine em all, bake. 

Then I added spices: a few teaspoons of cinnamon and hawaij for coffee, the yemeni spice mix that’s a blend of all of my favorite sweeter spices, like nutmeg and cardamom, which I thought would go perfectly with carrots and...

Brown sugar: I subbed 1 c of the sugar for brown sugar because a defining feature of carrot cake is that darker, molasses-y flavor. 

And of course carrots: when carrots are added, you’re essentially adding a ton of water, so the water and milk in my recipe went goodbye. The new recipe looked like this:

1 c brown sugar

3/4 c sugar

2 1/2 c flour

1 1/2 tsp each: salt, baking powder, baking soda

2 tsp cinnamon

1 tsp hawaij

2 large eggs

1/2 c oil

1 tb vanilla

2 c shredded carrots

Before I went ahead and tested this, I read about a thousand more carrot cake recipes, and found that, a) most of them had at least double the eggs and oil as my recipe, and b) a lot of them required a method where you cream the eggs and sugar first until they’re fluffy and then drizzle in the fat. In other words, one more step and another dirty stand mixer bowl. Allison’s recipe however required beating together the carrots and sugar first. And then a few of the recipes required oil and sugar first, and then adding the eggs one at a time. I wanted to know what the difference was between each of these methods. 

So I started an internet thread about it and got some great answers from Stella, Allison, Ali, and a whole bunch of other kind people. Here was a selection of the findings:

-Beating eggs + sugar first helps aerate the cake, giving slightly more lift and offsetting the denseness of the sugar 

-Beating carrots + sugar first helps release all of the moisture from the carrots

-More eggs are required for the structure and to help the leavening work, and more oil is required to keep it moist and not eggy (I think I still have some questions about this…)

So here were the new measurements:

1 c brown sugar

3/4 c sugar

2 1/2 c flour

1 1/2 tsp each: salt, baking powder, baking soda

2 tsp cinnamon

1 tsp hawaij

4 large eggs

1 1/2 c oil

1 tb vanilla

2 c shredded carrots

I went ahead and tested the four different methods that I was wondering about and did side-by-side comparisons. Here they are along with their notes:

A: mixing dry, mixing wet, folding in the carrots [the laziest way]

-batter is thick, dark, and chunky and not well combined, kind of oily, almost like a brownie batter

-cake is dense and good! has a great caramelized crust. center is slightly oily.

-baked for about 33 minutes

B: whisking sugar and oil first by hand, whisking in eggs on at a time, folding in dry ingredients and carrots [slightly less lazy, but still doesn't use a stand mixer]

-nice batter that held its shit together. smooth and dark.

-cake is dense and GOOD

-baked for about 33 minutes

C: beating sugar and eggs until pale and fluffy in a stand mixer with a whisk attachment, then drizzling in fat, adding dry, folding in carrots [The Stella Method]

-batter is very light, more yellow, and fluffy, so satisfying to beat the eggs

-it rose WAY more, layer is about 1/2” taller than A and B, smooth on top

-needed about 38 minutes in the oven, longer than A and B

-cake was fluffy, less moist than A and B

D: beating carrots, sugar, and salt in a stand mixer with a paddle until sandy, combining eggs and oil and then adding those, adding dry [The Allison Method]

-batter was golden color (between A/B and C), way more liquidy and bubbly

-cake domed nicely, the smoothest top out of the four

-cake was fluffy, less moist than A and B

(left to right: the batters and layers of a, b, c, d. sorry these aren't the best photos, a and b were sitting upside down on the wire rack for a little bit before i took the pictures which is why they have all of those little lines in them.)

(left to right: a, b, c, d)

It was so fascinating to see one set of identical ingredients, all mixed up with different methods. They were all great! With methods C and D, the ingredient list would have to adjust to lean heavier on the fat (and maybe sugar?) to provide slightly more moisture. But in general my cake preference is usually on the denser side, so I chose to fly with method B, excited with the added bonus that it doesn’t require a stand mixer. 

Then I tested something that caught my eye in Stella’s recipe, browned butter! I am fairly new to brown butter but it seems like everyone flips out about it. I used method B. Here were my notes:

-batter looks pretty much the same as B

-brown butter flavor definitely present in cake

-texture very similar to B, slightly grainy, which was good, slightly more structural integrity, also good

-I don’t know that I necessary like brown butter flavor…. am I a monster if I don’t like browned butter?

I’m still going back and forth about whether or not I like brown butter. I really feel like a monster about this. The cake made with brown butter tastes exactly like a brown butter cake with spices, so if you know that you love brown butter, this is the option for you. I’ve included both options in the recipe below. 

Brown butter or not, I am very happy with this cake. It is dense, moist, and fit for my pops' 60th birthday!

Ok, let's now move on to the frosting. Do you know BJ’s story about carrot cake? And you've already read Allison's frosting non-negotiables right? So carrot cake has to have the best frosting and it has to be cream cheese frosting, we’re all on the same page about that. 

I wasn’t going to fuck around with the frosting too much until halfway through my research when I found the halva caramel cream cheese frosting in Soframiz, and girl, it kept me up at night. I just couldn’t stop thinking about it. I’ve always flipped past cakes that have caramel in the frosting because the thought of cleaning caramel out of a pot stresses me out and I honestly don’t love caramel. But obviously if you add tahini to anything I am sold. So I gave it a shot, using the caramel that Maya and I made for our molten halva lava cakes, and it turns out that such a small quantity of caramel only takes a few quick minutes to make and is actually really satisfying. The caramel mixed with the cream cheese and butter makes for a frosting that is nutty, not too sweet, full of flavor, and an important part of a really nice civilized slice of carrot cake. 

And the addition of tahini all makes sense because carrots go with cinnamon, cinnamon goes with hawaij, cinnamon goes with tahini, tahini goes with caramel, carrots go with tahini, etc., etc., guilty by association, there is a great flavor party happening in this cake. 

Ok I’m done talking about carrot cake for now. 

Oh pistachios! I added them because I like them. And sesame seeds are there because that’s what Soframiz does and I like that there is some sesame continuity now with the frosting. And marzipan carrots are my non-negotiable. 

Ok I’m really done now. 

Happy birthday to me and to my pops! I am spending the day decorating cake and making hotdish and recovering from a weekend of piñata making, taco eating, and rhombus brewery shutting downing!

K bye!


carrot cake with hawaij and tahini caramel frosting

makes two 8" one-layer cakes (pictured) or one 8" two-layer cake

ingredients

for the cake:

2 1/2 c (340g) all-purpose flour 

1 1/2 tsp kosher salt

1 1/2 tsp baking powder

1 1/2 tsp baking soda 

2 tsp cinnamon 

1 tsp hawaij (or sub 1/2 tsp ginger, 1/2 tsp cardamom, and a pinch each of nutmeg and cloves)

1 c (166g) c brown sugar 

3/4 c (154g) c granulated sugar

1 1/2 c (320g) oil (to sub browned butter, brown 400g butter using stella’s directions and cool

4 large eggs 

1 tb vanilla bean paste or extract

2 c (200g) freshly shredded carrots 

Optional: 2 tb toasted sesame seeds and/or 90g chopped roasted pistachios

for the frosting:

6 tb (76g) granulated sugar

1/4 tsp kosher salt

1 tb water

1/4 c (63g) heavy cream

1/2 c (114g) unsalted butter, softened and divided

3 tb (48g) tahini

8 oz (226g) cream cheese, softened

1 1/2 tsp vanilla extract

to assemble:

Shaved carrot flowers

Marzipan kneaded with orange and green food coloring and shaped into flowers

Pistachios

Sesame seeds

Sprinkles

Birthday candles

clues

for the cake:

preheat the oven to 350ºf. grease and line two 8” cake pans with parchment and set aside.

in a large bowl, combine the flour, salt, baking powder, baking soda, cinnamon, and hawaij and set aside. in a large bowl, whisk together the brown sugar and granulated sugar with the oil. whisk in each of the eggs, one at a time, mixing well after each. whisk in the vanilla extract.

using a wooden spoon or rubber spatula, add the dry ingredients to the wet ingredients and mix until about 90% incorporated. add the carrots, sesame seeds and pistachios (if using), and mix to incorporate (and by this time all of the flour mixture should be incorporated as well).

pour the batter into cake pans and bake until a toothpick inserted into the center comes out clean, begin checking for doneness at 30 minutes.

cool for 10 minutes in the pans and then turn onto a wire rack to cool completely. 

for the frosting:

first make the tahini caramel: place the sugar and 1/8 tsp salt in a saucepan. stir in the water and cook over high heat until it starts to bubble. stop stirring and continue cooking for 2-4 minutes until it turns a medium amber color. reduce heat to low and carefully drizzle in the cream while stirring (it will bubble up quickly and make a weird sucking sound, don’t be alarmed). continue to stir until the mixture smooths out. add half of the butter (1/4 c), cube by cube, stirring, until mixture is thick and homogeneous.

remove from the heat and stir in the tahini. let cool and refrigerate until ready to use. this can be made a day in advance. 

To make the frosting, combine the caramel, remaining 1/4 c butter, cream cheese, vanilla, and remaining 1/8 tsp salt in a stand mixer and mix with a paddle attachment until smooth. 

to assemble:

frost each cake liberally with frosting and decorate as desired! or, stack the two cakes for the two-layer version. 

enjoy!


-yeh!