Homemade Cake Mix for Peanut Butter Cake with Chocolate Glaze

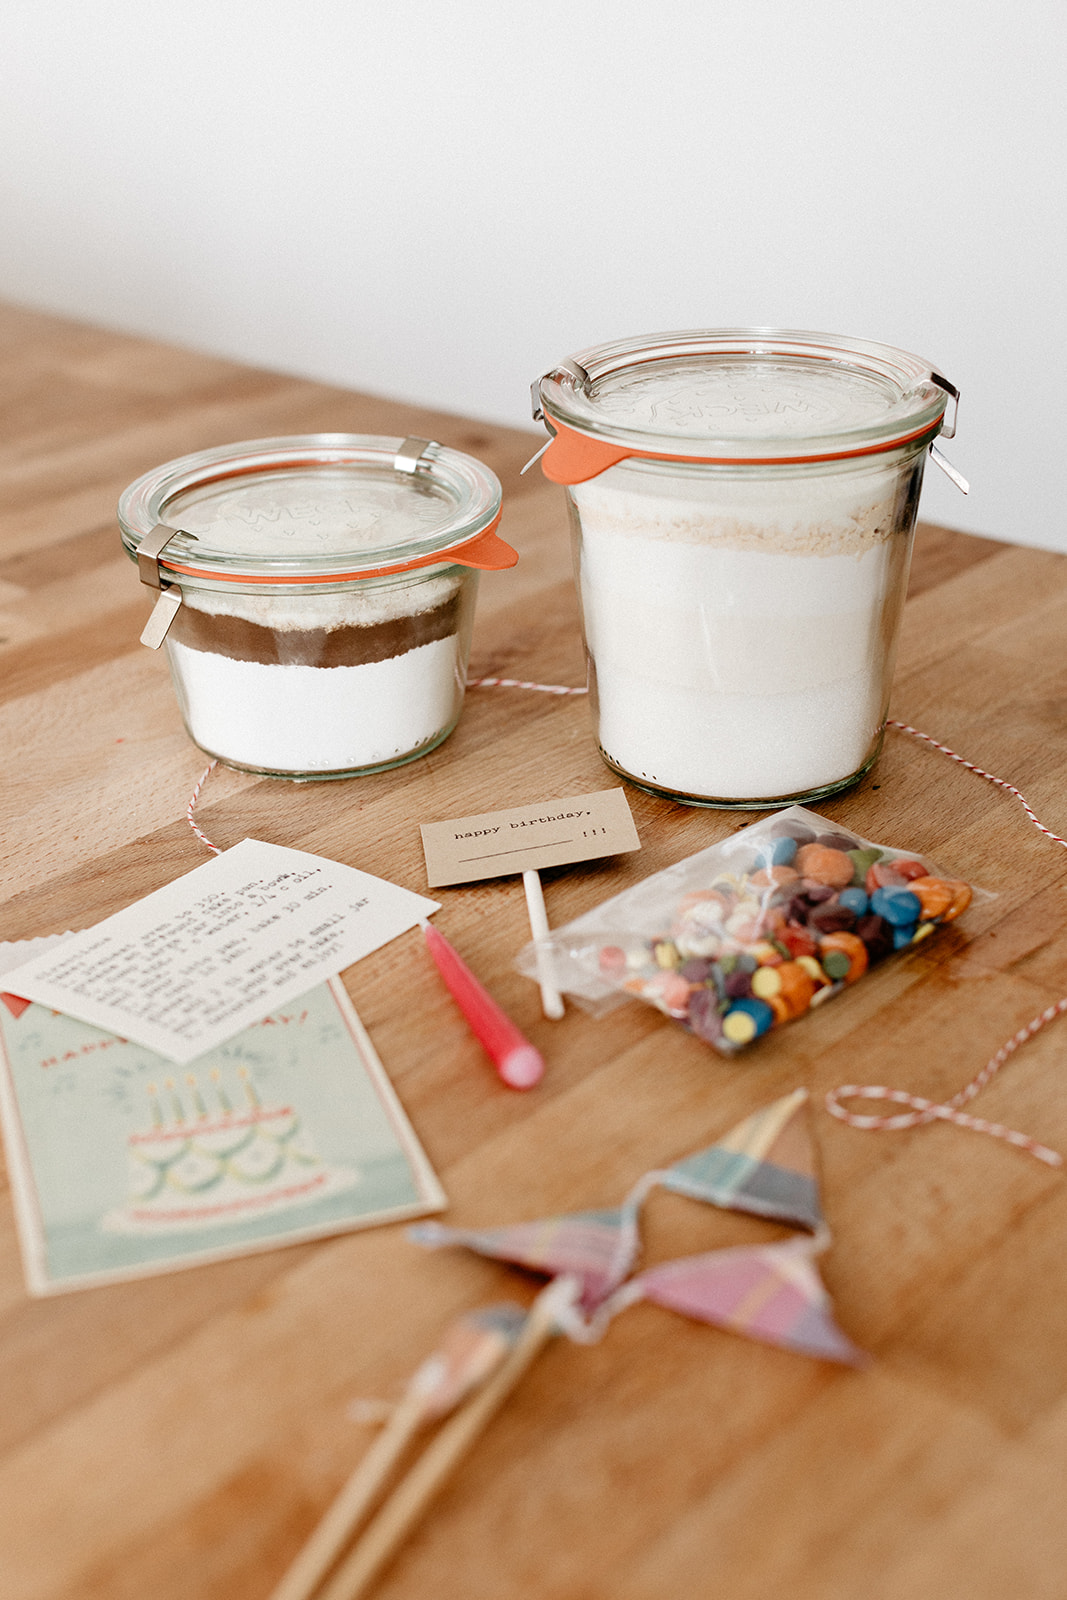
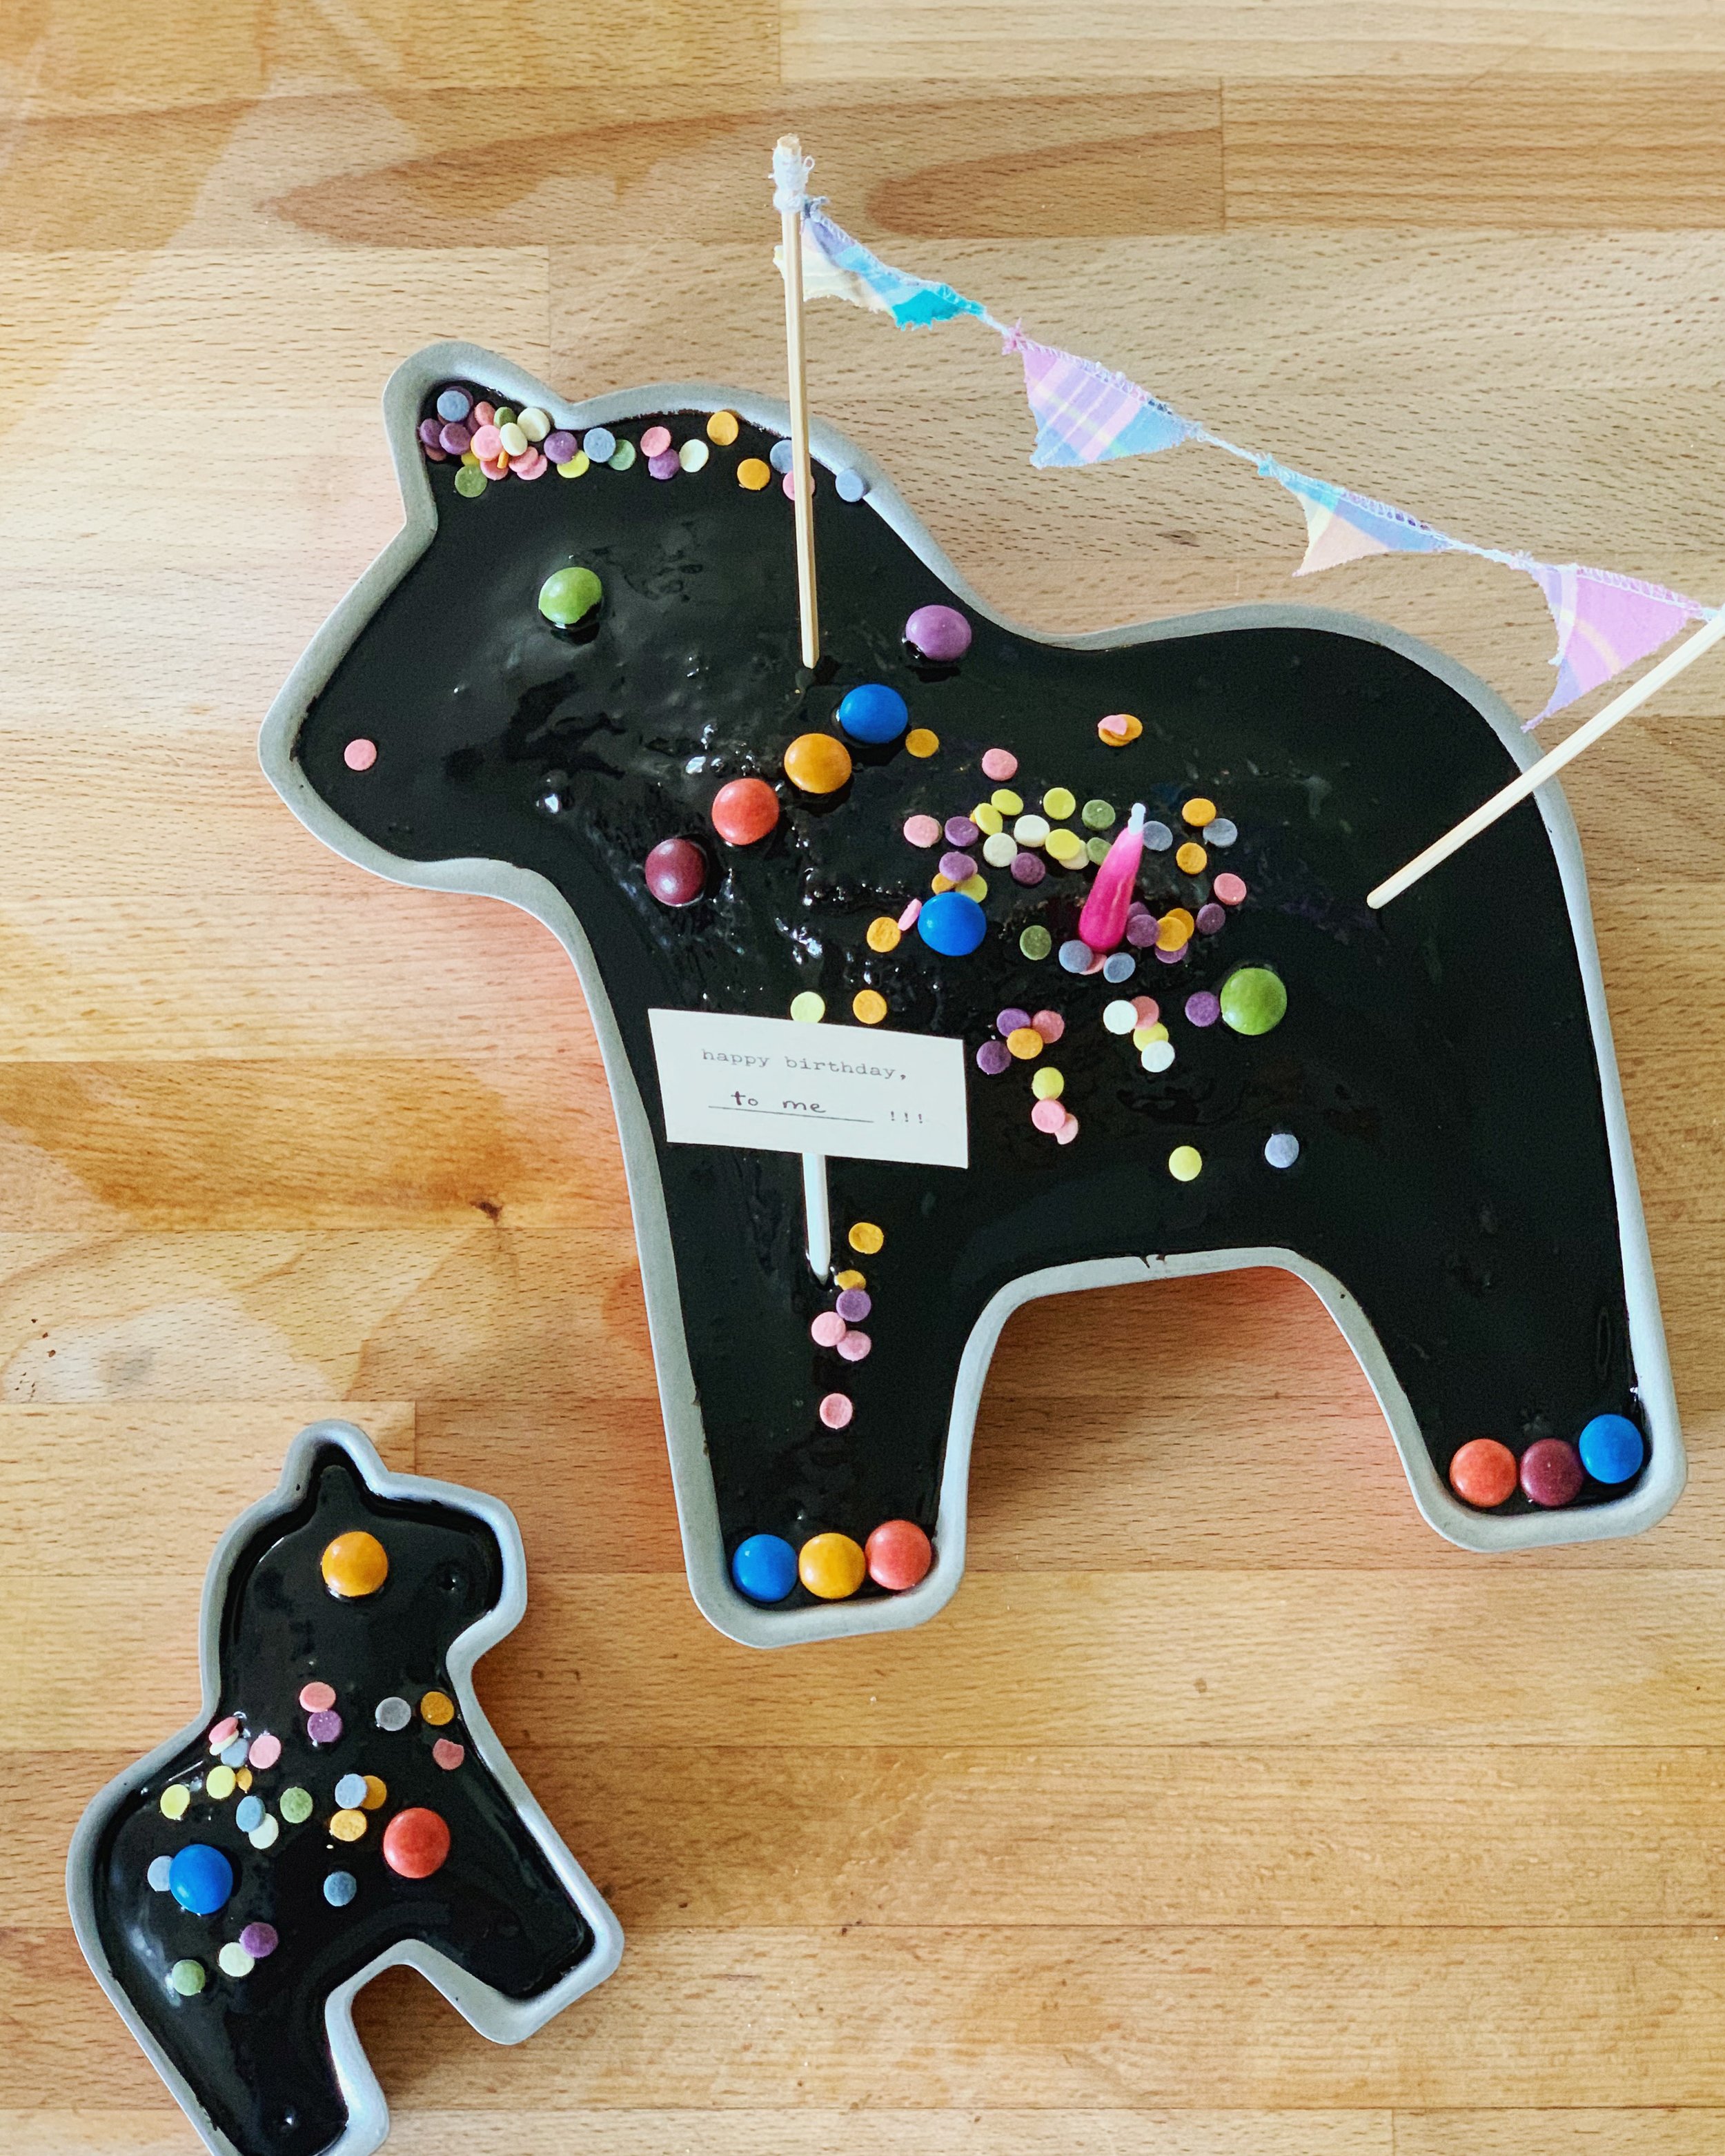
Hello, I am so excited about this cake mix!!!! It’s everything I love in one tidy highly giftable package: cute jars, sprinkles, typewriter cards, string, peanut butter (!), a menorah candle disguised as a birthday wish, and the anticipation of cake! Developing this might have been my favorite part of meal prep especially because it’s the most fun and also, well, it’s for my birthday today! I just figured, who knows if Eggboy will have time to bake my annual yellow cake, and I’ll certainly be too busy to pipe a dang embroidery marzipan llama. So what’s the easiest next best option? A homemade peanut butter cake mix with chocolate glaze mix that I can whip up with a Bernie in one arm and a whisk in the other. I assembled the mix back in March and it’s been sitting in my pantry since. (I kind of feel like I should have half a dozen of these on hand for future cake emergencies, no?) I’d never made anything like it before but realized after looking at my peanut butter cake ingredients that most of the ingredients are easily available in powdered form. Powdered peanut butter and powdered milk were the only two things that I didn’t already have on hand but I bought some at the store and tried them out and they worked so well! So the only things that are required for assembly are an egg, oil, and water, just like a store-bought mix! The result is a really moist and fluffy cake with a shiny chocolatey glaze. I made a set of dala horse cakes, just enough for our little family, but this can be made in a round 8” cake pan or easily doubled and made into a sheet cake!


Homemade Cake Mix for Peanut Butter Cake with Chocolate Glaze

Makes 1 One-layer 8” Round Cake

Ingredients:

Cake:

3/4 c + 2 tb (175g) sugar

1/2 c + 2 tb (81g) all-purpose flour

1/2 c (65g) cake flour, or more all-purpose flour

1/4 c (28g) powdered peanut butter (such as PB2)

2 tb (14g) milk powder

1/2 tsp kosher salt

1 1/8 tsp baking powder

Glaze:

1 c (120g) powdered sugar

1/4 c (30g) unsweetened cocoa powder (I like dutch cocoa for the darker color)

2 tb (14g) powdered peanut butter

1 tb (7g) milk powder

Other bells and whistles:

A birthday candle

A card with directions (see below)

A packet of sprinkles and other colorful candy

Other decorations as desired

Clues

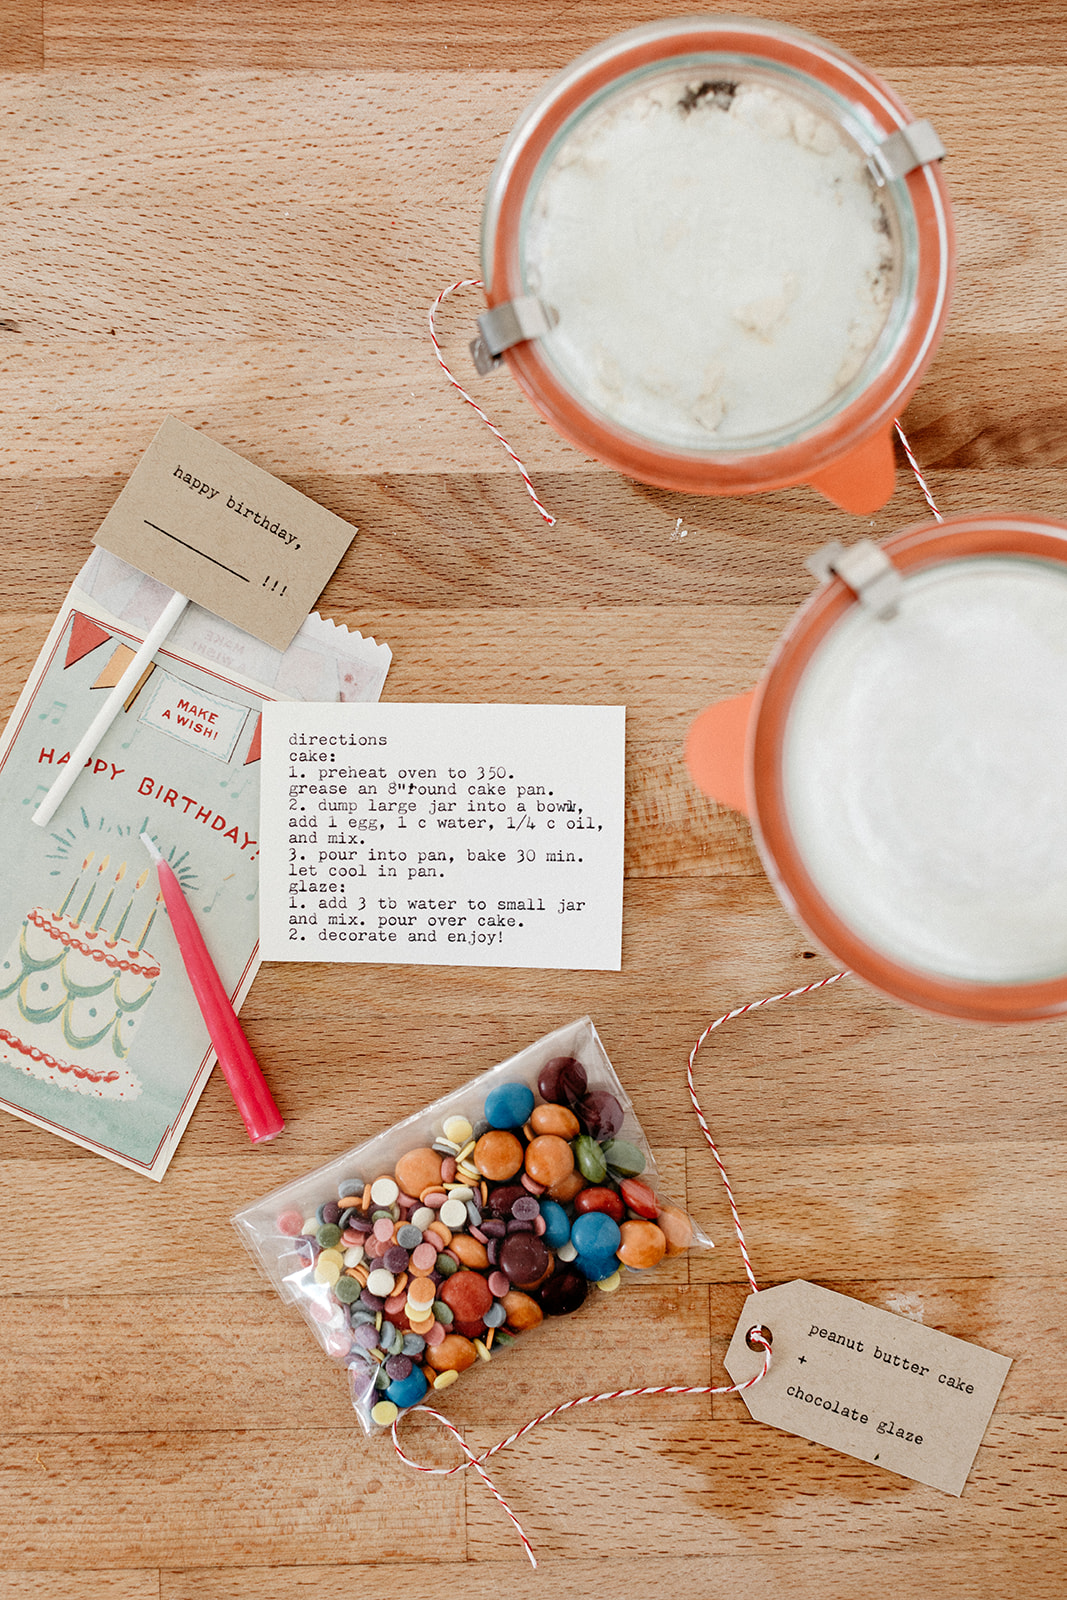
In a medium jar (I used a 1/2 L Weck jar), layer the sugar, flour, cake flour, peanut butter powder, milk powder, salt, and baking powder. In a separate smaller jar (I used a 1/4 L Weck jar), layer the powdered sugar, cocoa powder, peanut butter powder, and milk powder. Cover and wrap up cutely with a candle, directions card, a packet of sprinkles, and any other decorations. Go wild! Gift it to the birthday person! 

Directions To Bake (print this out or make a card on a typewriter if you’re into that)

Cake:

  1. Preheat oven to 350ºf. Grease an 8” round cake pan.

  2. Dump the large jar into a bowl and whisk to combine. Add 1 large egg, 1 cup water, and 1/4 cup oil and whisk to combine. 

  3. Pour into pan and bake for 30 minutes, or until a toothpick stuck in the center comes out clean. Let cool in pan.

Glaze:

  1. Add 3 tablespoons water to the small jar and mix until spreadable, adding an additional tablespoon of water if it’s too thick to spread. Pour over cake.

  2. Decorate and enjoy!


-yeh!

photos by chantell and brett quernemoen

mozzarella pesto mac and cheese

I prepped my Mother’s Day brunch months in advance, I prepped my birthday cake months in advance (coming next week!), so obviously I also prepped my birthday dinner months in advance. I promise this isn’t a statement about my faith in Eggboy’s cooking skills so much as it is an example of my obsession with meal prep. I don’t know if it was obvious but I started planning my baby meal prep the moment the little pee stick flashed the word “pregnant” on it. Sorry, I’ll never talk about pee in a recipe post again. So back in like August when I was planning all of this, I thought what will I want to eat on my birthday in May? It was so far in the future but macaroni and cheese always has and always will be my number one favorite food, so I figured that was the most reliable choice.

So here is a version of mac and cheese that I have been really loving these days. It’s not as cheesy as the casseroles that I grew up eating on every special occasion, it’s more saucy and milky, and pretty mild, flavor-wise. I knew I’d be prepping giant batches of it to have on hand for my whole maternity leave, so I went with something that was on the lighter end of the spectrum, at least for mac and cheese. It’s got a pretty green dollop of springy pesto (I used store-bought but would have used homemade if I had basil back in March!), and these individual servings make it really easy to heat quickly. They’re perfect to pair with salad or, my go-to sides as a 7-year-old, apple slices and cold baby carrots. 

If you’ve never made mac and cheese before or are looking to create your own version of mac and cheese with all of your favorite cheeses and mix-ins, this is a great basic recipe to start with. It’s pretty barebones, which means that it lends itself nicely to switching up or adding more cheeses (any cheese should work! less melty ones, like feta, won’t yield a smooth sauce but they’ll still be tasty), adding different flavors (paprika, nutmeg, sriracha, harissa, a little mustard, etc.), veggies (peas! onions! broccoli!) or meats (hot dogsssss!!!!). You can really go wild here. 

And of course, you don’t have to make individual servings or make this to freeze ahead. Bake this in a big casserole dish! Immediately! Or do what I do and just stand over the pot and take a million test bites, just to make sure it’s good, before it gets dumped in the casserole and browned in the oven for other people to eat since you’ve just filled up on “test bites.”

I’ve used Our Family cheese and noodles here, which I always have on hand in case of mac and cheese emergencies! 


Mozzarella Pesto Mac and Cheese (Freezer Friendly)

makes 10 servings

Ingredients

1 lb (16oz) Our Family mini shells or macaroni noodles

1/2 c (113g) unsalted butter

1/2 c (65g) all-purpose flour

6 c (1.44kg) 2% or whole milk

1 1/2 c (6oz) shredded Our Family mozzarella

1 c (4oz) shredded Our Family swiss

3/4 c (3oz) shredded Our Family parmesan, divided

Kosher salt and black pepper, to taste

5 tb prepared pesto

10 tb (32g) panko breadcrumbs 

Directions

If baking immediately, preheat the oven to 375ºf. If prepping for the freezer, see directions below.

Cook the noodles to al dente per the directions on the box. Drain and set aside.

In a large pot, melt the butter over medium high heat. Stir in the flour and cook for about a minute. Add the milk, one cup at a time, whisking or stirring with a wooden spoon after each until thickened. Add the mozzarella, swiss, and 1/2 cup of the parmesan and stir until melted. Season with salt and pepper to taste. Add this point if you want to add fun mix-ins like cut up hot dogs or crispy bacon or peas or hot sauce, now’s the time to do so. Stir in the noodles. It may seem overly saucy at this point but once it bakes up, it’ll be perfect!

To bake immediately, pour into a 9” x 13” casserole dish, dollop all over with the pesto and sprinkle with the breadcrumbs and remaining 1/4 cup of parmesan and bake for 25 minutes, or until browned and bubbly. Enjoy!

To prepare for the freezer, divide into 10 individual containers (I like these because they are safe for the oven, microwave, and freezer). Add a heaping teaspoon of pesto to the tops of each and sprinkle with the breadcrumbs and remaining 1/4 cup of parmesan. Let cool slightly, wrap well in plastic wrap, label, and freeze for up to 3 months. Reheat in the oven at 375º for 25 minutes covered with foil plus 20 minutes uncovered, or until browned and heated through. Or reheat in the microwave by heating for 4 minutes, stirring halfway through. Enjoy!


-yeh!

photos by chantell and brett quernemoen

this recipe was created in partnership with our family!

Here is a PDF of the freezer labels that I made! They are for Avery labels #6570.

pancakes and sausage on a stick

Back in March when I was doing all of my meal prep, I realized that Mother’s Day would happen soon after I gave birth! It was a wild realization that I’d suddenly be an honoree of the day and I obviously immediately got the urge to cry and be emotional. I imagined my perfect Mother’s Day with a newborn (which is different than my perfect Mother’s Day with, say, a 6-year-old because by that time I can expect some super cute breakfast in bed, right?!) and what I imagined was holding a little nugget in one hand and eating my special brunch in another. A brunch on a stick. And one of my favorite brunches ever, pancakes and sausage! I mean, a bouquet of flowers would be nice but a bouquet of pancakes and sausage on a stick would be nice and tasty. So here we are, I made my own Mother’s Day brunch and it’s in the freezer now waiting to be microwaved. Lol. Pressure’s off, Eggboy! 

Pancakes and sausage on a stick were one of my faaaavorite breakfasts growing up. We’d get them in bulk from Market Day at school (does Market Day still exist?! Omg, it does!) and I’d have them before early morning ice skating practices. These days I can’t walk by them in the freezer section of the Super Target without seriously considering buying them every single time but then I look at the ingredients and have to put them down. So with this homemade version, even though they’re a totally fried breakfast version of a corn dog, I feel a little better about eating them because I can use my fave sausages (I like Applegate’s natural chicken sausages) and then also add some oat flour to the batter. More oats = more boob milk! Yeah! And the oats add a nice nuttiness to the pancake.

So here’s a big batch that you can make, freeze, and nuke for breakfast in a snap and Mother’s Day with a newborn and the like! 


Pancakes and Sausage on a Stick

Makes 18

Ingredients

1/2 c (65g) all-purpose flour

1/2 c (65g) oat flour, or more all-purpose flour

2 tb sugar

3/4 tsp kosher salt

1/2 tsp baking soda

1 1/2 tsp baking powder

1 large egg

2 tb flavorless oil

1/2 c (120g) buttermilk

18 pre-cooked breakfast sausages (if frozen, heat them a little just until they’re soft enough to insert with lollipop sticks)

Flavorless oil, for frying

Maple syrup, optional, for serving

Clues

Fill a large heavy pot or high sided skillet fitted with a thermometer with 1” of oil and heat over medium high heat to 360º F.

In a medium bowl, whisk together the flour, sugar, salt, baking soda, and baking powder. In a separate small bowl or measuring cup, whisk together the egg, oil, and buttermilk. Add the wet ingredients to the dry ingredients and stir to combine. Transfer the batter to a tall skinny glass or measuring cup (this step isn’t completely necessary, but it will make coating the sausages easier). Working in batches of 3 or 4 sausages at a time, insert popsicle sticks or lollipop sticks into the sausages, pat off any excess moisture with a paper towel, and dip them into the pancake batter to fully coat, scraping off excess. It doesn’t need to be a very thick coating as the batter will puff up when frying. Carefully lower the entire thing (stick included) into the hot oil and fry until golden, 1 1/2-2 minutes. Use tongs to transfer to a paper towel or wire rack. Repeat with the remaining sausages. Cool slightly before serving. 

To freeze, cool completely and then store in a ziploc bag in the freezer for up to 3 months. To reheat, wrap loosely in a paper towel and microwave for about 40 seconds, or until heated through. Let cool slightly and enjoy!


-yeh!

photos by chantell and brett quernemoen

spring veggie white matzo lasagna

I am so curious to see what our opinions are re: matzo after Passover is over this year because since last year’s Passover, we have basically kept the itsy bitsy Kosher section of our grocery store in business with our aggressive year-round matzo eating habit. I ate an insane amount of it while I was pregnant, with peanut butter and jelly, with Kewpie mayo and sliced cheese, and in extra shallot-y matzo brei covered in ketchup. Matzo was my go-to 3am snack, in bed. I am pretty sure Bernie is 1/3 made of matzo. Eating matzo is different when you have the option to eat bread though, right? Which is why we never got sick of it. This week without the option though, I’m afraid we’ll get sick of it and I’ll have to find another easy 3am snack. What a dramatic life we lead! 

When it came to baby meal prep, I was told over and over to make lasagna! So a matzo lasagna, one big enough to provide enough leftovers for a few good days, was an obvious choice for Passover. And I wanted to make sure it was veggie packed, so I converted my spring vegetable quinoa hotdish in Molly on the Range to a freezer-friendly layered situation. The matzo pieces get nice and soft with the white sauce, and the flavors of leeks, chives, ricotta, and peas whisper spring! Even though it’s totally loaded up with cheese and milk, the ricotta and bright flavors add a nice sense of airiness. And there’s layers upon layers of spinach in this. So go ahead, have seconds!

Thanks to Our Family for partnering on this post and providing all of the cheese for this delicious Passover supper!


Spring Veggie White Matzo Lasagna

Makes one 9” x 13” casserole

Ingredients

Sauce

1/4 c (57g) unsalted butter

2 large leeks, chopped

4 scallions or ramps, chopped, white and green parts separated

Kosher salt

4 cloves garlic, minced

6 tb matzo meal

3 c (720g) whole or 2% milk

1 c (236g) vegetable stock

1/4 c (75g) chopped chives

1/2 c (55g) fresh or frozen peas

1/4 tsp nutmeg

1 tsp onion powder

Black pepper

Hot sauce, to taste

Filling

1 large egg

1 (15oz) container our family part skim ricotta

3/4 c (3oz) our family shredded parmesan cheese

2 c (8oz) our family shredded mozzarella

1/2 tsp kosher salt

3 c (5-6oz) fresh spinach

9 sheets matzo (I use lightly salted matzo)

Directions

If planning to bake immediately, preheat the oven to 350ºf. If prepping ahead, see directions below.

To make the sauce, in a large pot, melt the butter over medium high heat. Add the leeks, the white parts of the scallions or ramps, and a pinch of salt and cook until softened, 5-7 minutes. Add the garlic and cook for another minute, and then stir in the matzo meal and cook for another minute. Add the milk, one cup at a time, stirring until thickened after each. Add the vegetable stock and continue to stir until thickened. Stir in the green parts of the scallions or ramps, the chives (reserving a small handful for the topping), peas, nutmeg, onion powder, a few turns of black pepper, hot sauce, and salt to taste. Remove from heat.

To make the filling, in a medium bowl, mix together the egg, ricotta, 1/2 cup of the parmesan, 1 1/2 cups of the mozzarella, and the salt.

To assemble, spread 1/2 cup of the sauce in the bottom of a 9” x 13” casserole pan (see specifics below on type of pan you should use if you’re planning to freeze). Layer in the following: 2 sheets of matzo, a third of the cheese filling dolloped all over, 1 cup of spinach, a layer of sauce, 2 sheets of matzo, another third of the cheese filling, 1 cup of spinach, a layer of sauce, 2 sheets of matzo, the remaining cheese filling, 1 cup of spinach, remaining sauce, and then sprinkle the top with the remaining 3 sheets of matzo broken into pieces, and the reserved parmesan, mozzarella, chives, and a few turns of pepper.

Bake, covered with foil, for 45 minutes, and then for an additional 15 minutes uncovered, or until golden brown on top. Enjoy!

To freeze: I’d recommend using a foil pan that you can place directly in the oven from the freezer. Otherwise, you can use glass or enameled cast iron pan, but it would be best to defrost it in the fridge overnight before baking to avoid cracking the pan. Once the lasagna is assembled, let it cool slightly and wrap in plastic wrap or foil. Freeze for up to 3 months. To reheat, bake at 350ºf covered in foil for 1 hour 30 minutes, and then uncovered for an additional 15-30 minutes, or until golden brown on top and heated through. Enjoy!


-yeh!

photos by chantell and brett quernemoen

this recipe was created in partnership with our family!