carrot steamed buns

A long time ago, during my bangs and eyeliner phase, I had the steamed carrot buns at Dirt Candy, and I still think about them regularly because they were so good and clever! I don’t remember too many specifics other than loving that the texture of the carrots held their own against the squishy buns, and that the slight sweetness of both the buns and the carrots just went well together. And then a squirrel ran into the restaurant and everybody stayed very cool about it. These days, whenever I get the urge to throw bun parties, I like making sure to include a vegetarian option and always consider the carrot. There is a recipe for Dirt Candy’s buns online but every time I look at it I get a little stressed out because it has some ingredients that I just don’t keep on hand regularly, and whenever I make steamed buns I like to err on the side of keeping my fillings simple since making a dough and shaping buns, while extremely satisfying, is time consuming. (See: the shamelessness that is American Cheese Steamed Buns in Molly on the Range.

So when Soy Vay sent over some of their sauces I got really excited because, well, first of all, it’s basically *me* in sauce form. It was created by an Asian person and a Jewish person! And I remember seeing it in our fridge growing up. And also I saw that their Veri Veri Teriyaki sauce contained a lot of the same ingredients that I’d want to put into a carrot bun, like garlic, ginger, soy, and sesame, and immediately thought, yes, I am four steps closer now to carrot buns. So I got to work and came up with some of the most delicious pillow-y soft buns that explode with flavor! They are salty, sweet, and nutty and I love them. They’re not too difficult to make at all, and they are vegan! They’re great hot or at room temp (take them to a picnic!) or reheated from the freezer. 

I have nice buns and, look, now you can have nice buns too. 

Carrot Steamed Buns

Makes 16 buns

Steamed bun dough

1 c (236g) warm water

2 1/4 tsp dry active yeast

1 tsp + 6 tb (75g) sugar

2 c (260g) all purpose flour, plus more for dusting 

1 c (128g) cake flour*

3/4 tsp kosher salt

2 tb canola oil

*highly recommended for a fluffier texture but if you don’t have it, subbing in the same amount of ap flour is ok.


Filling

1 1/4 lbs. (about 5-7 large carrots), chopped into 1/2” pieces

1 tb canola or olive oil

1/2 tsp Kosher salt

6 tb Soy Vay Veri Veri Teriyaki sauce, plus more for serving

1 tb rice vinegar

1/4 c (34g) crushed roasted salted peanuts, plus more for topping

6 scallions, minced, plus more for topping

Sriracha

Clues

First, make the dough: In a small bowl, swirl together the water, yeast, and 1 teaspoon sugar and let it sit until it becomes foamy on top, about 5 minutes.

In a large bowl, mix together the flours, salt, and remaining 6 tablespoons sugar. Pour in the yeast mixture and oil and mix to form a dough. Turn onto a surface and knead for 5 minutes, dusting with flour as needed, until dough is smooth and slightly sticky. Transfer the dough to an oiled bowl, turning to coat, cover the bowl with plastic wrap or a damp towel and let it rise for 2 hours, or until doubled in size. 

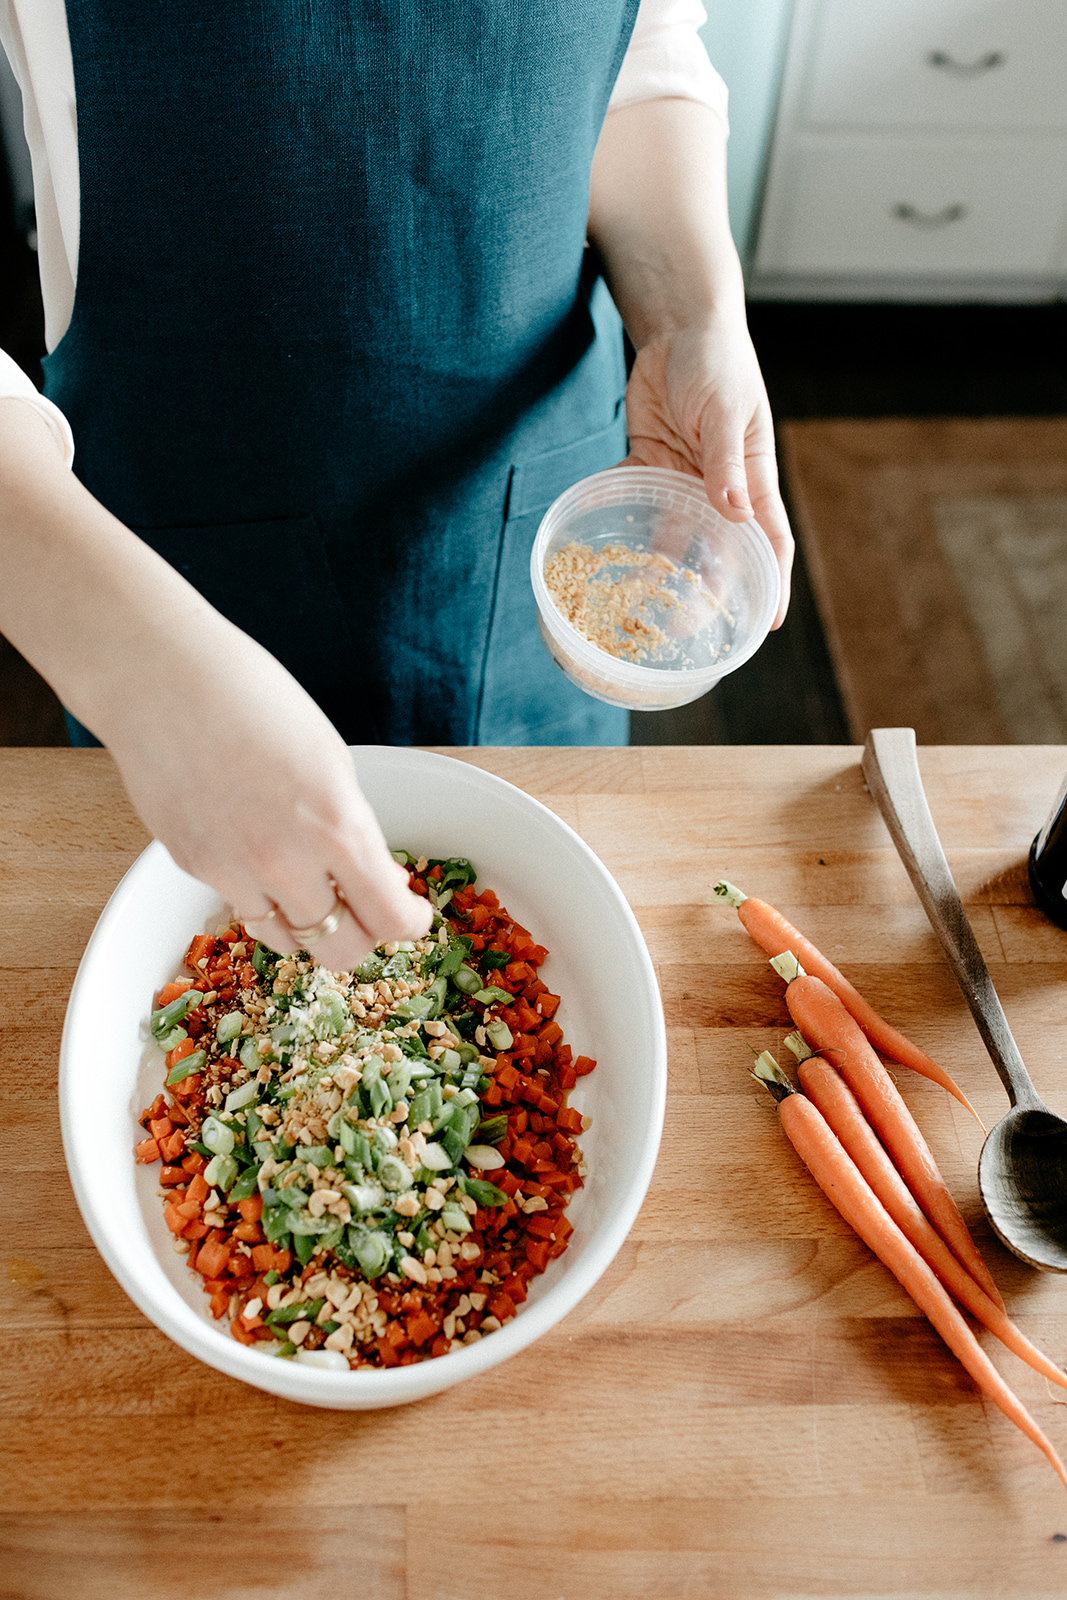
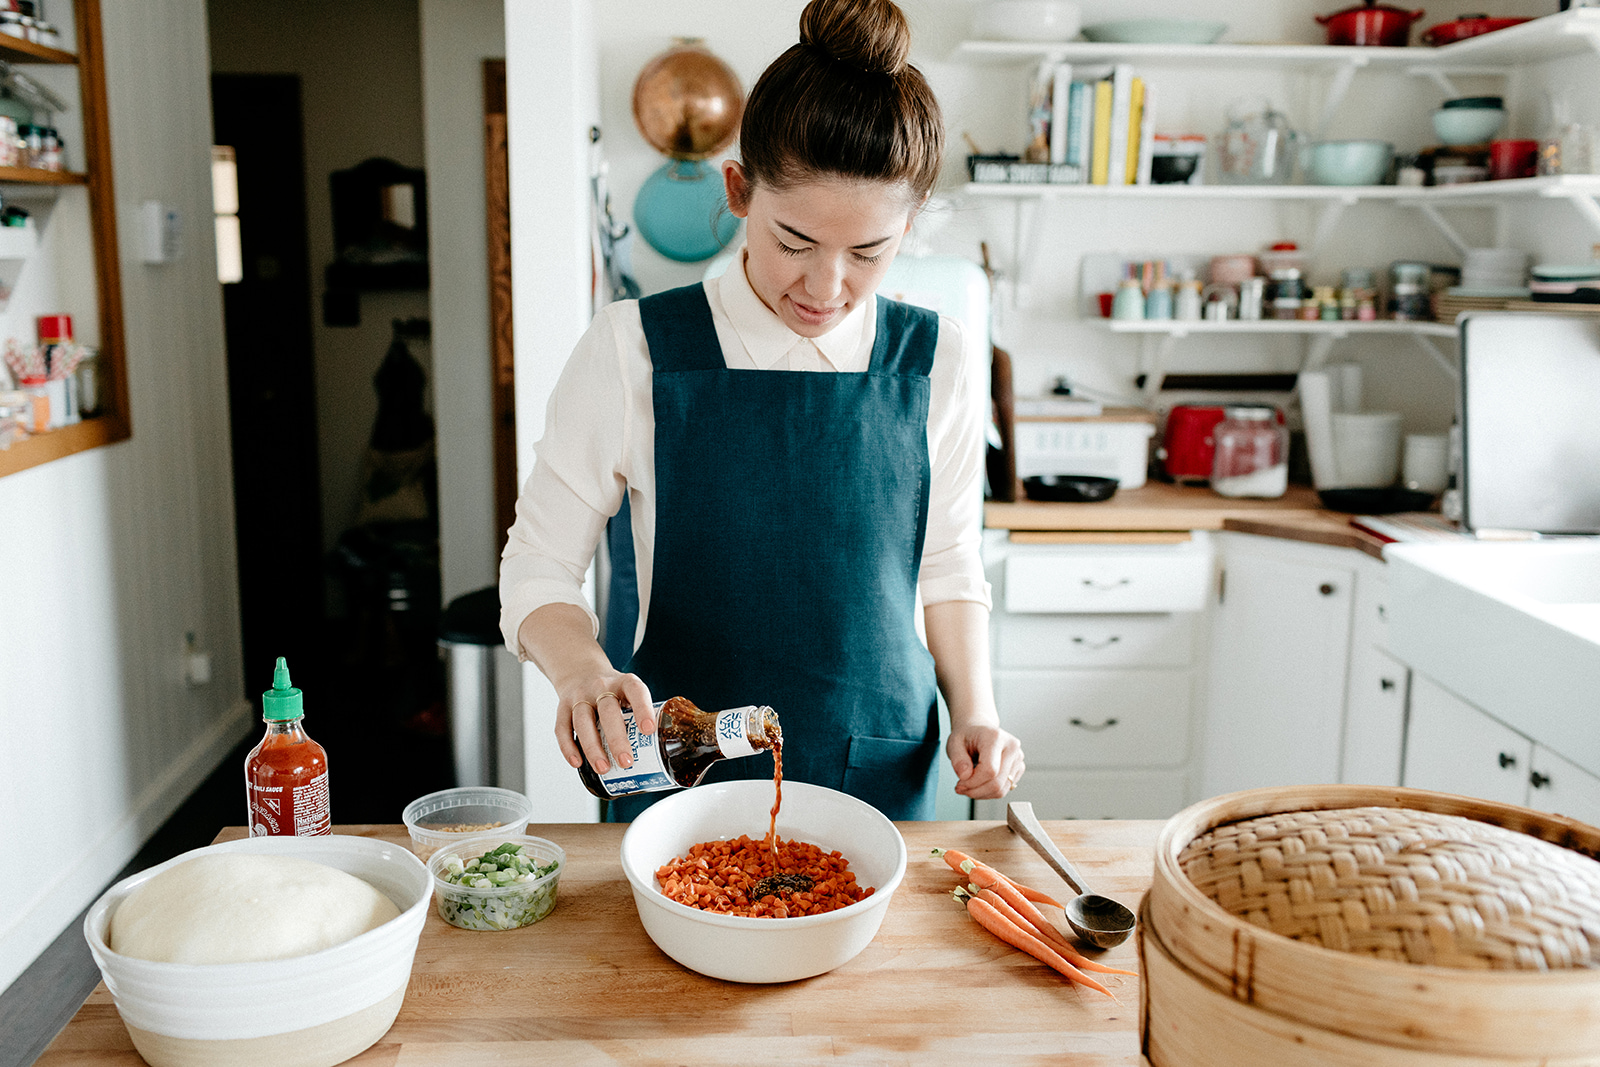
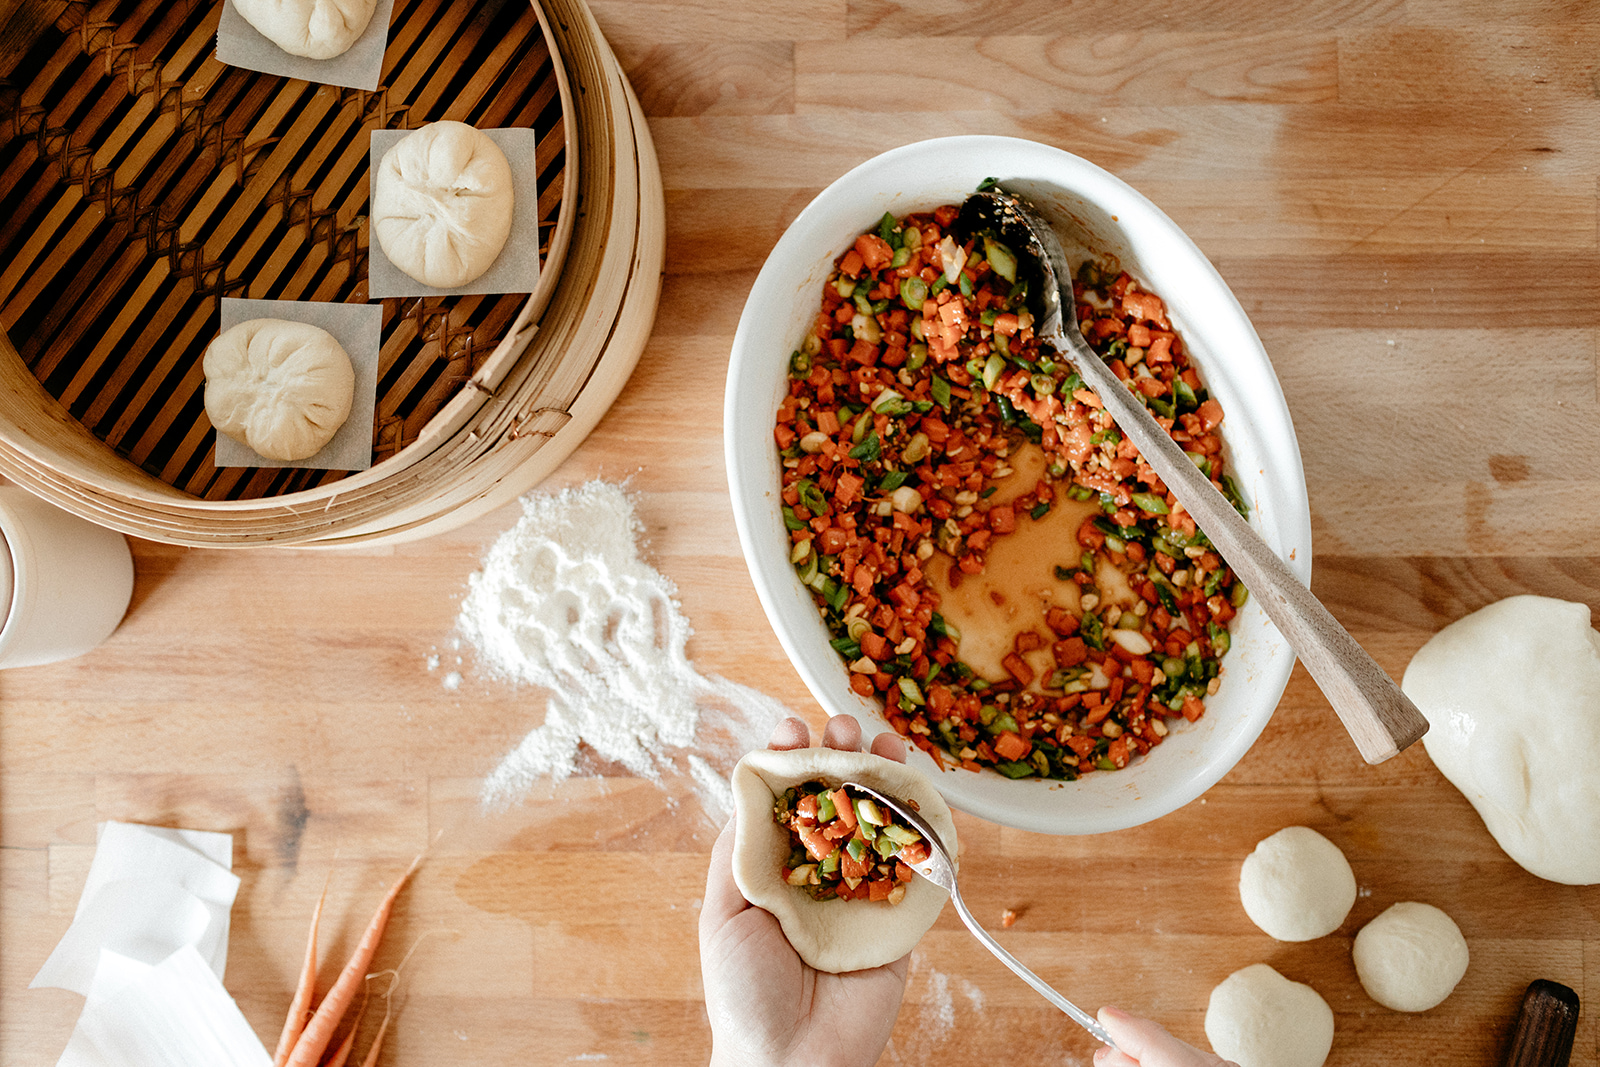
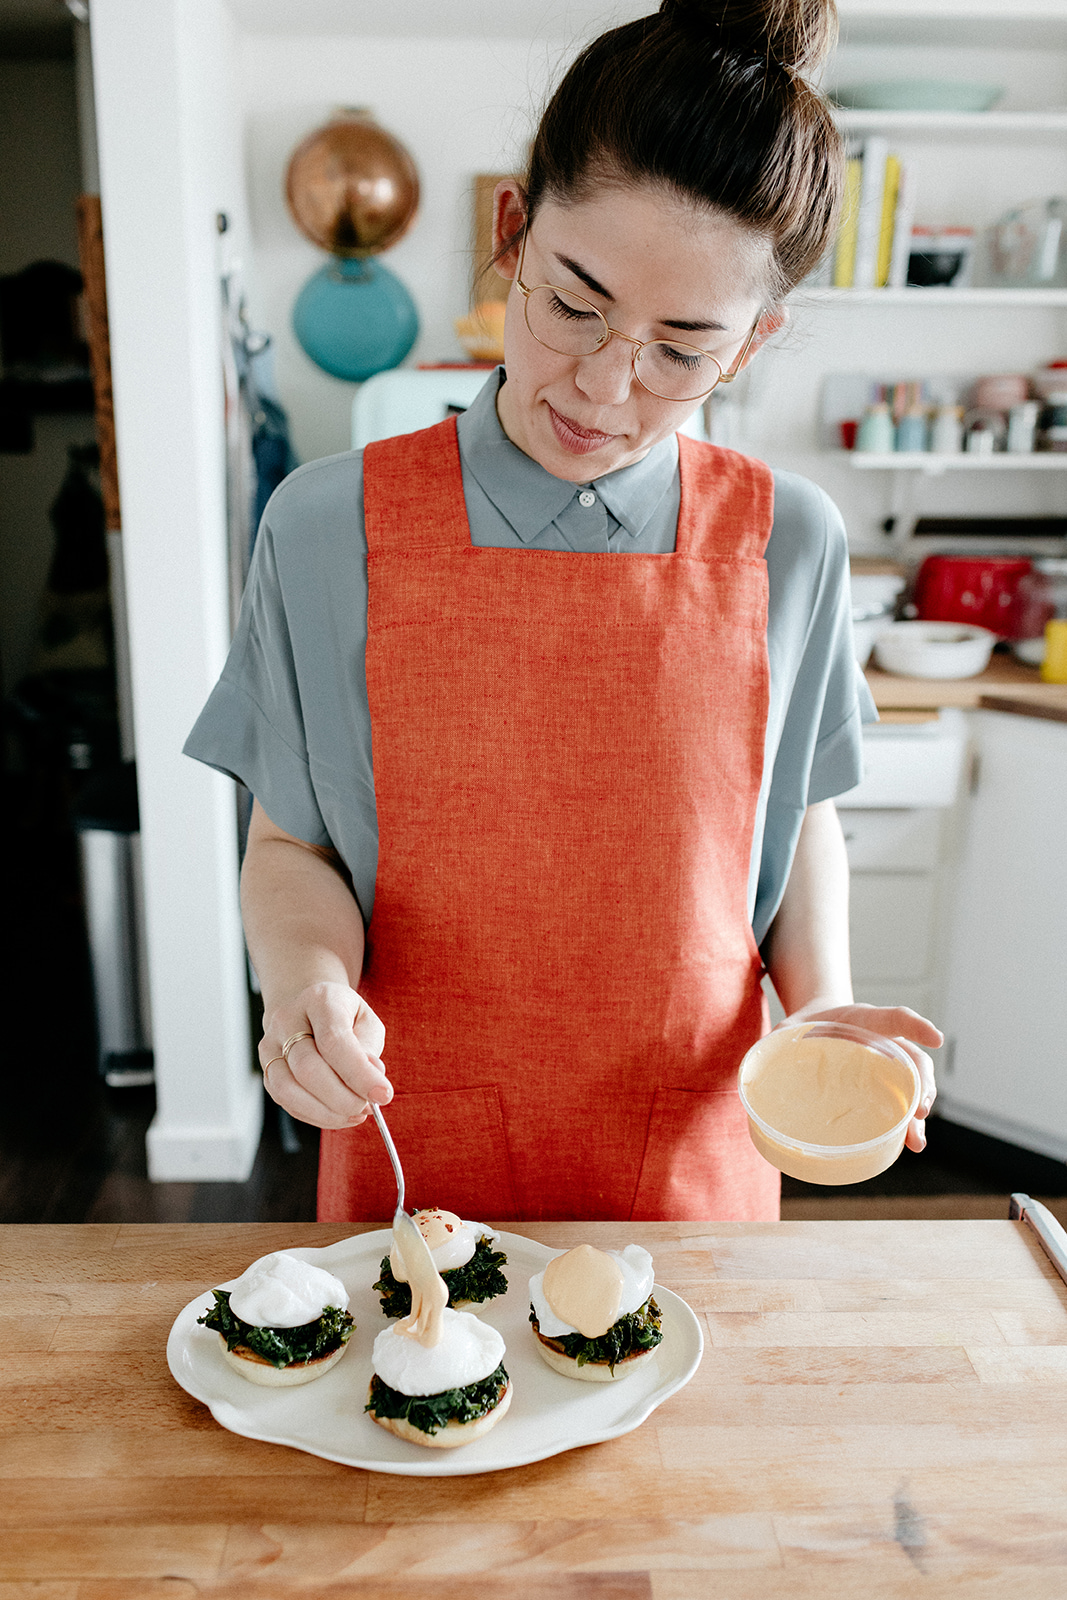
While the dough is rising, make the filling: Preheat the oven to 425ºf. Place the carrots in a baking dish and toss with oil and salt. (I like baking them in a high sided dish like a casserole so that I have room to add the other filling ingredients and then there’s no need to transfer to a bowl.) Bake for 30-35 minutes, until tender, and then let cool for 5 minutes. Add the teriyaki sauce, rice vinegar, peanuts, scallions, and a drizzle of sriracha and stir together. Set aside to continue to cool. It’s ok if it’s still a little warm when it’s time to fill the buns. This filling can be made a day in advance and kept covered in the fridge.

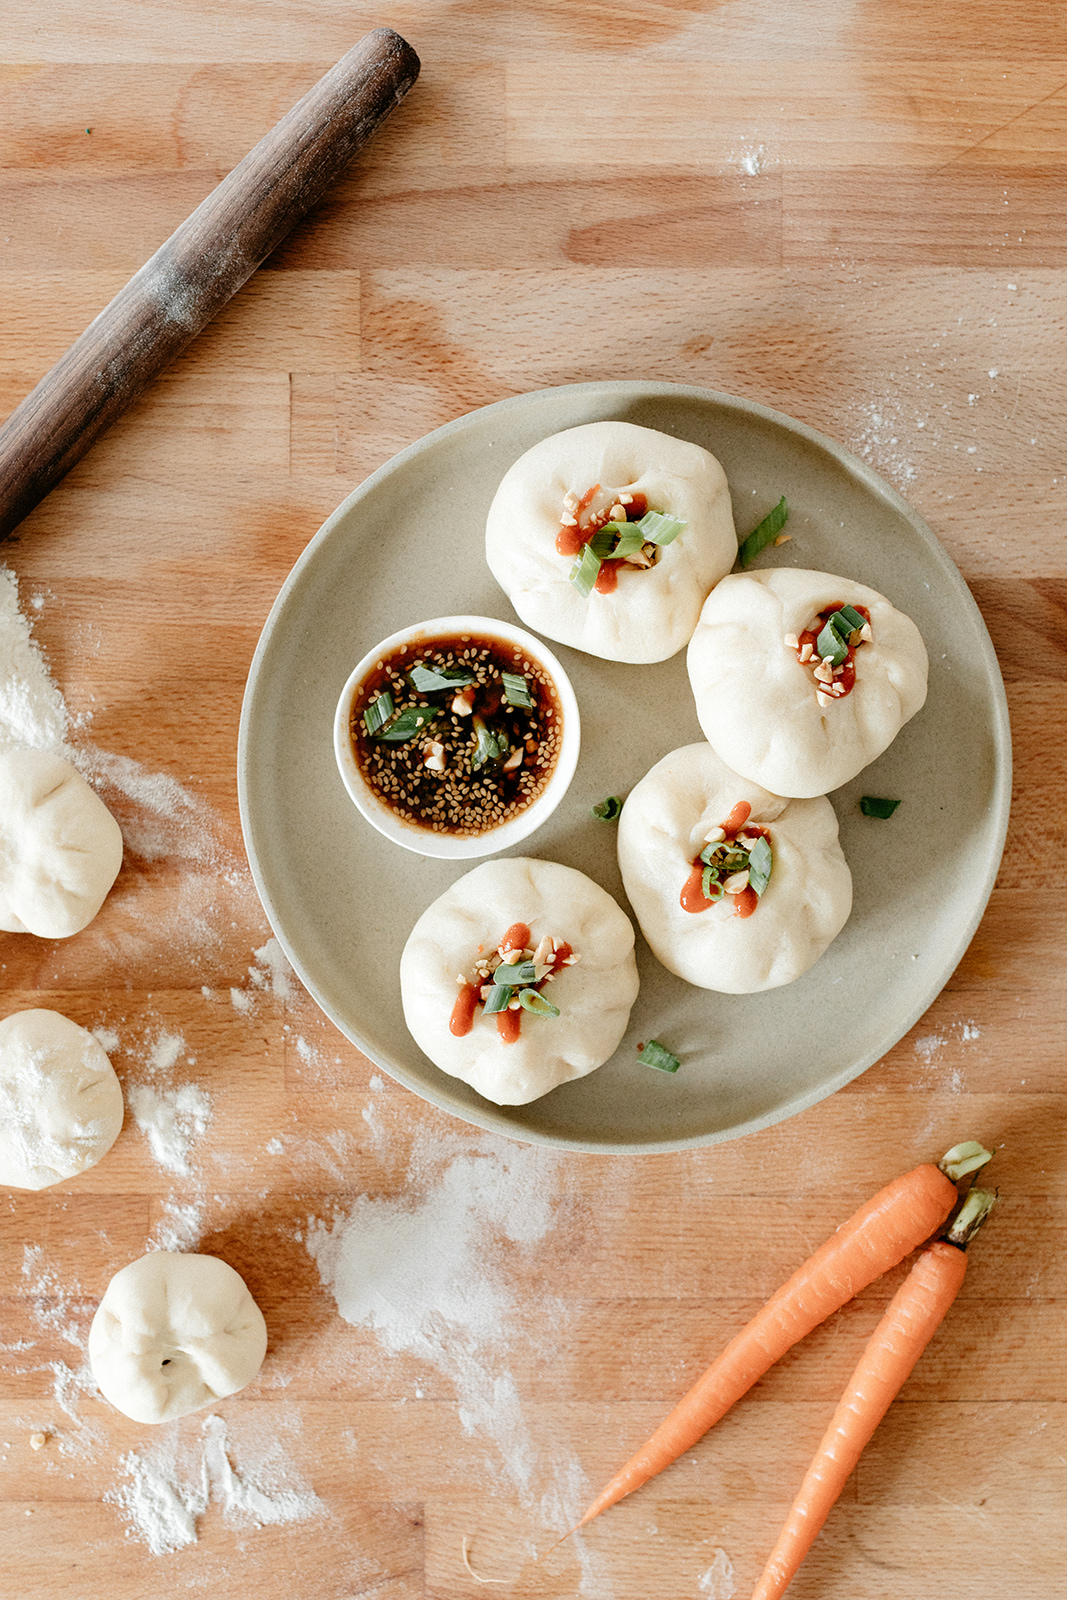
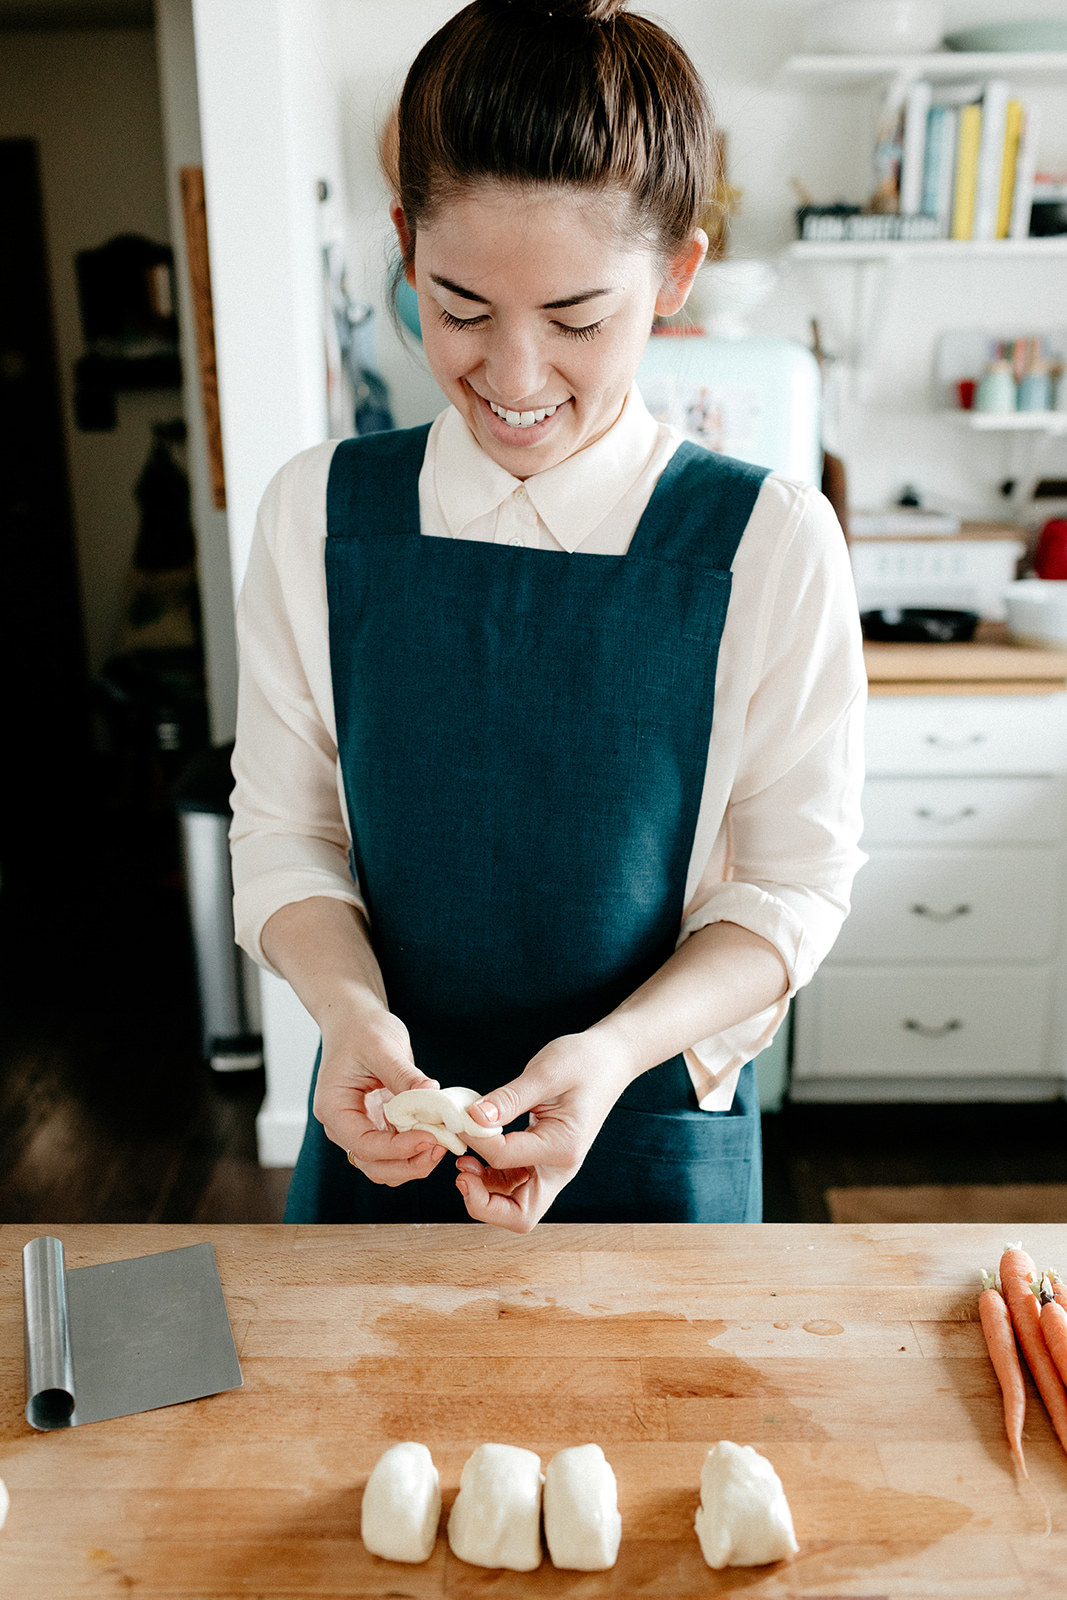
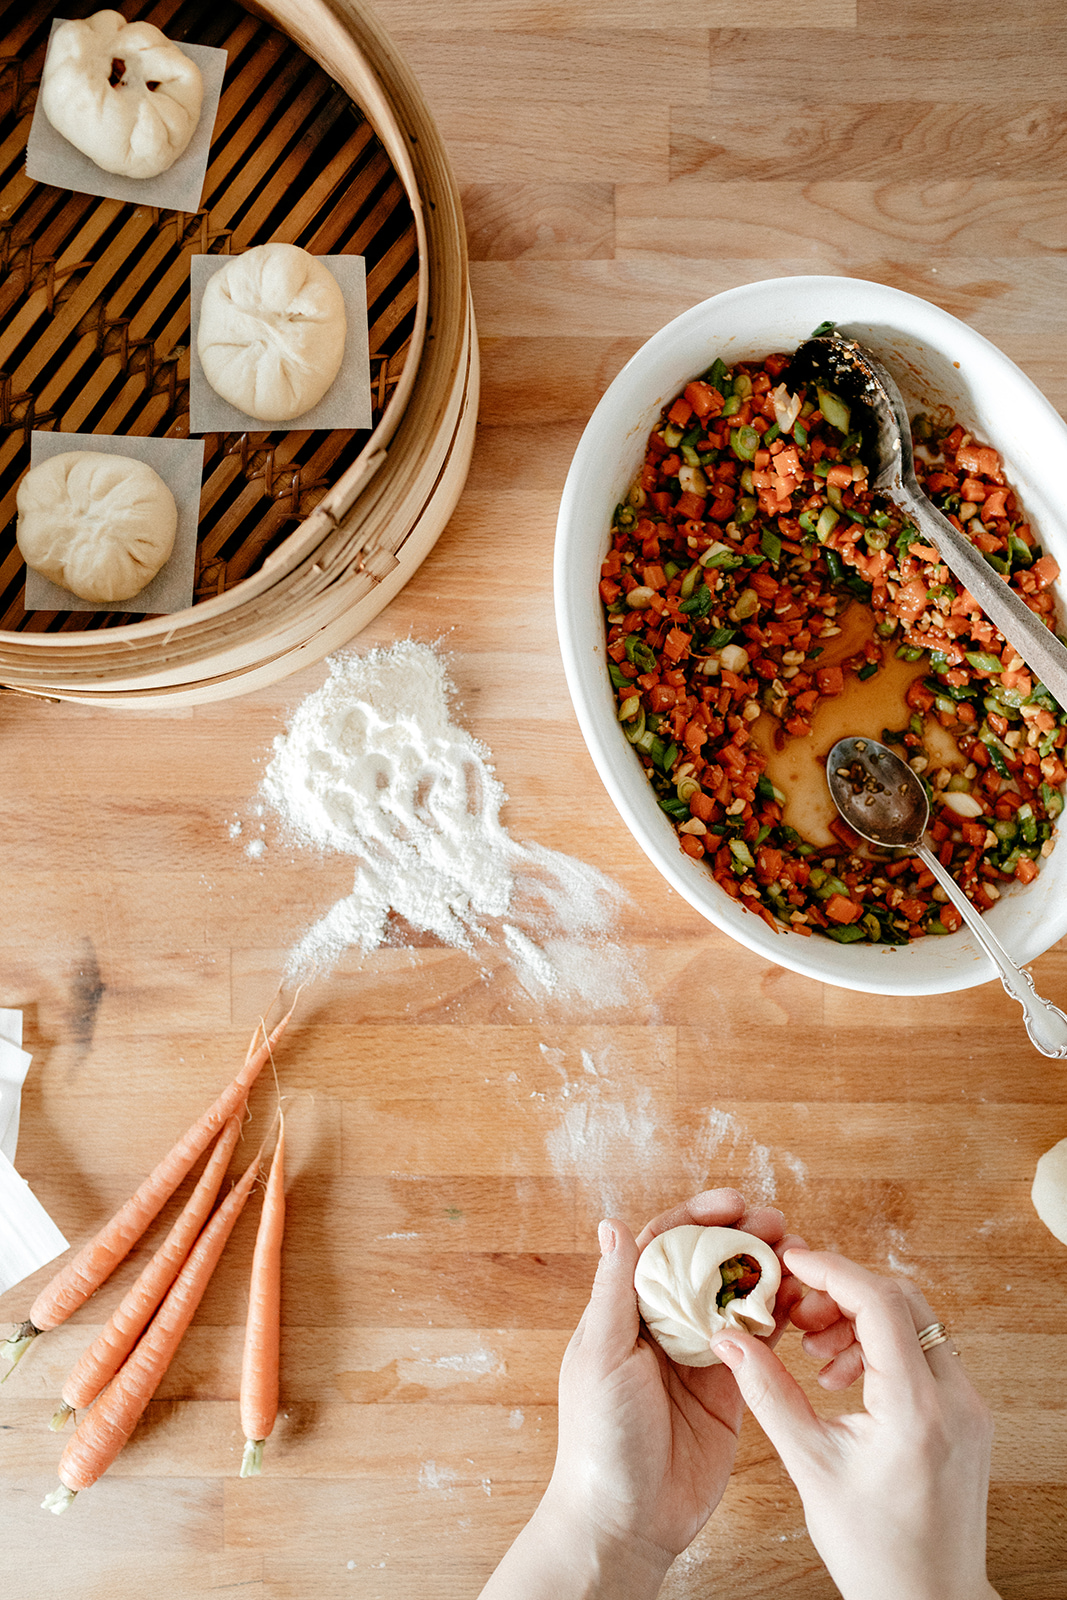
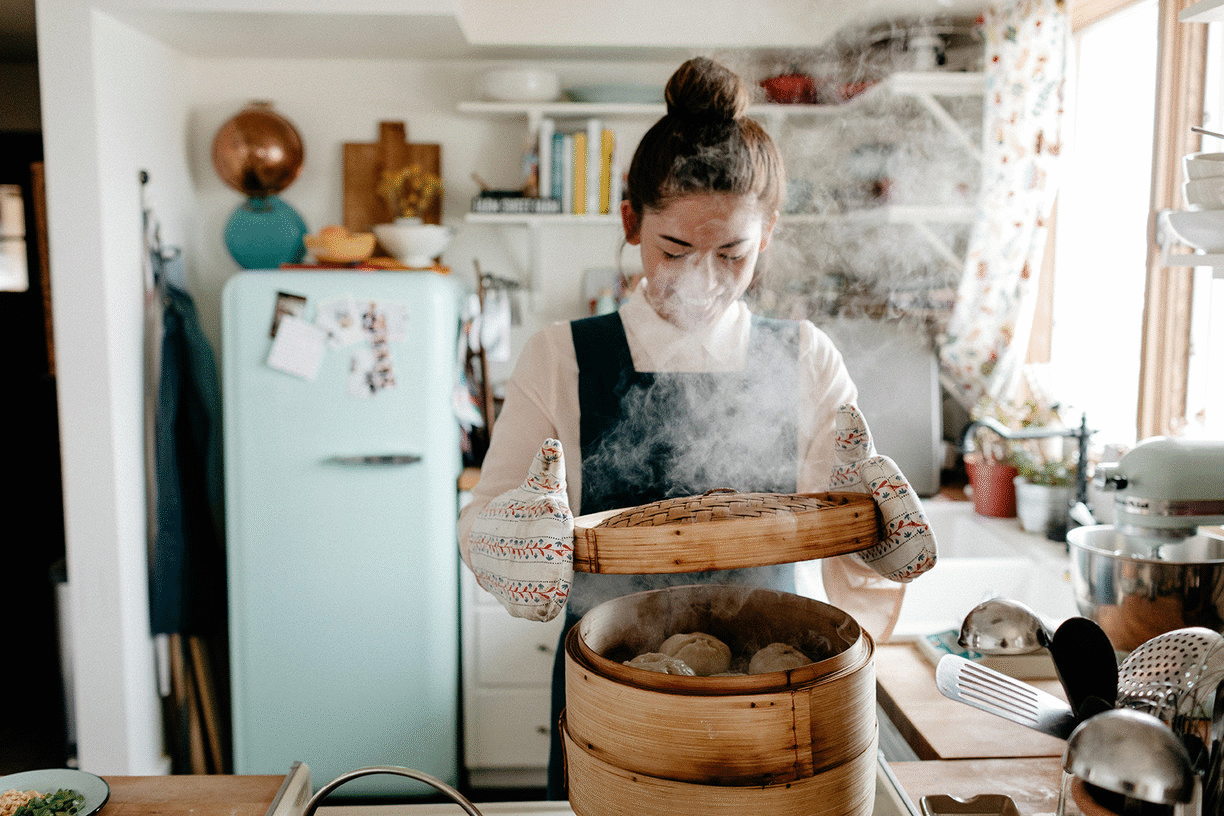
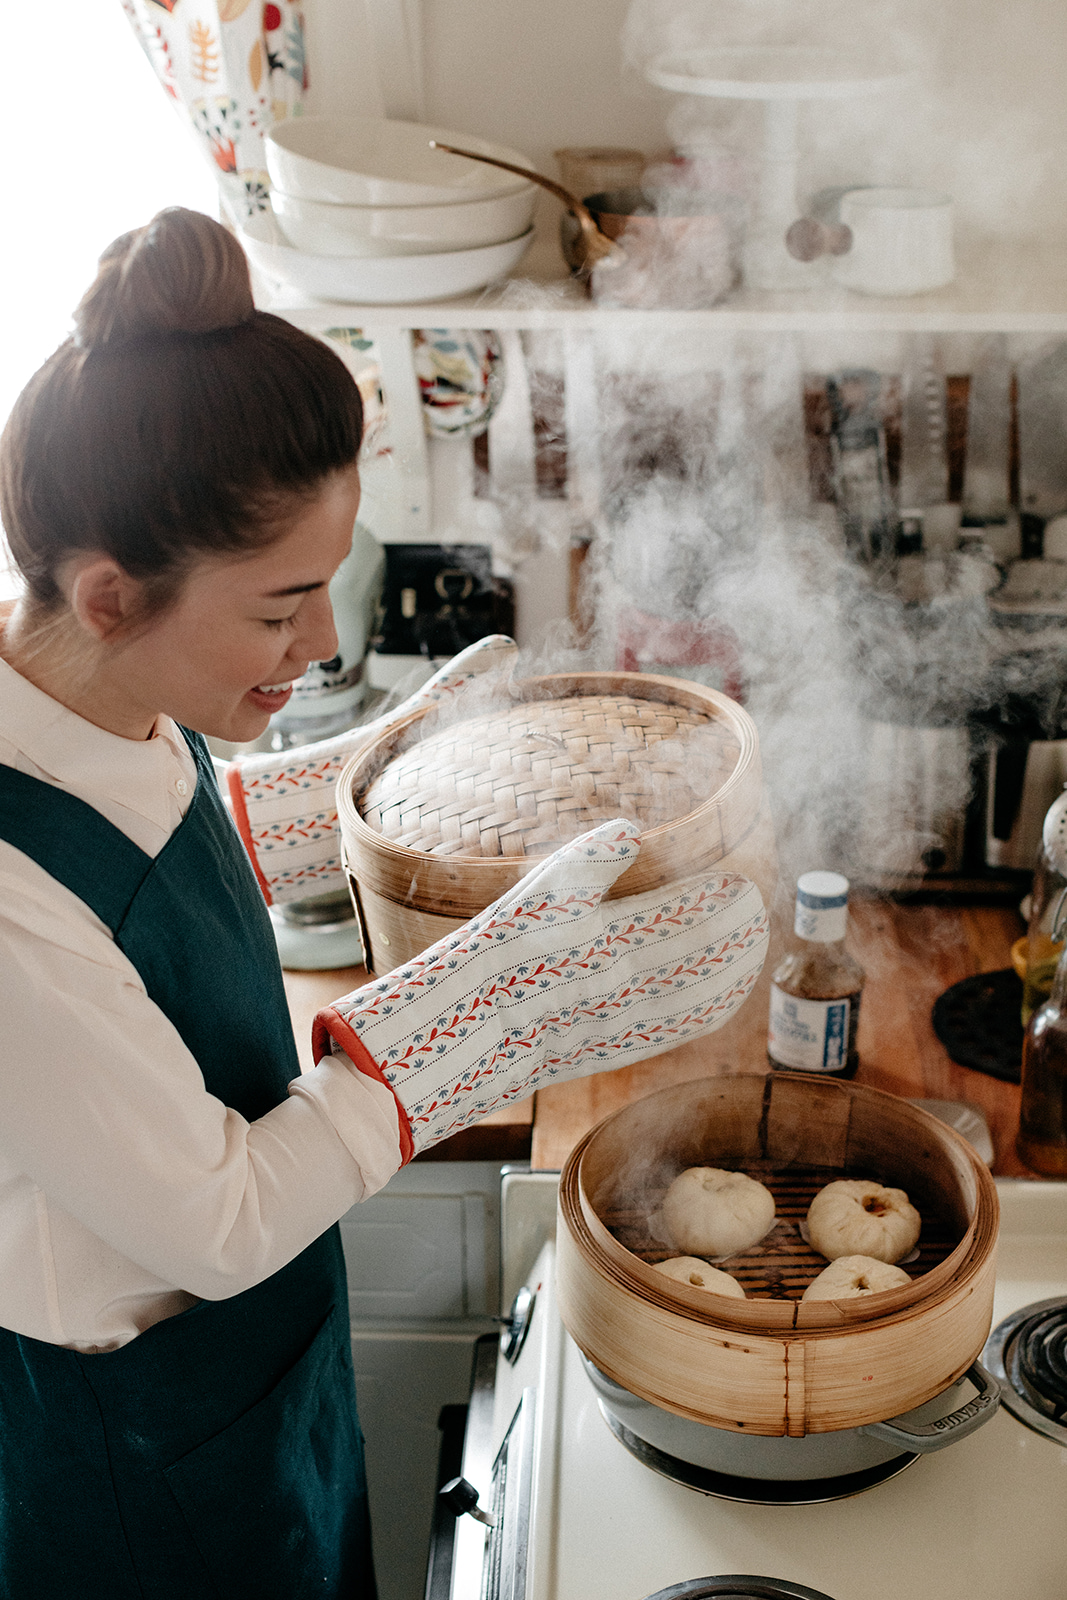
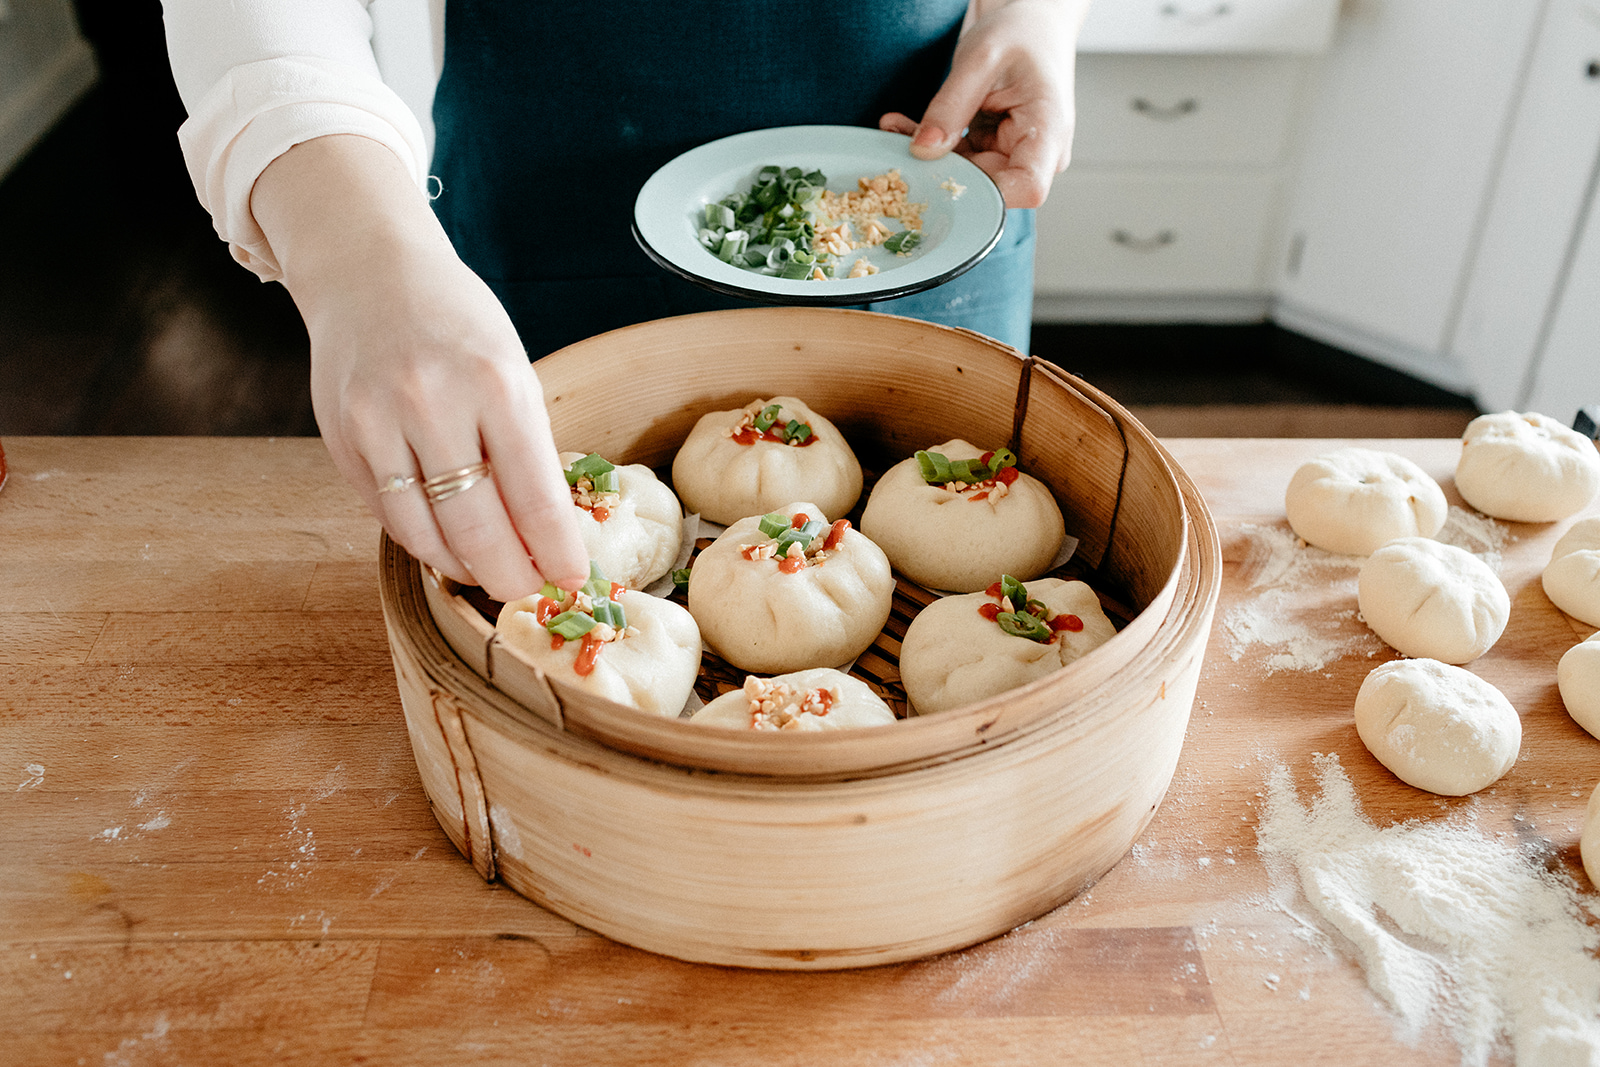
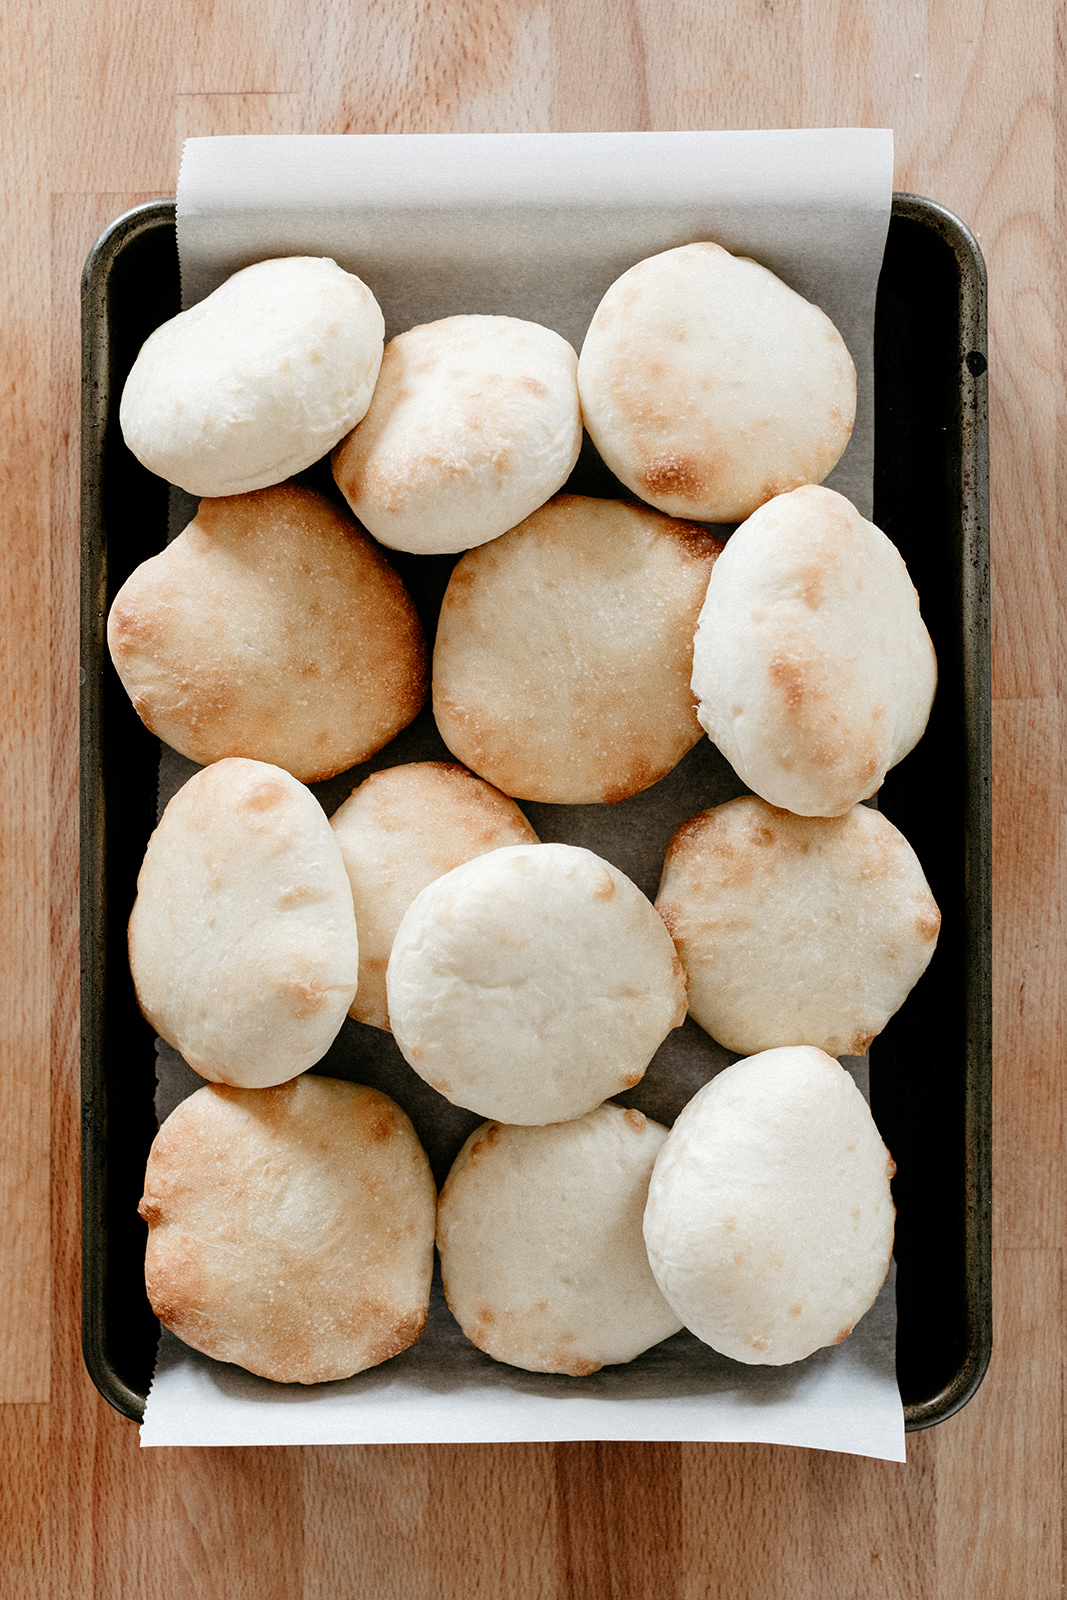
Once the dough has completed its rising time, turn it out onto a clean work surface and divide it into 16 balls. Keep the dough covered when you’re not working with it. Working with 1 ball at a time, roll them out to 4 1/2-5” circles, fill with about 2 heaping tablespoons of filling, and pinch the edges shut to seal well. Now is a good time to youtube steamed bun pleating videos! Place on individual squares of parchment paper, about 3” by 3”, and space them out in a steamer basket 1 1/2-2” inches apart. (If your steamer doesn’t fit all of the buns at once, steam them in batches.) Cover and let rise 30 more minutes.

Bring a large pot of water to a boil over high heat. Place the steamer over it and steam the buns for 20 minutes, until light and fluffy. To serve, top with another little drizzle of sriracha, and some sprinkles of peanuts and scallions. Dip in teriyaki sauce and enjoy!

Leftovers can be cooled and kept in the fridge for a couple of days or in the freezer for a few months. To reheat, wrap them in a damp paper towel and microwave until heated through.

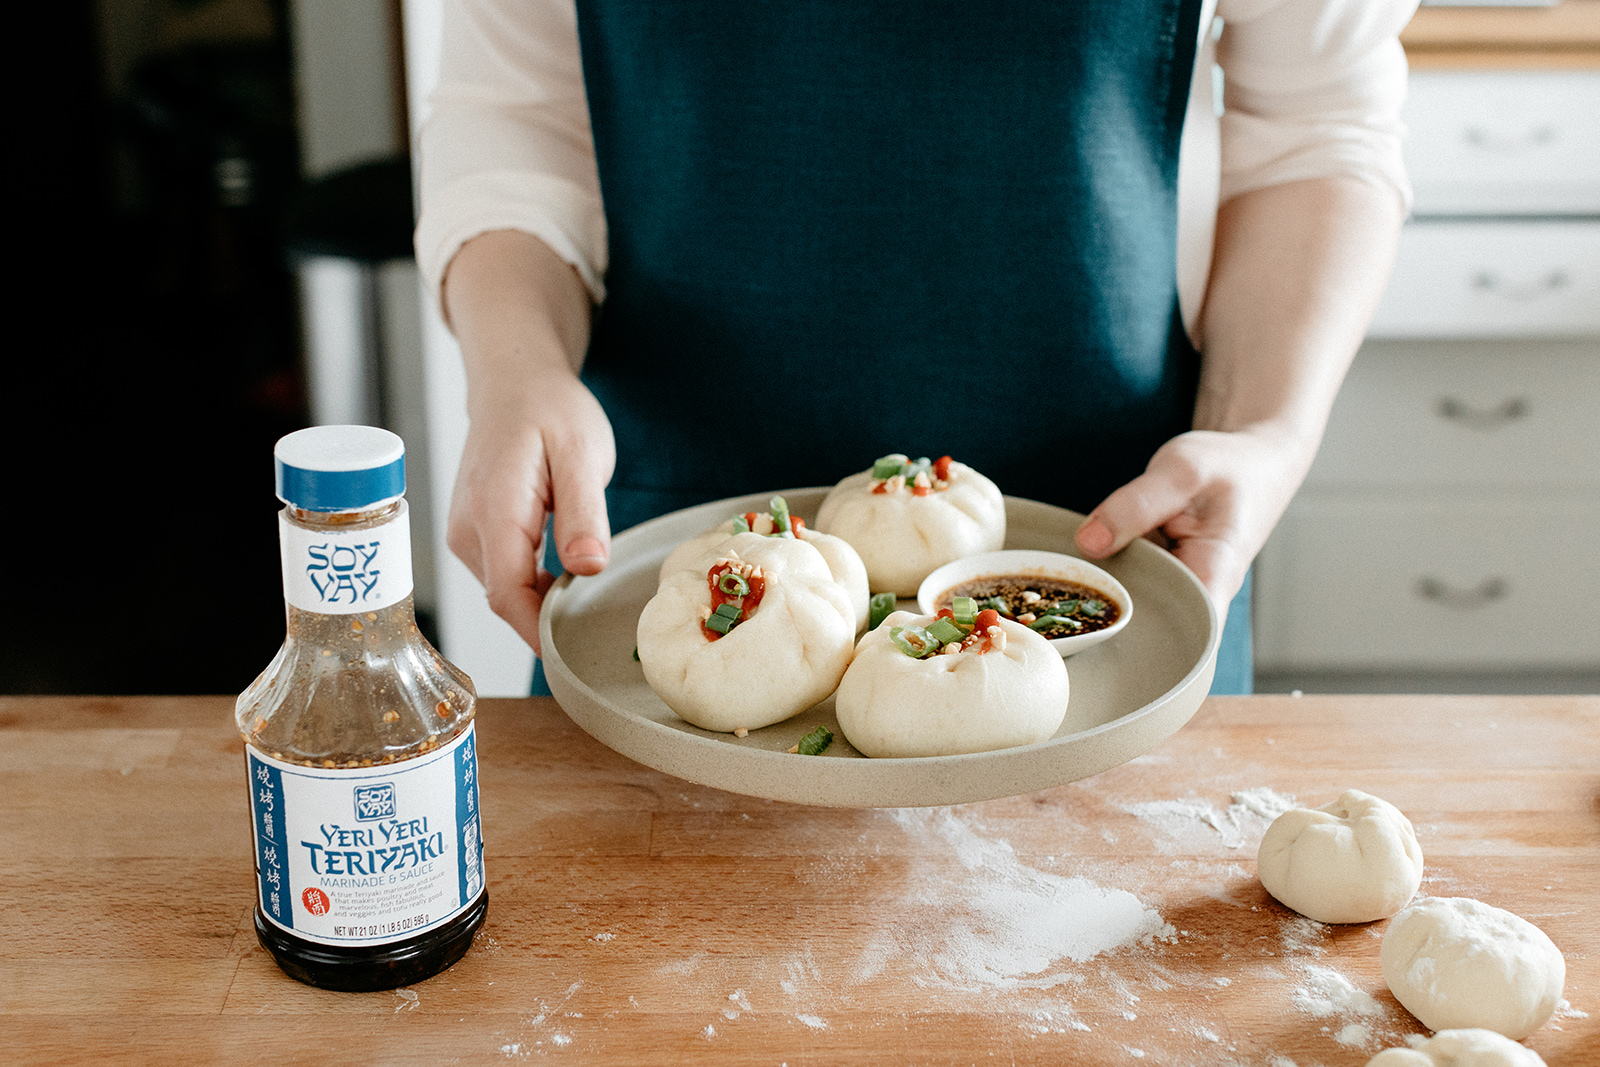
thank you, soy vay, for sponsoring this post! shop here with discount code SOYVAY10 for 10% off!

photos by chantell and brett quernemoen

pistachio nutter butters + a giveaway!

Hello to my birthday month, the month where I get to chill a little more, eat a little more, and spend a little more, at least at Sephora, so I can get my free birthday lip gloss. Every day feels like pizza friday during birthday month! And this month I’m going to Stars on Ice so like, wow, if you thought I freaked out at the Olympics, just wait until Meryl and Charlie take the ice. I cannot wait.

Here are some photos from over the weekend when I met Nile’s Beethoven dog puppy, Frida, and then went to the Empire gala! We danced our butts off, wore big dresses, sang, it was the perfect eve to birthday month. 

Now I’m kicking off May with two recent objects of my obsession: pistachio nutter butters and jewelry that reminds me of rainbow sprinkles. Pistachio nutter butters felt like such an obvious thing to do, given my love of pistachio butter (see: pistachio buttercream and pistachio pudding pops). So I replaced the peanut butter in my favorite peanut butter cookie recipe for pistachio butter and they came out chewy and amazing. And then when sandwiched with creamy pistachio frosting, they just got better. They are thick nutty wonders of the cookie world. And, yes, they deserve to be rolled in sprinkles.

Speaking of sprinkles, I have the most fun giveaway happening over on Instagram for the colorful ring that I’m wearing in these photos! I have been a fan of Elisa Solomon’s jewelry for years, ever since finding her rings at Catbird. (I sometimes just go onto the Catbird site just to look at this ring). Her jewelry is right up my alley, it’s colorful and whimsical and dainty and every time I look at my ring I think of rainbow sprinkles!! So I could not be more excited to partner with her on this giveaway. To enter, head over to Instagram (but if you don’t have Instagram, you can leave a comment here)! And be sure to check out her other jewelry, like this Sven cat ring!!! 


Pistachio Nutter Butters

Makes 8 large cookies

Ingredients

Cookies

1 1/4 c (160g) raw pistachios
1 1/4 c (160g) raw almonds
1/4 tsp kosher salt
zest of 1/2 lemon
1/2 tsp almond extract
1 c (200g) sugar, plus a couple more tablespoons for rolling
1 large egg

Filling

6 tb (85g) unsalted butter, softened
1 c (120g) powdered sugar
Pinch of kosher salt
1/4 tsp vanilla
1/4 tsp almond extract
a pinch of lemon zest
Optional: splash of rosewater

Sprinkles
 

Clues

Preheat oven to 350ºf. Line two baking sheets with parchment and set aside.

To make the cookies, in a high powered food processor, blend the pistachios and almonds for 10-15 minutes until spreadable. Remove 1/4 c (or 64g) of the mixture and set aside for the filling. To the food processor, add the salt, lemon zest, almond extract, and sugar to the food processor and blend together. Add the egg and blend to combine. Scoop out 16 tablespoon sized balls and roll in sugar. Place on baking sheets 1 inch apart and flatten with two presses of a fork to get a crisscross pattern. Bake for 12 minutes (they’ll still be very soft but they’ll firm up as they cool). Let cool on the pans for 10 minutes and then transfer to a wire rack to cool completely.

To make the filling, in a stand mixer fitted with a paddle attachment, blend together the butter and reserved pistachio butter. Add the powdered sugar and blend to combine. Add the salt, vanilla, almond, lemon zest, and rosewater, if using. 

Fill a piping bag with the filling and pipe in the centers of half of the cooled cookies, sandwich them with the other half of the cookies and then roll in sprinkles. Enjoy!


-yeh!

photos by chantell and brett quernemoen!

apron from enrich and endure, cookie plate from le creuset

pita and greens benedict with feta cream

Not to talk about the weather but because a dramatic shift in weather also means an actual dramatic shift in our life as farm humans: it is spring!! The snow has melted, the birds are chirping, the heat has been turned off, I’m deep in #VestLife, and the chickens are sooooo happy that they have more sunlight and grass to waddle around in. Last week, Eggboy put his farm hat on for the first time this year which means that spring planting is near and he’ll soon start coming in later and later at night smelling like sweat and dirt. The fields are bare right now but in a few weeks they’ll have little sprouts popping out all over and soon we’ll have a garden!!!! And I’ll no longer have to spend $5 on 15 leaves of basil at the Hugo’s on 32nd. 

Since I’m not the one who tends to the fields, the arrival of spring for me pretty much just means that I work slightly longer hours in the kitchen since supper time is way later, and I go to the gym at night by myself. Usually by the time I get back from the gym, Eggboy’s in and it’s Westworld o’clock, even though the sun doesn’t go down until really late but maybe that’s a good thing because Westworld is creepy.

It’s usually in these warmer months when I start taking on bigger kitchen projects, like learning buttercream flowers or bagels, and I think that this is the year I’d like to finally keep a sourdough starter alive and learn to make good crusty bread.

Ok let’s talk bout this recipeep! 

A solid 70% of the time, my mom and I have the same exact brunch order: eggs benedict hold the hollandaise. Just like pork and creamed soups, hollandaise sauce was one of those things growing up that *other people ate*. Who, really, I can’t be sure, but no one in our family. And I think it was simply because hollandaise sauce is heavy and unhealthy, and, to be frank, completely unnecessary. Or, maybe it’s necessary on other things, but a well-salted and adequately Tabasco’d perfectly poached yolky egg on thick Canadian bacon (I know! Pork! Somehow bacon never counted as real pork in our house!) and a toasty English muffin is nary in need of more. Hollandaise actually kind of hardcore effs it up because it takes a relatively healthyish breakfast option to bellyache status and, honestly, I wouldn’t miss hollandaise if it ceased to exist. Oops, this got dark! But the more I think of it the more I really want to just go back in time and convince the eggs benedict inventor to stop after the egg. 

Here’s a version of eggs benedict that does have a sauce but it’s a better sauce than hollandaise, for it is feta yogurt. It’s a light flavorful deal that adds loads of brightness and I realize I just shat all over the very idea of a sauce on a benedict but in my opinion it makes more sense here. All it does is tie together some great garlicky kale, a poached egg, and a fluffy homemade pita, almost more like a dressing than a sauce. And with this vegetarian version, the feta yogurt fills in for the ham in the protein department. This eggs benedict is salty, creamy, garlicky, and green. It’s one that doesn’t require you to order it without the sauce and a colorful main for your next brunch party. 

And you know what’s cool?? You can poach eggs in advance: Simply transfer freshly poached eggs to an ice bath and refrigerate them in a container of water for a day or two until serving time. When it’s time to serve, reheat them by submerging them in hot water until warm. (more details here!)

As for the thick pitas you see: I made one batch of dough (recipe here) into 16 pitas and rolled them out just lightly, molding them more into slightly flat bread rolls as opposed to a flatbread, so they could be thick enough to get sliced in half. 


Pita and Greens Benedict with Feta Cream

Makes 4

Ingredients

2 oz feta, crumbled

1/2 c (113g) whole milk greek yogurt

1/2 tsp aleppo pepper or paprika, plus more for sprinkling

black pepper

Olive oil

2 cloves garlic, sliced

6 oz kale, thinly sliced

Kosher salt 

2 tb water

Juice of 1/2 lemon

4 large eggs

2 thick puffy pitas, halved

Clues

In a high speed blender, combine the feta, yogurt, aleppo or paprika, a few turns of pepper, and 2 tablespoons of olive oil and blend until very smooth. Taste and adjust seasonings if desired. Cover and refrigerate until ready to use (this can be made a day or two in advance). 

In a large skillet, heat 1 tablespoon of olive oil over medium heat. Add the garlic and cook for a minute. Add the kale, a few pinches of salt, and the water, and cook, stirring occasionally, until softened and wilted. You may need to add the kale in batches if it’s too much to fit in all at once. Season with pepper and squeeze with lemon. Turn heat down to low just to keep this warm while you poach the eggs.

To poach the eggs, bring a large pot of water to a boil. Crack the eggs one or two at a time into a fine mesh sieve and let any loose bits of egg whites seep out (this step isn’t totally necessary but it will decrease the amount of wild rogue egg white bits) and transfer to a bowl. Carefully lower them into the boiling water. Cook until the whites are firm but the yolks are still runny, 2-3 minutes. Use a slotted spoon to remove to a paper towel or clean kitchen towel to dry off any excess moisture. 

Toast or grill the pitas. Drizzle with a little olive oil and top with the kale and eggs. Spoon on the feta cream and sprinkle with fresh black pepper and a pinch of aleppo or paprika. Enjoy!


p.s. Enrich and Endure makes Crossback aprons now! Omg, I am obsessed. Keep an eye on Instagram, I’ll be doing a giveaway with them in the coming weeks!!

-yeh!

photos by chantell and brett quernemoen

fresh mint olive oil cake with labneh and honey

This color is real!!! And, no, Kermit was not harmed in the making of this. This is really just a basic olive oil cake that simply has a bunch of fresh mint purée mixed in to give it the most delightfully fresh herbal flavor and of course this bright natural color. It’s inspired by a dessert that Lily, Alana, and I had at The Exchange Restaurant last month that was basically a bowl of crumbled bright green cake topped with yogurt sorbet, a lemony drizzle, and baklava crumble. We ordered it expecting a regular yellow olive oil cake but when it arrived and we saw the color we were like omgomgomg and immediately did that thing where all three of us suddenly block out everything that’s going on around us in order to decipher what’s happening in our mouths and in front of our eyes. We poked at it, snooped around its every nook and cranny, and took very deliberate tastes in order to figure it all out. It’s so good eating with them. The only thing that could have improved such a moment is if one of us had raised up a monocle or magnifying glass. We figured it must have been a few different herbs in there, basil maybe, or parsley even, and then we got on the subject of spinach cupcakes (ew?), and finally had a chat with the server about what all was happening. And it turned out that it was just mint! Which is wild because it didn’t taste specifically minty, the most minty thing about it was that it had a faint version of that fresh feeling you have after brushing your teeth. Past that it was sort of generically herbal, which was cool because it allowed the yogurt sorbet and pistachio baklava crumble to shine through. And above all it was delicious. One of the best most inspiring desserts I’ve ever had. I turned around faster than I’ve ever turned around in my life and flew home and started experimenting with olive oil mint cakes. 

And I came up with this one! It’s a riff on the grapefruit olive oil cake from Yogurt book and it is really fun to make. You might think that the mint purée color would fade in the oven but it stays so bright. Sorry I am like one month late for St. Patrick’s Day, but actually I’m just 11 months early. 

I originally intended to slather this in a classic sweet cream cheese frosting but at the last minute before bringing it to Mackenzie’s birthday party I decided to go deeper into my nod to The Exchange dessert and just use labneh with a honey drizzle and pistachios. I loved it because it was so aggressively not sweet. It was definitely not your typical happy birthday sugary cake though so because of this I was trying really hard to figure out what all of my friends thought of it. The thing about being surrounded by so many nice Midwest people however is that they will not tell you if your cake is bad!! Emily said it tasted *fancy* so there is that?? I’ll leave you with this: when it comes to assembling this cake, choose your own adventure. If you’re hankering for a classic sweet frosting use a standard cream cheese frosting. But if you’re celebrating a sophisticated 30-year-old birthday party then try out the labneh option (as written below)! You can always add more honey drizzles. If you can’t decide, use some of the cake scraps as test bites and concoct your frosting accordingly.  


Fresh Mint Olive Oil Cake with Labneh and Honey

Makes one 2-layer 6” cake

Ingredients

Cake:

1 c (50g) firmly packed fresh mint leaves

1/2 c (118g) whole milk or unsweetened almond milk

1 1/2 c (190g) all-purpose flour

1/2 c (56g) almond meal

1 tsp kosher salt

1 tsp baking powder

1/4 tsp baking soda

Zest of 1 lemon

3/4 c (150g) extra virgin olive oil

1 1/4 c (250g) sugar

2 large eggs

1/2 tsp vanilla


Assembly:

About 1 1/2 c (338g) labneh

crushed pistachios

honey and/or turbinado sugar

lemon zest

sliced kumquats, optional

Clues

Preheat the oven to 350ºf. Grease and line the bottoms of two 6” pans with parchment and set aside.

Rinse the mint leaves and then ring them out very well. In a high powered blender like a vitamix, blend the mint and milk together until very smooth. Set aside. In a medium bowl, whisk together the flour, almond meal, salt, baking powder, baking soda, and lemon zest. In a large bowl, whisk together the olive oil and sugar until combined.  Add the eggs, one at a time, whisking very well after each, and then add the vanilla. Add the dry ingredients and mint mixture in three alternating additions, whisking after each until just combined. Pour into the pans and bake until a toothpick inserted into the center comes out clean; begin checking for doneness at 25 minutes. Let cool in the pans for 10 minutes and then transfer it to a wire rack to cool completely. Level off the tops.

Spread half of the labneh on one of the layers and top with pistachios, honey or turbinado, and a little bit of lemon zest, and then place the other cake layer on top and spread on remaining labneh. Decorate as desired with pistachios, honey or turbinado, lemon zest, and sliced kumquats, if using. Enjoy! 


-yeh!