a chrismukkah kransekake

Around here, it just isn’t the holidays if, after being buried under a mountain of cookies all month, I don’t then emerge to make a holiday cake. It usually has marzipan or a storm of coconut snow or some type of gingerbread house-inspired element, and it’s typically my contribution to Nick’s extended family’s holiday party. This year I decided that it was time to tackle the magical Kransekake!

Kransekake is a Norwegian and Danish cake that’s traditional to have at big celebrations like weddings, Christmas celebrations, and Syttende Mai (Norwegian Constitution Day). In my eyes it’s the centerpiece of the celebration. It presides over the party. Whenever I’m in the room with one I just gaze at it with heart eyes because it’s so stunning and geometrically pleasing. The circles stacked up look so clean and pretty and I just always assumed that it would be extremely complicated and time consuming to make. So I started my research months ago and tapped friends and family for their recipes and tips. I learned of secret almond paste sources and admired Erin’s gingerbread version and got the story from Chantell and Brett on the wedding tradition of pulling off the top ring to see how many other rings stick to it and that symbolizes how many children you’ll have (!!!) Hah. I love it. 

Probably my favorite thing that I learned was [whispers] that it’s actually easy to make. It may look delicate and time consuming, but in reality it’s quite sturdy and pretty difficult to screw up. The dough is easy to work with and there’s no gluten in it so you don’t have to worry about overworking it. The only thing that requires pre-planning is ordering the molds on Amazon. Past that, you don’t need a stand mixer or fancy ingredients or days and days of time. With good time management, you can crank one out in a day. 

Also!!!! It’s so tasty!!! It’s basically baked marzipan. Crisp on the outside, super chewy on the inside, it bursts with almond flavor, and it also kinda lasts forever so you can totally make it far in advance. I can’t sing enough praises about Kransekake. It’s officially my favorite Norwegian thing since Bernie. 

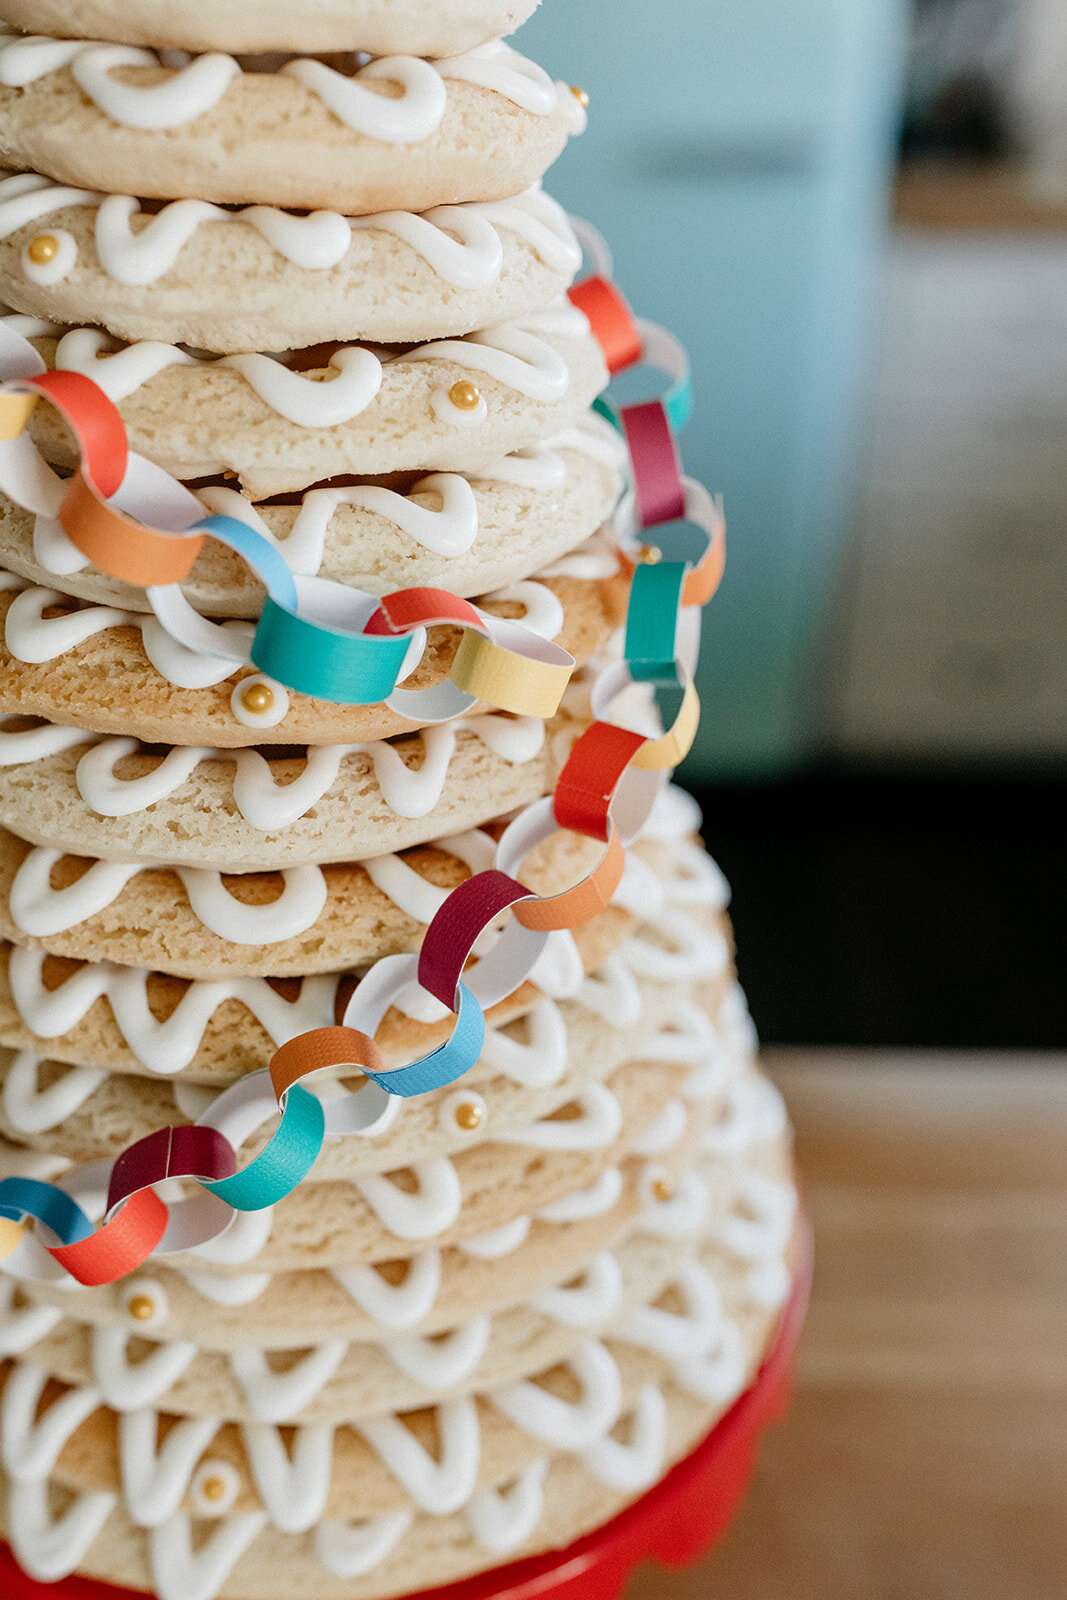
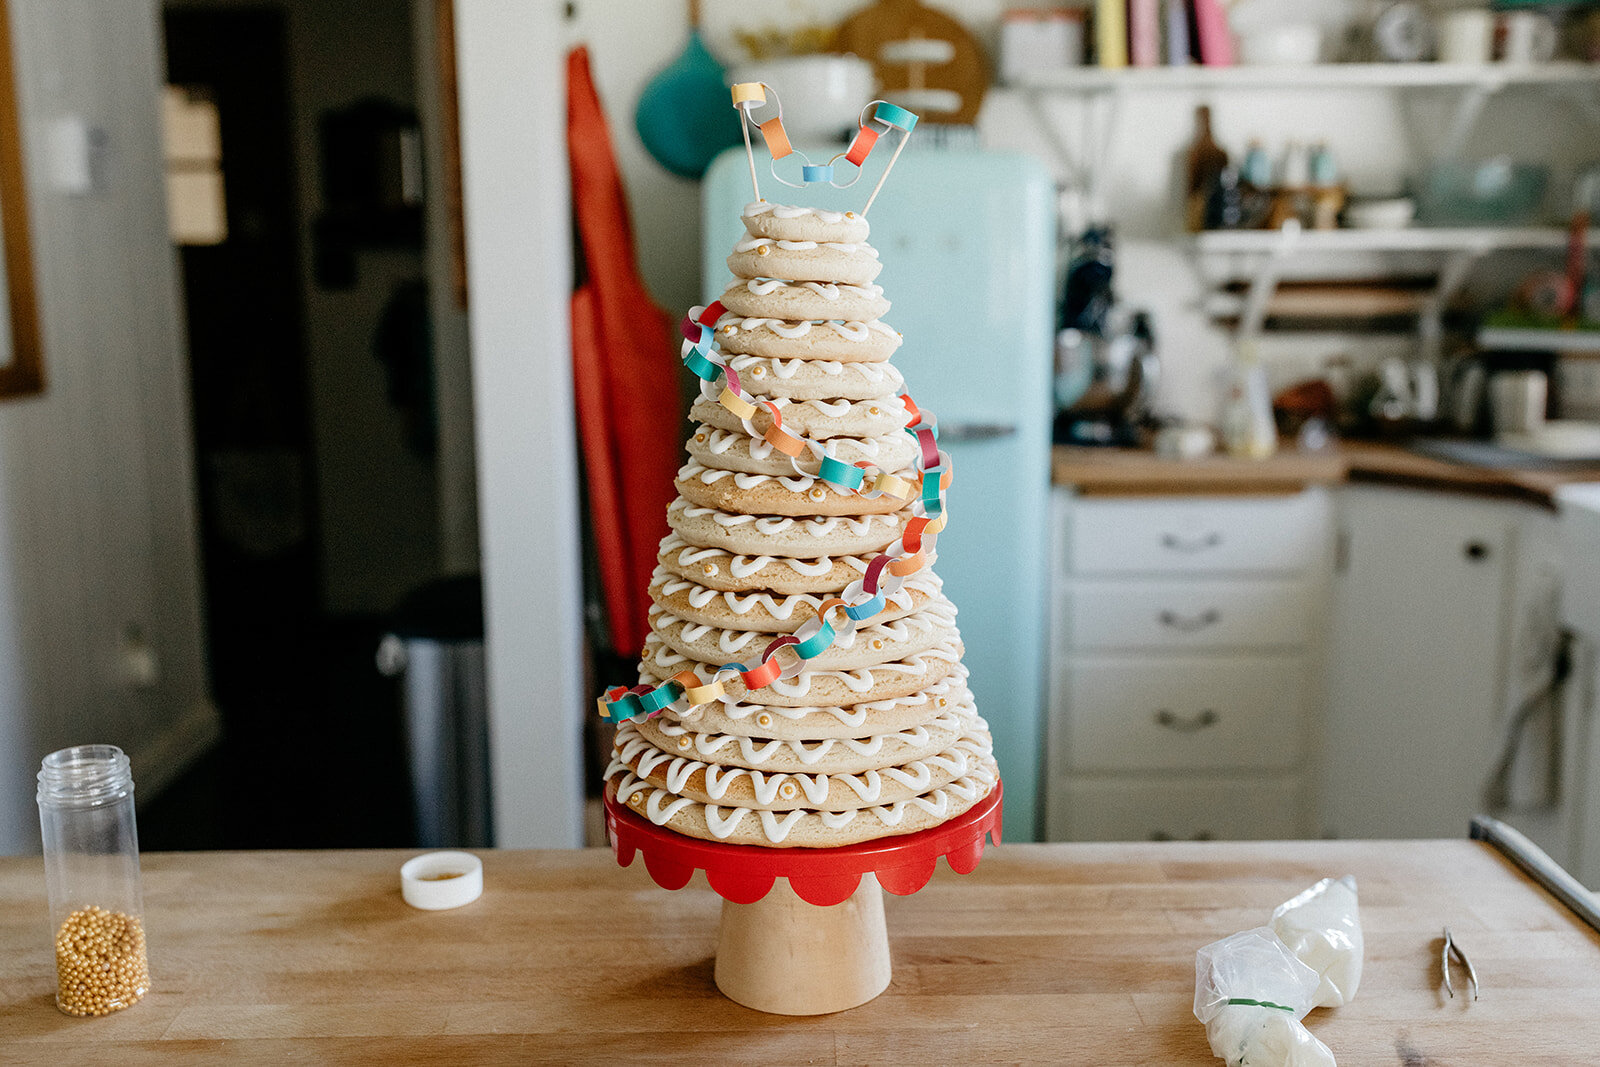
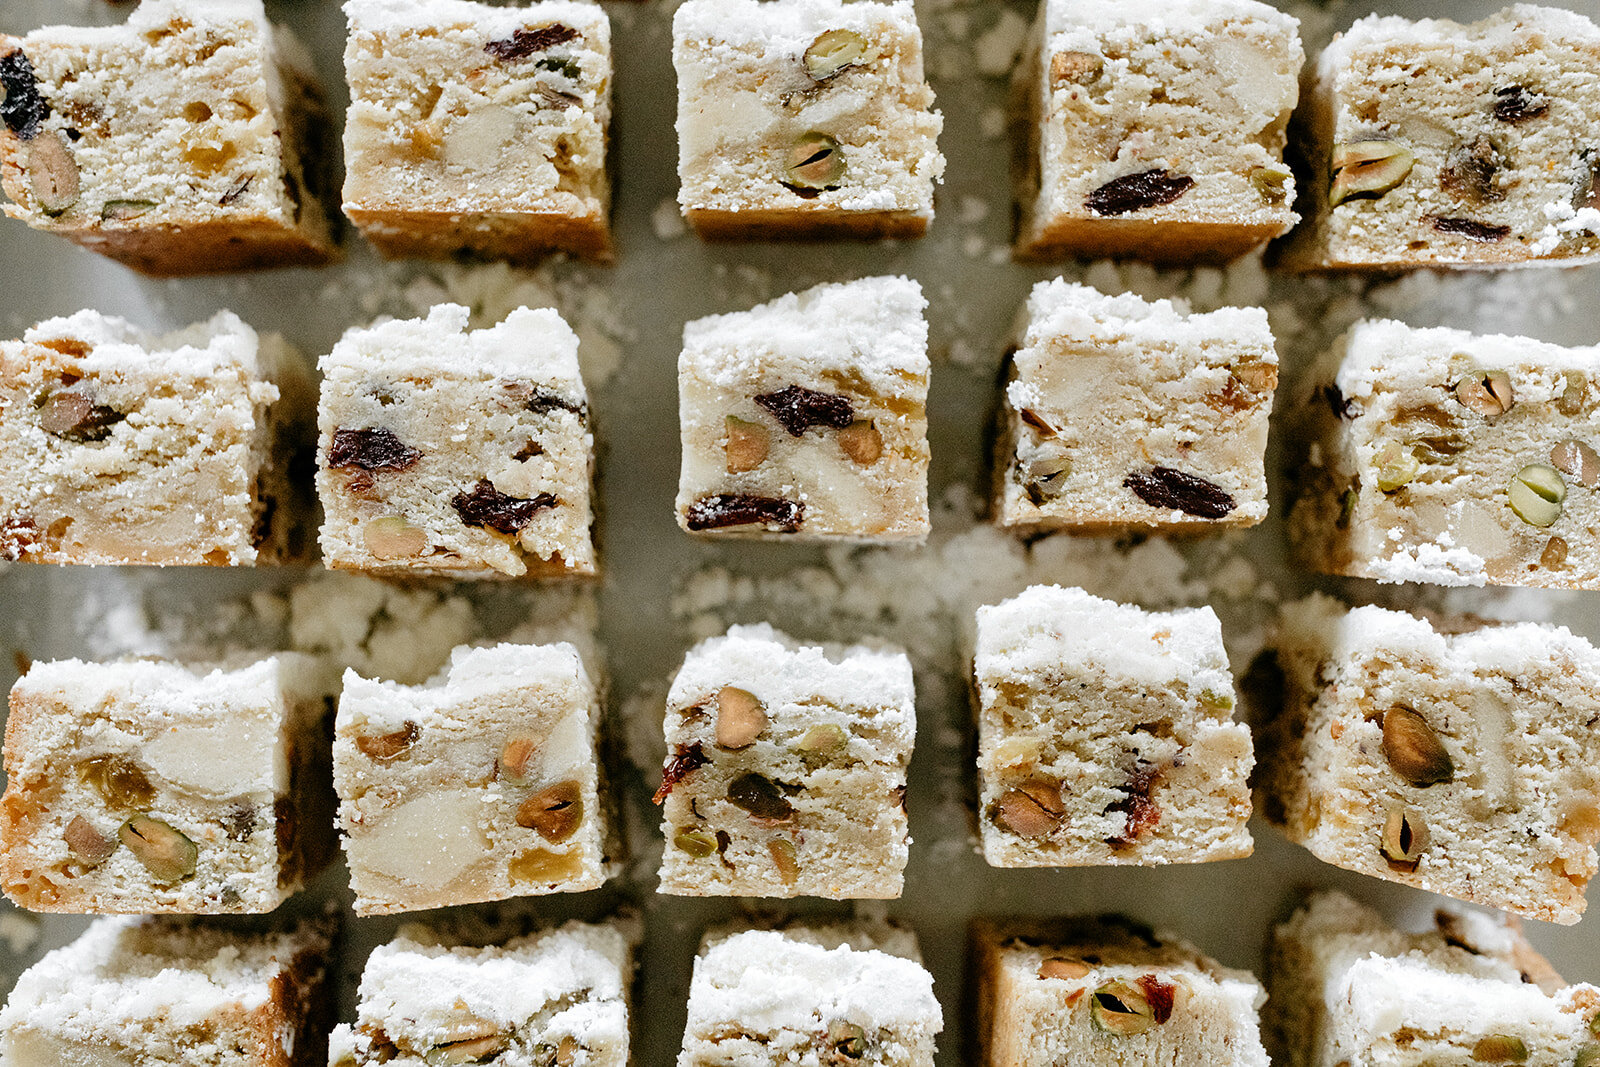
My version is a Chrismukkah Kransekake. It’s decorated with a paper chain that’s a miniature version of the rainbow felt chain that Nick and I made years ago for our Chrismukkah bush. (It’s rainbow because rather than going with a red/green Christmas theme or a blue/white Hanukkah theme, we just went with all of the colors!) It’s a pretty standard Kransekake recipe that I’ve embellished slightly with rosewater or orange blossom (both go so well with almond) and I like to grease the pans with coconut oil for a hint of coconut flavor. You could always go with butter though.

So if you’re looking to impress all of your fronds with a holiday party centerpiece that’s less labor intensive than a gingerbread house (and, well, much tastier), make this!!!! 


Kransekake

Makes 1 large Kransekake

Ingredients

500g (4 c + 7 tb) almond meal, plus more for dusting

500g (4 c + 3 tb) powdered sugar

1/2 tsp kosher salt

4 large egg whites

1 tsp almond extract

1/2 tsp orange blossom water or rosewater, optional

Softened butter or coconut oil, for greasing

For assembly

Royal icing (I just bought meringue powder from my local grocery and followed the recipe on the back!)

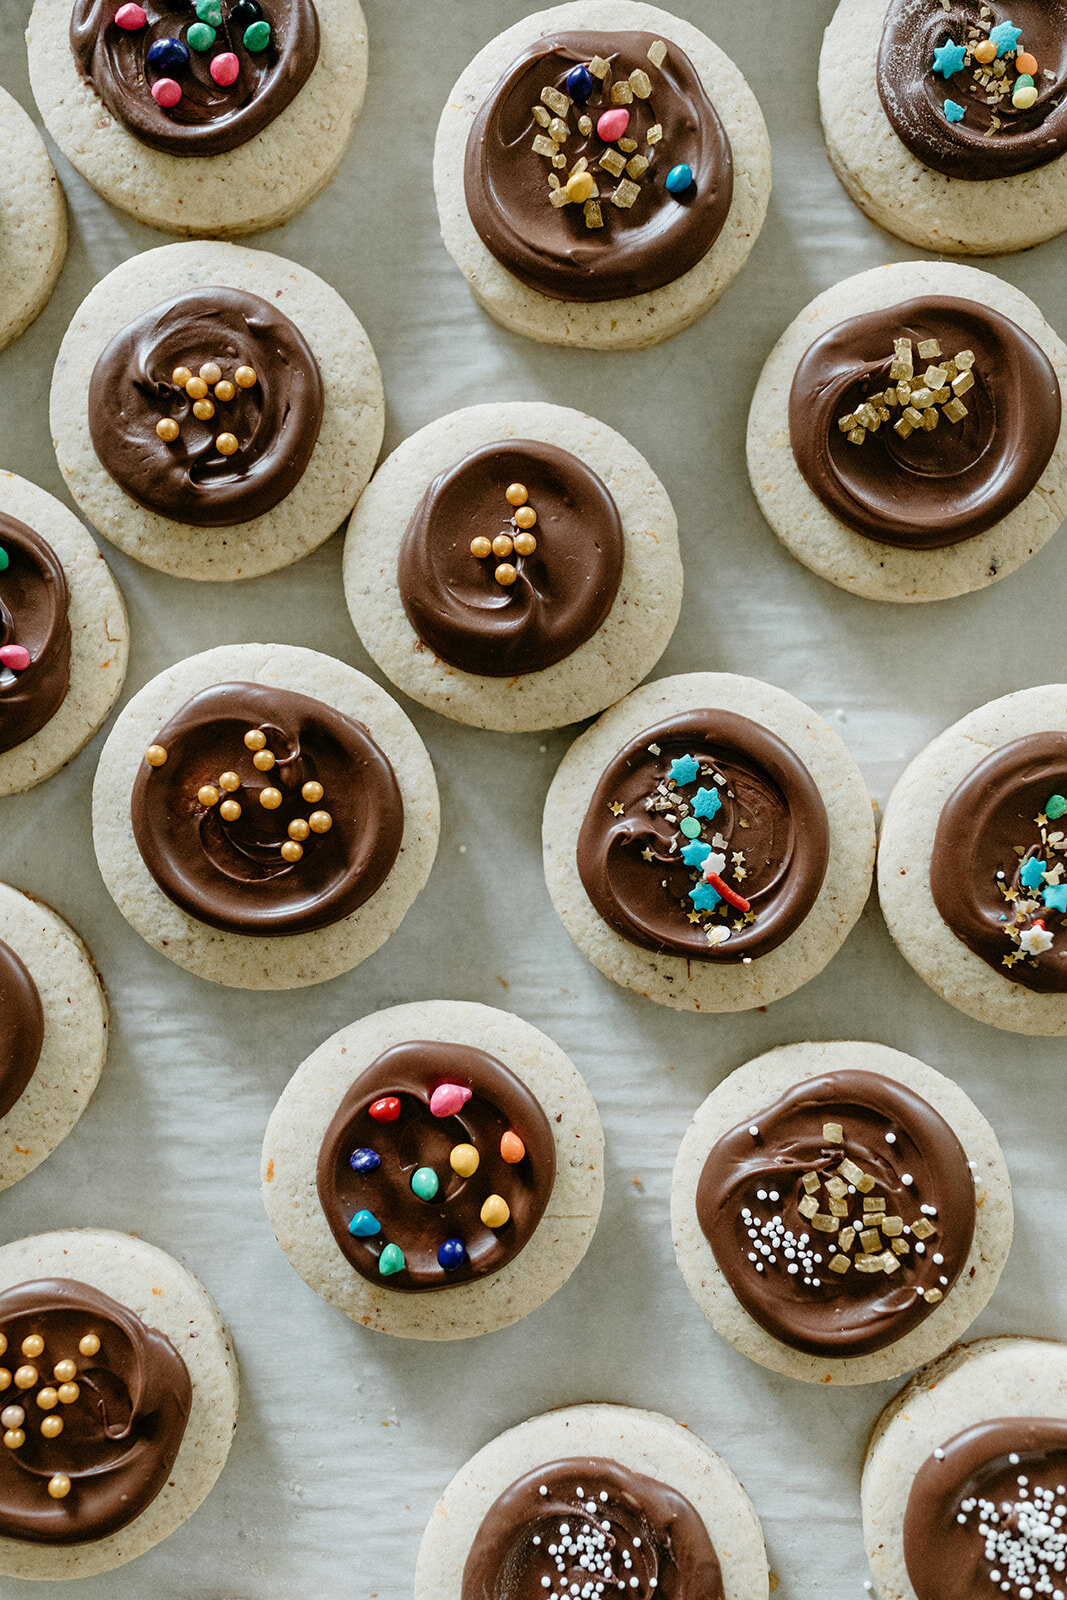
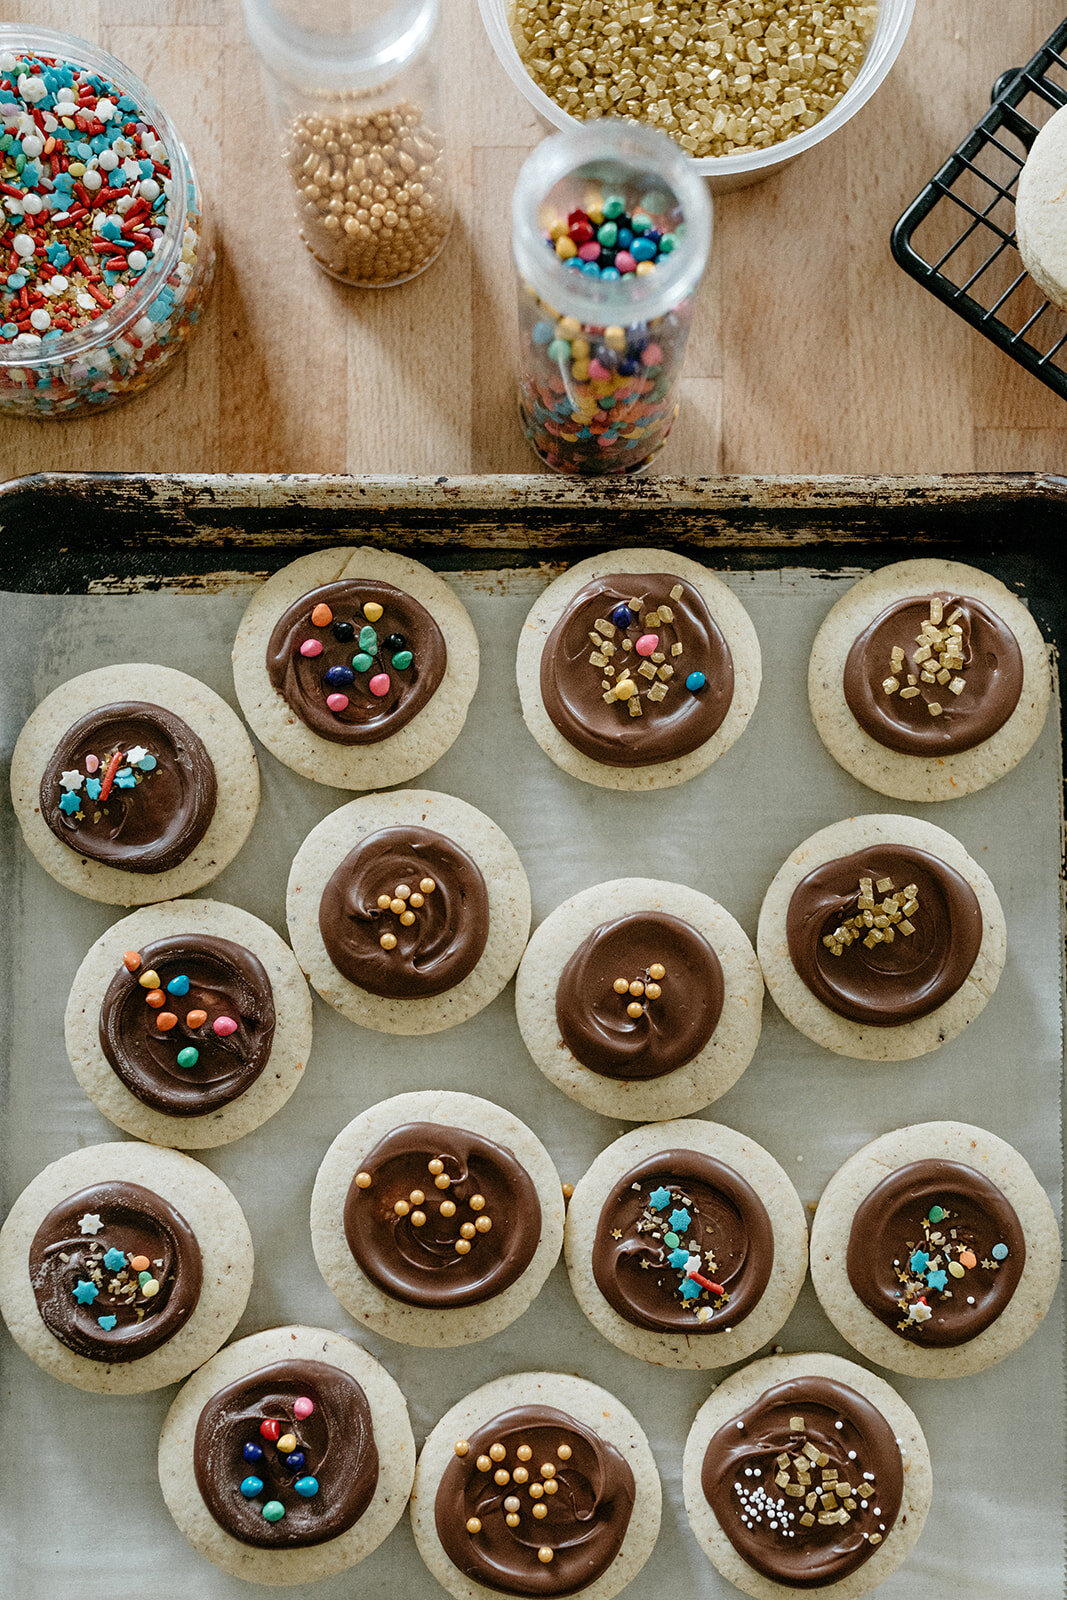
Sprinkles, paper chains, flags, any other fun decor!

Clues

In a large bowl, whisk together the almond meal, powdered sugar, and salt. Add the egg whites, almond extract, and orange blossom water or rosewater (if using) and stir with a spatula to combine. At first it will seem like there is not enough liquid to hold everything together but just keep on mixing and it will eventually form a dough. Pat the dough into 2 discs, wrap in plastic wrap, and refrigerate for 2 hours or up to overnight.

Preheat the oven to 400ºf and position the racks in the center of the oven. Use your hands to grease your kransekake molds liberally with butter or coconut oil and set aside. I prefer to set the molds on large baking sheets so that they’re easier to move around. 

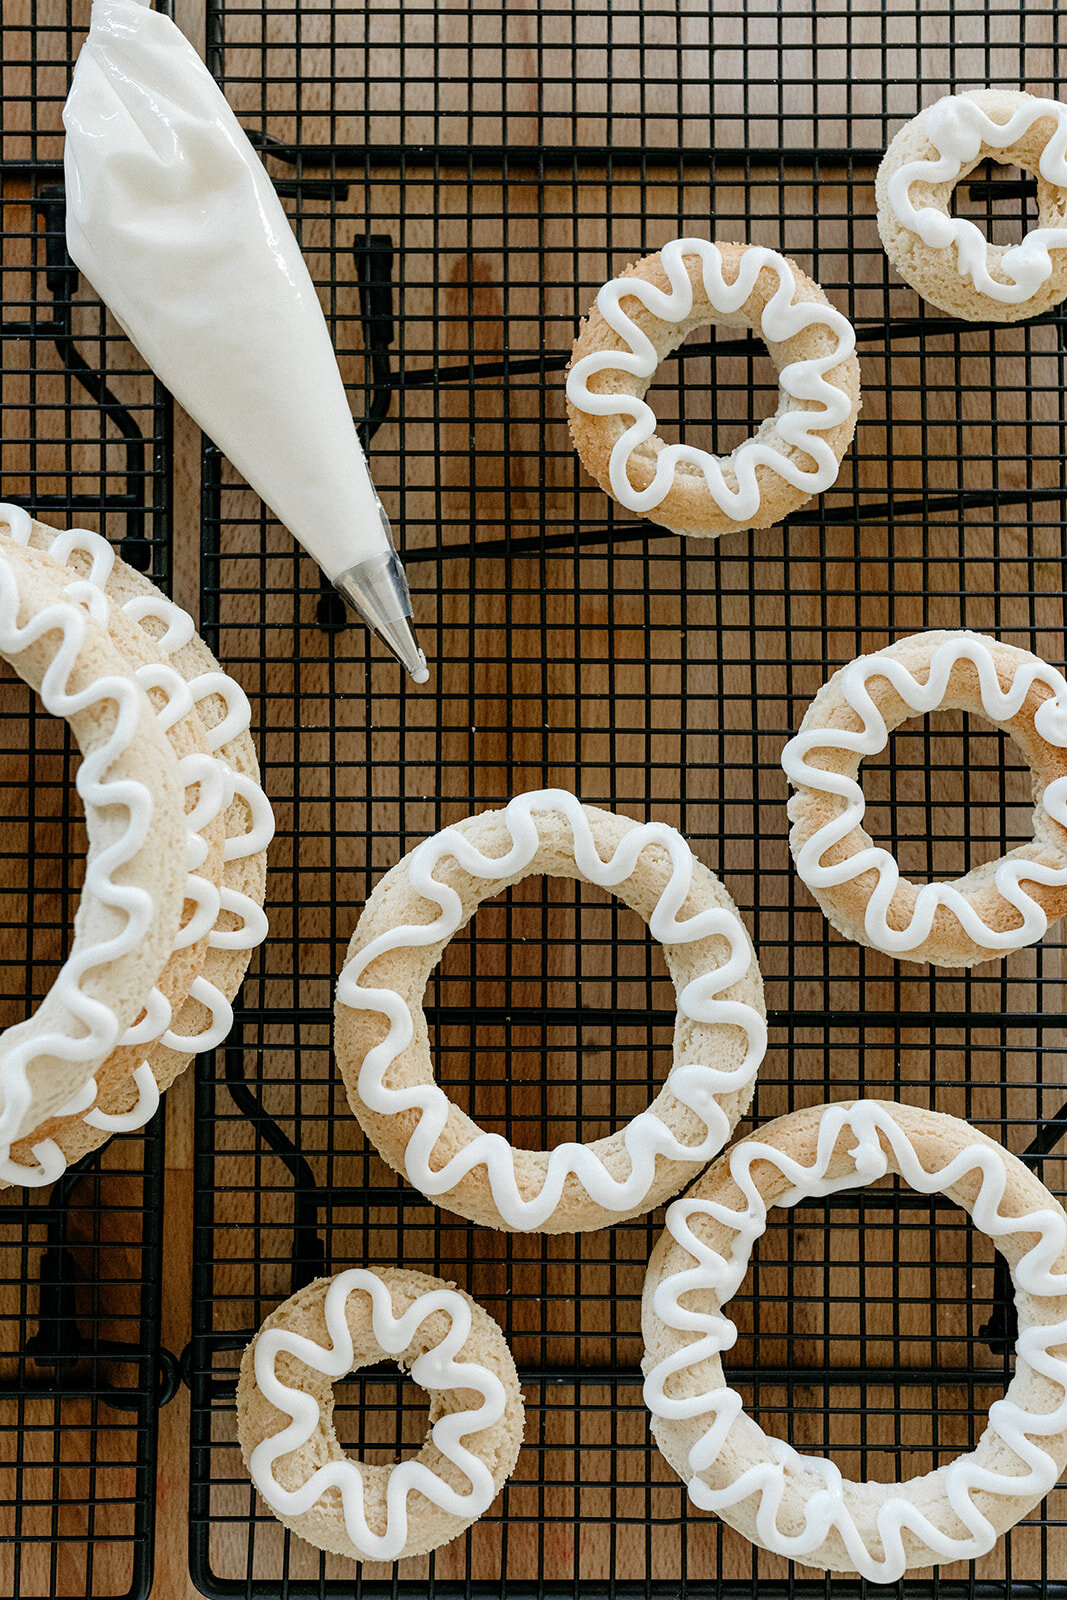
Working with one dough disc at a time, chop off a piece of dough and roll it into a rope that’s a generous 1/2” thick (or, if you’re pulling your kitchen ruler out, just go with 5/8” thick…), dusting with additional almond flour if the dough is sticky. Coil the rope into the molds, pinch off any excess dough, and pinch the ends to seal them together. Continue this, re-rolling scraps as needed, until all of the molds are filled. Don’t worry about overworking the dough! Bake until golden; begin checking for doneness at 9 minutes. You’ll likely need to bake these layers in batches, which is totally fine, just keep any dough that you’re not working with covered and in the refrigerator. 

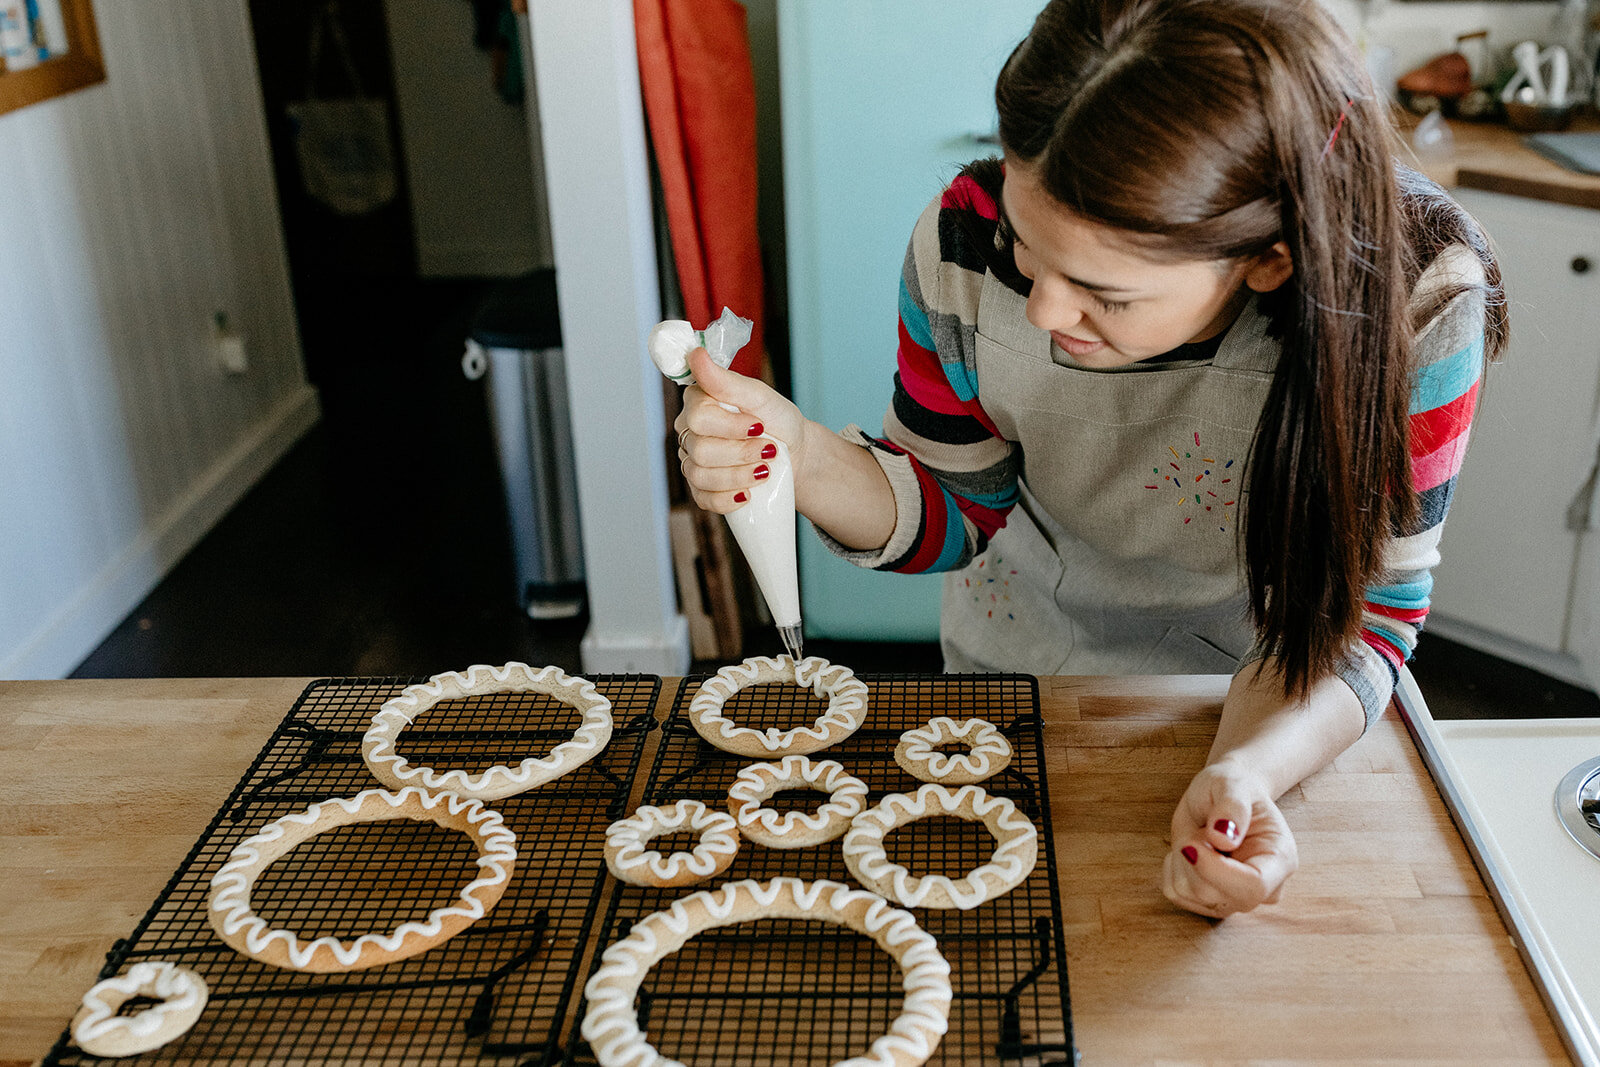
Let the rings cool in the pans and then carefully pop them out (a small offset spatula or butter knife will help) and transfer to a baking sheet or wire rack. 

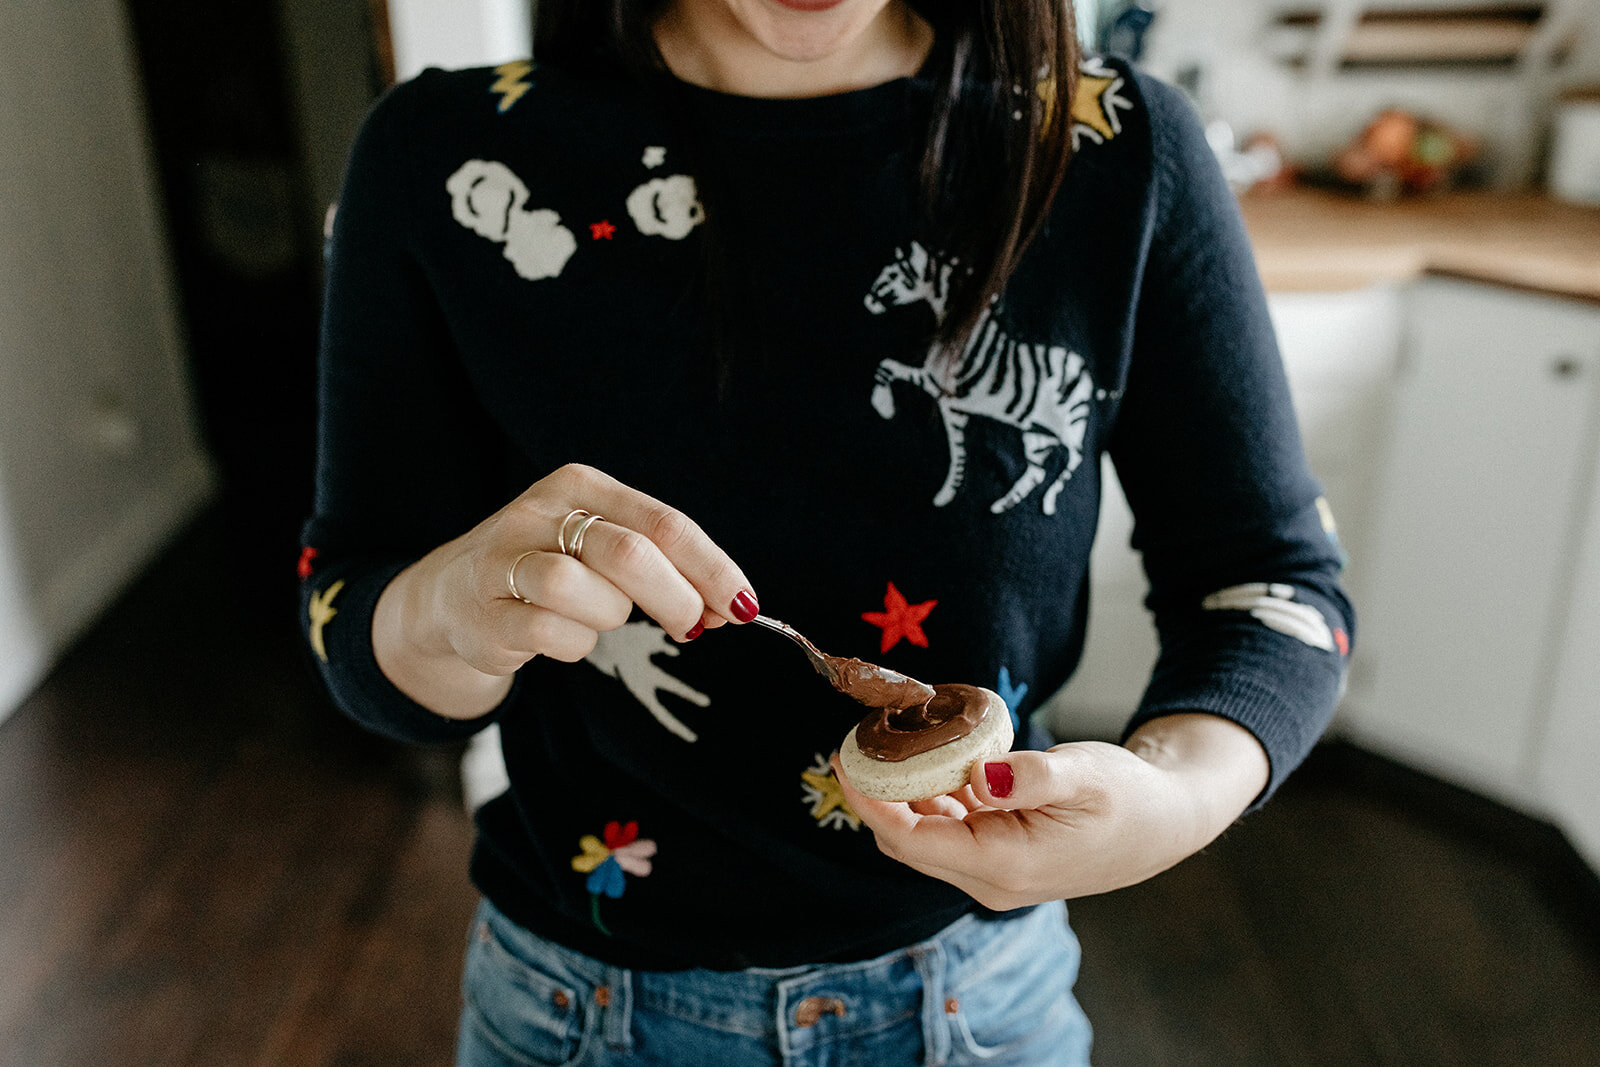
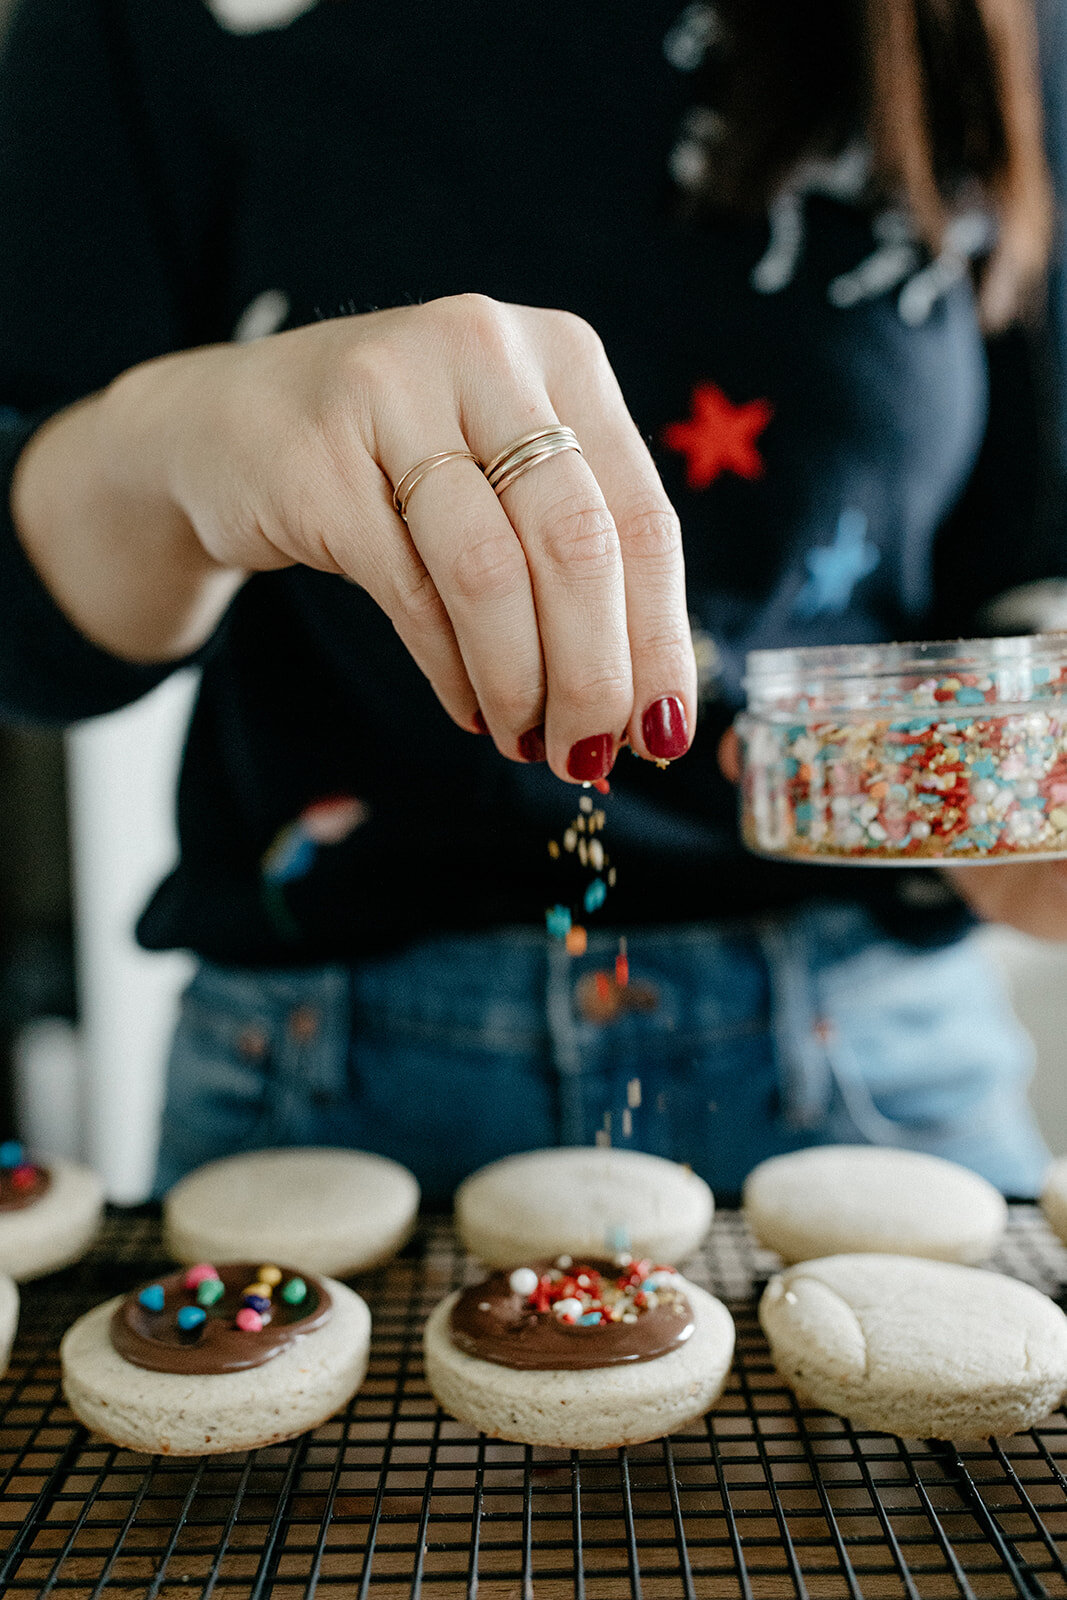
Make your royal icing and stack the rings up and then pipe on your decorations or pipe on your decorations, let them dry, and then stack them up. When you stack them up, “glue” them together with dots of royal icing (I do dots at 12 o’clock, 3 o’clock, 6 o’clock, and 9 o’clock). Let the icing dry and then decorate with sprinkles, paper chains, flags, or other decor as desired! This is good for at least a few days uncovered at room temperature, so feel free to make this in advance!


hazelnut gelt cookies

These cookies were born out of my desire to build a repertoire of Hanukkah cookies in a Christmas cookie world! I mean I obviously love a Christmas cookie but I also love a Hanukkah dessert that a) doesn’t require me to fry anything and, b) can allow me to pull out all of the sprinkles and decorate stuff. A few years ago, I learned the joys of making homemade gelt. It’s so simple yet fun! You just melt blobs of chocolate and add any toppings you want. And you can control your own currency and game the dreidel system so that whatever happens, you’re rich! (Oh, your gelt is topped with sunflower seeds? Well mine is way more valuable since it’s topped with sea salt. Therefore I win.) So this year I decided to up the ante and put this gelt right on top of a cookie. Gelt on cookies is nothing new, but homemade gelt on a thick soft hazelnut cookie is a thing of modern beauty! You could obviously schmear melted chocolate on any kind of cut out cookie but I’ve used these hazelnutty orange zesty pucks here because they’ve got more personality than your standard holiday sugar cookie. The result is a combination of textures (soft cookie + snappy chocolate) and flavors (hazelnut + chocolate + orange) that is worthy of a prime spot in your Hanukkah cookie box.

So have at it and let your creativity run wild! Make some for your Ultimate Hanukkah Challenge viewing party*!!! 

*Your daily reminder that the Ultimate Hanukkah Challenge is a show that exists and it is premiering on December 21st at 9pm/8c on Food Network.


Hazelnut Gelt Cookies

makes about 26 cookies

ingredients

for the cookies:

3 1/2 c (448g) all-purpose flour, plus more for dusting

1 1/3 c (150g) ground toasted hazelnuts (you can make your own or buy hazelnut flour, bob’s red mill sells it!)

1 tsp baking powder

3/4 tsp kosher salt

1 c (226g) unsalted butter, softened

2/3 c (137g) granulated sugar

2/3 c (80g) powdered sugar

Zest of 1 orange

2 large eggs

1 tsp vanilla extract

for the topping:

6 oz (168g) chopped milk chocolate or milk chocolate chips

sprinkles

clues

to make the cookies, in a medium bowl, combine the flour, ground hazelnuts, baking powder, and salt and set aside. in the bowl of a stand mixer fitted with the paddle, cream together the butter, sugars, and orange zest on medium high until pale and fluffy, about 3-4 minutes. add the eggs, one at a time, beating after each, and then add the vanilla.

reduce the speed to low and gradually add the flour mixture, mixing until blended. at this point you can wrap the dough in plastic wrap and refrigerate for an hour, or up to two days, or you can get going on rolling out your dough and cutting out your cookies immediately. 

when ready to bake, preheat the oven to 350ºf. line two baking sheets with parchment and set aside. working with half of the dough at a time, roll it out on a lightly floured surface to a thickness that’s just under 1/2” thick. cut out 2 1/2” circles with a biscuit cutter and then transfer to a baking sheet, 1" apart. re-roll scraps and cut out more shapes. bake until they’re lightly browned on the bottom; begin checking for doneness at 12 minutes. let cool on the baking sheets for 5 minutes and then carefully transfer to a wire rack to cool completely. 

To decorate, melt the chocolate in a double boiler or in a microwavable bowl in 30-second increments, stirring after each. Melt until it’s just smooth and then remove from heat. Spoon a teaspoon of chocolate onto the top of each cookie, and spread it around with a spoon into a little Gelt-sized circle. Top with sprinkles and let set in the fridge or at room temperature. Enjoy!


stollen bars

This time last year when I was a million months pregnant, I got the wildest craving for Stollen, the yeasted spiced Christmas cake that has a bunch of tasty mix-ins (most notably, marzipan). This craving came out of nowhere because I don’t think I’d even ever had Stollen before?! I guess I wanted all of the warm spices and a cake with not too much sweetness, and, obviously, marzipan. Because, spoiler alert, I am approximately 75% marzipan during the holiday season. But then when I started looking for recipes, I realized I wanted something with a little more instant gratification because I was too impatient to let stuff rise. I also wanted a softer moister denser texture than a yeasted cake could give me. After searching high and low, I came across Dan Lepard’s Stollen bars!! They are a stroke of genius and delivered everything I was looking for: a buttery soft blondie-like consistency, loads of flavor, hidden surprises like chewy dried fruit and toasty pistachios, not too much required in the way of time or energy, and gigantic chunks of marzipan. GIGANTIC CHUNKS OF MARZIPAN!!! They were SO GOOD!!! I made multiple batches and gifted them all over the place. My only challenge was that the recipe was written in British and required a lot of Googling and trial and error to figure out suitable equivalents to “mixed spice” and strong white flour, as well as the meaning of “sultana.” I also ended up throwing in some dried cherries because I’m in a dried cherry phase, and some orange zest and almond extract because they tie all of these flavors together soo nicely. 

So here is my version of Dan’s bars and, ugh, I am obsessed with these. I love the earthy understated look. They’re sturdy, reliable, low maintenance (make them ahead! they last for a few weeks!), and all around delicious. The cream cheese in the dough adds a sparkle of tang and melted butter brushed on top combines with a storm of powdered sugar for a wintery rustic alternative to glaze. If colorful frosted sugar cookies are the fancy sequined holiday party dress that you’ve been planning on wearing for months, these bars are the very comfortable jeggings and oversized sweater that you decide to wear at the last minute with absolutely no regrets!


Stollen Bars

Makes 25 squares

Ingredients

2 c (260g) all-purpose flour

2/3 c (75g) almond flour

1 tsp baking powder

1 tsp cinnamon

3/4 tsp kosher salt

1/4 tsp ground cardamom

A pinch of ground cloves

A pinch of allspice

3/4 c (168g) unsalted butter, divided, at room temperature

4 oz (112g) cream cheese, room temperature

1 c (200g) sugar

Zest of 1 orange

1 large egg

1/2 tsp almond extract

1/3 c (53g) dried cherries

1/3 c (53g) golden raisins

1 c (112g) roasted pistachios

8 oz (227g) marzipan, chopped into 3/4” pieces

1/3 c (40g) powdered sugar

Clues

Preheat the oven to 350ºf. Grease an 8” square pan and line with parchment paper so that 1” wings come up on two sides. Set it aside.

In a medium bowl, whisk together the flour, almond flour, baking powder, cinnamon, salt, cardamom, cloves, and allspice. In a stand mixer fitted with a paddle, beat together 1/2 cup of the butter, the cream cheese, sugar, and orange zest on medium high until pale and fluffy, 3-4 minutes. Add the egg and almond extract and beat until combined. Reduce the speed to low and then beat in the dry ingredients followed by the cherries, raisins, and pistachios. Fold in the marzipan pieces by hand. Scrape into the pan and spread it out evenly with your hands or a rubber spatula. Bake until golden around the edges and lightly browned on top; begin checking for doneness at 28 minutes. 

Spread the remaining 1/4 cup of butter all over the top while it’s still hot out of the oven so that the butter melts and then sprinkle with powdered sugar. Let cool in the pan and then cut into squares and enjoy! Keep in an airtight container at room temperature or in the fridge for up to two weeks.


-yeh!

photos by chantell and brett quernemoen

sumac snickerdoodles

Hii!!!! How are you and how was your Halloween and are you in the holiday spirit yet?? We had such a fun first Halloween with Bernie!! She had a Halloween feast of squash (cause it’s orange!) and then donned her fleece lemon costume to trick or treat at Aunt Ethel’s building where she made friends with a Twizzler, or more specifically the crunchy wrapper of the Twizzler. It fascinated her all night long. Eggboy and I split a tiny box of Milk Duds and then ate spinach salads before going to bed by 9. 🤷🏻‍♀️ Going to bed by 9 is, like, how I get my thrills these days because being well rested is such an excellent high? Also, I’m now filming (season 5!) and my call time in the morning is very early o’clock, meaning I have to wake up six minutes before very early o’clock in order to brush my teeth and then commute from my bedroom to the kitchen. 

It’s gonna be a great season! It includes:

  1. A Passover episode, complete with our new Marian Bull Seder plate that I want to stare at all day long every day

  2. An appearance by one of my all time favorite bands

  3. Hockey, hockey stars (!), broomball, curling, Alana curling, and ice skating

  4. KNOEPHLA!!!!!

I know I say this about every season but I think this season is going to be the tastiest yet. And not just because it has the best mozzarella sticks and gruyere babka rolls of all time but also because Bernie’s cheeks have reached peak deliciousness (thank you to my grandpa and dad for those). 

Enough about me, I am going to talk about my frond Michelle now!!! Her book, Weeknight Baking, came out last week and it has SPRINKLE END PAPERS. And a recipe for one (1!) chocolate chip cookie that is just plain dangerous. And billions upon gajillions of tips for how to bake things in advance or speed things up or spread the work out over the course of a few days in order to make it fit any kind of crazy busy schedule. It’s baking efficiency at its tastiest and I love it. Like she’s even making me feel like I can bake a dang wedding cake over the course of a few Bernie naps. For those of you who liked the bake-ahead tips in this post, this book takes this type of thing to the next level. And all the while it offers deeeelicious ideas like halva blondies (!!!) and excellent styling tips like how to get perfectly straight edges when you cut cheesecake bars. This book is so clever, informational, beautiful, and delicious and I’m a proud kvelling frond right now.

One thing that Michelle and I share, other than the fact that we both have quiet reserved Nordic partners, is a love of sumac. Specifically, sumac in sweets! It’s so bright and fun! I sometimes think of sumac as ground up lemony vinegar, if vinegar were a solid. So like if you’re into lemon sour patch kids, you will like sumac’d sweets. (NY Shuk makes a great sumac, by the way.) Michelle made a delicious move in her book and rolled snickerdoodle cookie dough in a sumac/raspberry magic dust and the world is a tastier place for it. These cookies are sweet, tangy bright, crisp around the edges, and soft and chewy in the middle. They’re sassier than you’re average cookie and so pretty! Look at that natural pink color! I love these. And I love Michelle and Weeknight Baking. Yay!!!


raspberry sumac snickerdoodles

makes about 20 cookies

from michelle lopez'weeknight baking: recipes to fit your schedule

ingredients

for the raspberry sumac topping

1/4 c (1.75 oz) granulated sugar

2 heaping tb freeze-dried raspberries, finely ground

2 tsp ground sumac

for the cookies

2 3/4 c (12.35 oz) all-purpose flour

2 tsp cream of tartar

1 tsp baking soda

1/2 tsp kosher salt

1 1/2 c (10.5 oz) granulated sugar

1 c (8 oz) unsalted butter, at room temperature

2 large eggs

2 tsp pure vanilla extract

clues

position a rack in the center of the oven and preheat the oven to 400ºF. line two half sheet pans with parchment paper.

in a medium bowl, combine all topping ingredients and set aside.

in a medium bowl, whisk together the flour, cream of tartar, baking soda, and salt.

in the bowl of a stand mixer fitted with the paddle attachment, combine the sugar and butter. beat on medium-high until light, fluffy, and doubled in volume, 2 to 3 minutes, using a rubber spatula to scrape down the bottom and sides of the bowl as necessary. reduce the mixer to low and add the eggs one at a time, adding the next egg only after the previous one has bee fully incorporated. add the vanilla and beat until just combined. scrape down the bottom and sides of the bowl. with the mixer on low, gradually add the dry ingredients and beat until just combined. scrape down the bottom and sides of the bowl once more, and beat on low for an additional 30 seconds.

use a 3-tablespoon cookie dough scoop to portion the cookie dough into balls. roll each in the snickerdoodle topping, covering them completely. place the coated cookies at least 3 inches apart on the prepared sheet pans. bake one pan at a time for 10 minutes, or until the edges have set but the centers are still gooey. the cookies will look puffed when you pull them out of the oven, but will fall and crack into the perfect cookies as they cool. cool the cookies on the pan on a wire rack for 20 minutes, or until the edges and bottoms of the cookies have set and feel firm to the touch. repeat with the remaining cookie dough (or freeze it to bake later). serve warm or at room temperature. the cookies can be stored in an airtight container or zip-top bag at room temperature for up to 3 days.