spinach and artichoke chicken and biscuits

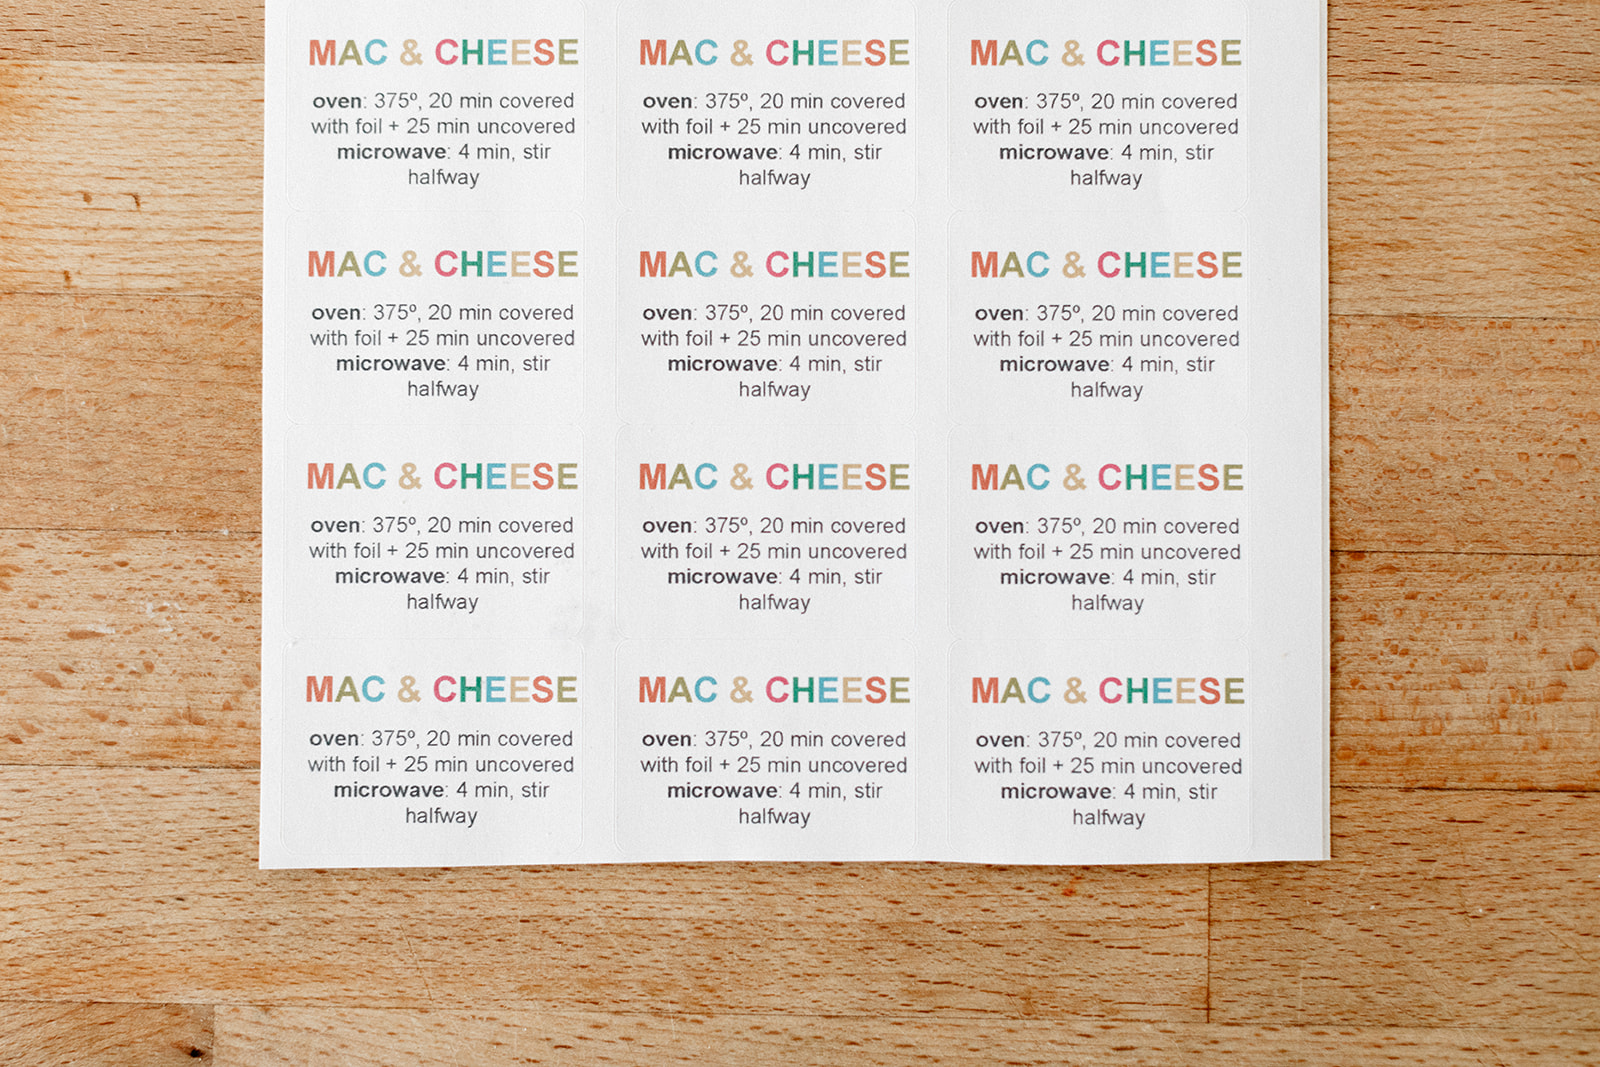
My quest to fill every inch of all of our freezers continues this week with a mashup of two great things: chicken and biscuits and spinach and artichoke dip. The chicken and biscuits part is inspired by one of the first dinner recipes (after mac and cheese) that I remember making with my mom, the chicken and biscuits from Rick and Lanie’s Excellent Kitchen Adventures. We used that book all the time growing up! And I remember that in the process of learning to make their chicken and biscuits, I learned that a roux can be used to thicken milk for purposes other than making mac and cheese. This was mind blowing to me! So rather than adding a bunch of cheese and noodles to the sauce, we added chicken, herbs, and veggies, and then topped it with biscuits and baked it all so that the tops of the biscuits got golden and the bottoms soaked up all of the delicious creamy sauce. It was the best. Especially during long dark homework-saturated Chicago suburban winters. A marked up version of this recipe is in the homemade cookbook that my mom made me awhile ago for Valentine’s day, and it is one of my favorite nostalgic things to make.

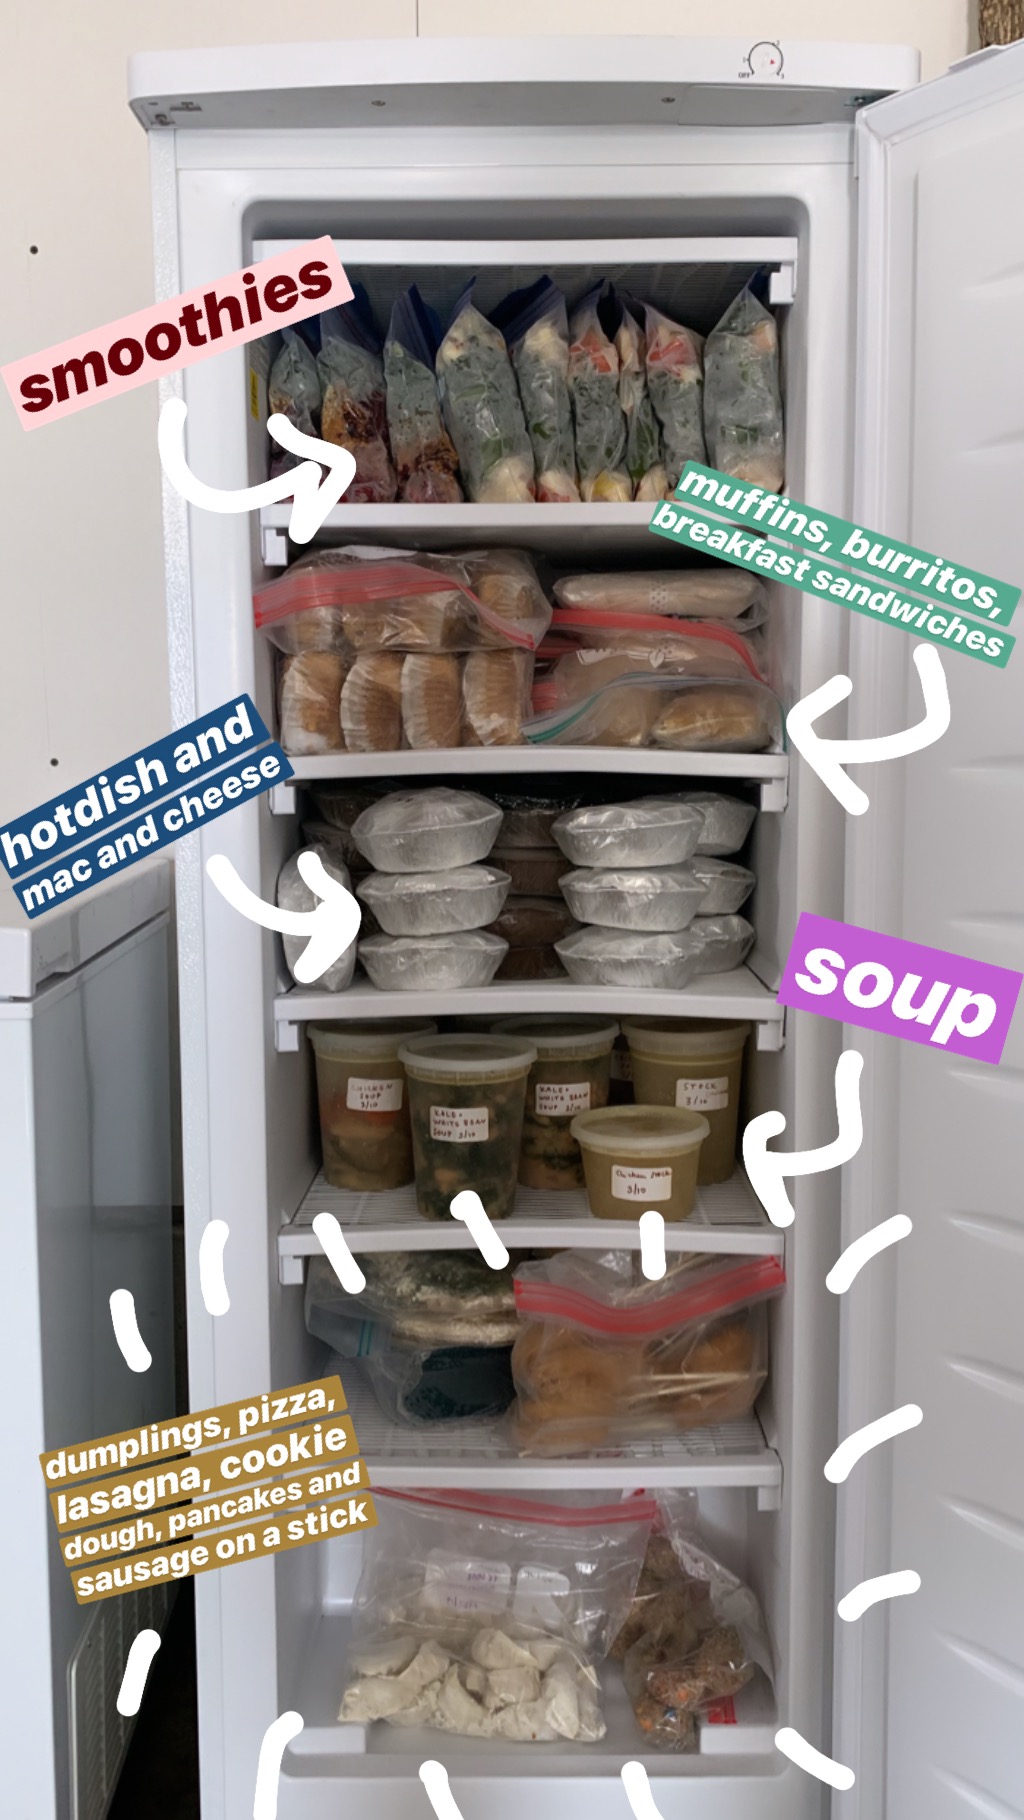
When it comes to meal prep for Poppy Seed’s arrival, I was advised early on to bring on the comfort foods, so chicken and biscuits jumped to the top of my list. But I also wanted to sneak in vegetables, which is where the spinach and artichokes come in. Spinach and artichoke dip is the best form of balance, no? You get vegetables but they’re blanketed with creaminess and cheese, so yes, I’m all about this. I typically don’t love chicken and cheese together but cream cheese is different, it’s milder and adds its signature subtle tang, so I’m letting it be a part of this. The result is really reeeeeeally good. It’s heavy on the comfort, carbs, and veggies, three things I plan to load up on during Poppy Seed’s first days, and dairy milk adds to the nutrition factor. 

The hardest part about this recipe is opening the can of store-bought biscuits, which remains the scariest kitchen task of all time. It’s so loud! And unpredictable! But I’ve opted to go this route in the interest of convenience since I still have a bazillion things to do before my due date. You can, of course, use homemade biscuits.

I’m so pleased to have partnered with Milk Life on this recipe! Dairy milk has always played a starring role in my kitchen and also in my most cherished memories with family and friends. I can’t wait to make new memories with Poppy Seed and these chicken and biscuits!!


Spinach and Artichoke Chicken and Biscuits

Makes 8 individual servings

Ingredients

3 tb unsalted butter

1 large onion, finely chopped

Kosher salt

2 cloves garlic, minced

1/4 c (33g) all-purpose flour

2 c (472g) 2% or whole milk

2 tsp chicken soup bouillon (just the bouillon itself, not diluted in water)

1 lb boneless skinless chicken thigh or breast, chopped into 1/2”-3/4” pieces

1/2 tsp dried thyme

Black pepper

1 (8 oz) block light cream cheese

1 (10 oz) block frozen spinach, thawed and drained

1 (14 oz) can artichokes, drained and chopped

1/2 bunch parsley, finely chopped

Hot sauce

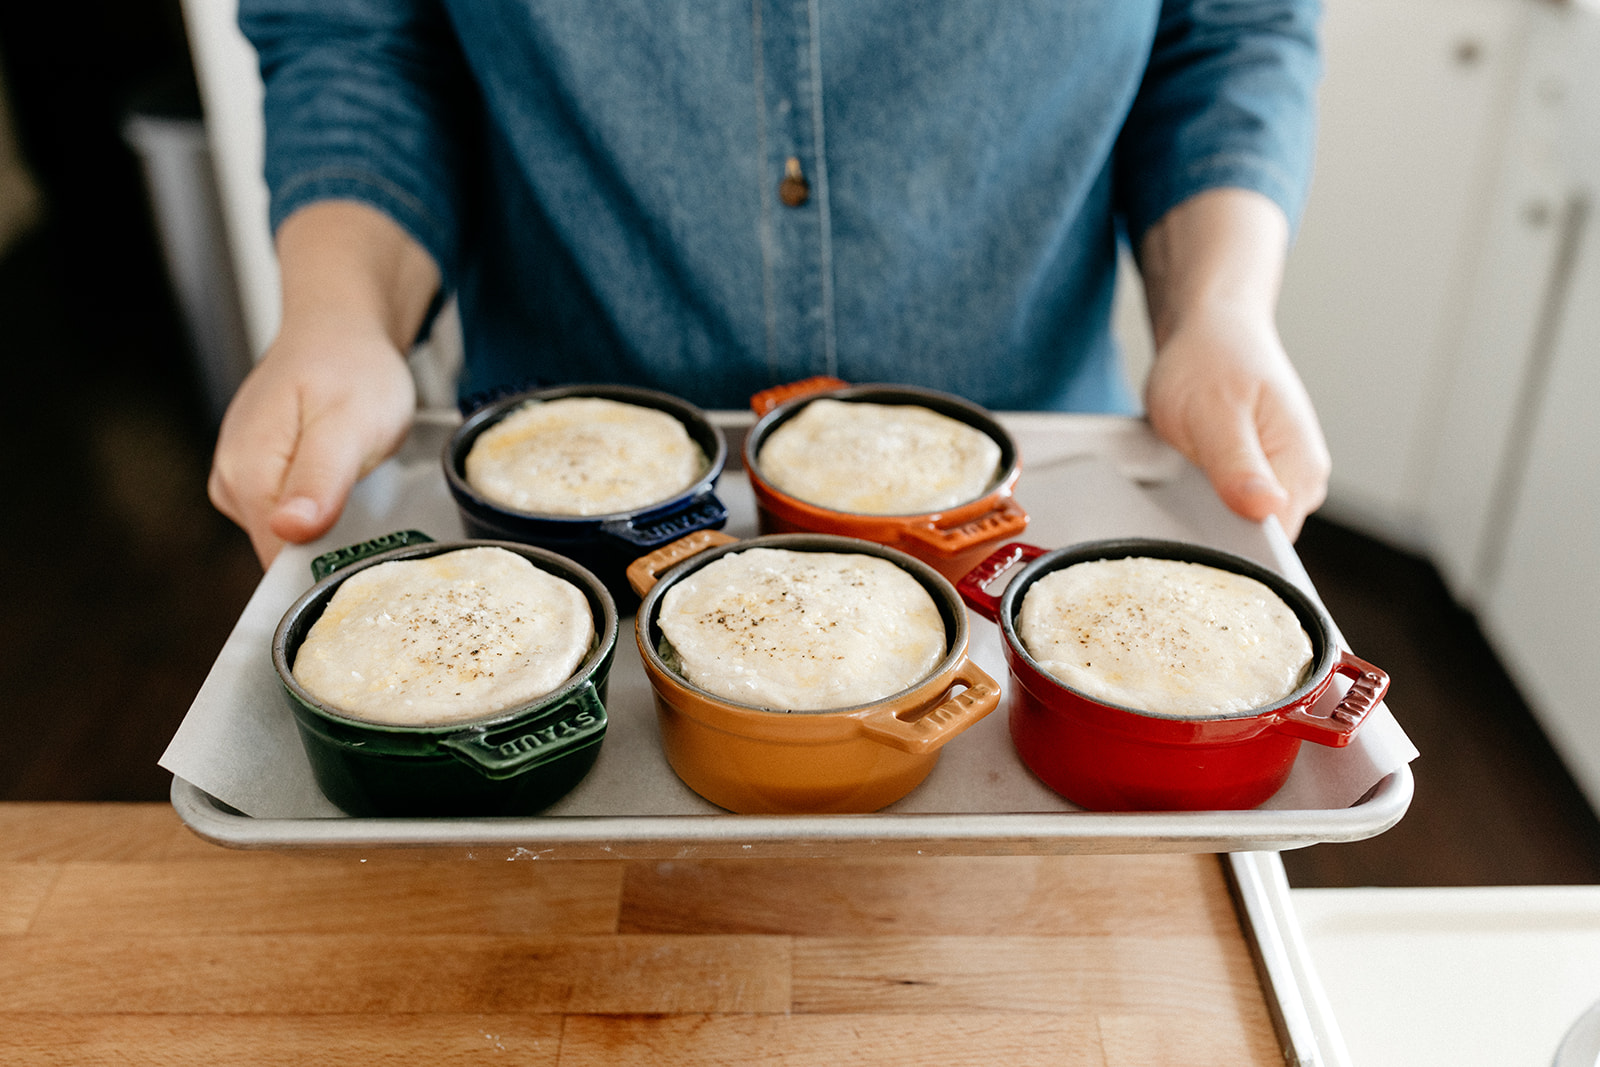
8 store-bought flaky buttermilk biscuits (or homemade biscuits)

Egg wash: 1 egg beaten with a splash of water

Flaky salt, for sprinkling

Clues

If baking immediately, preheat the oven to 400ºf. If planning to freeze, see freezer directions below.

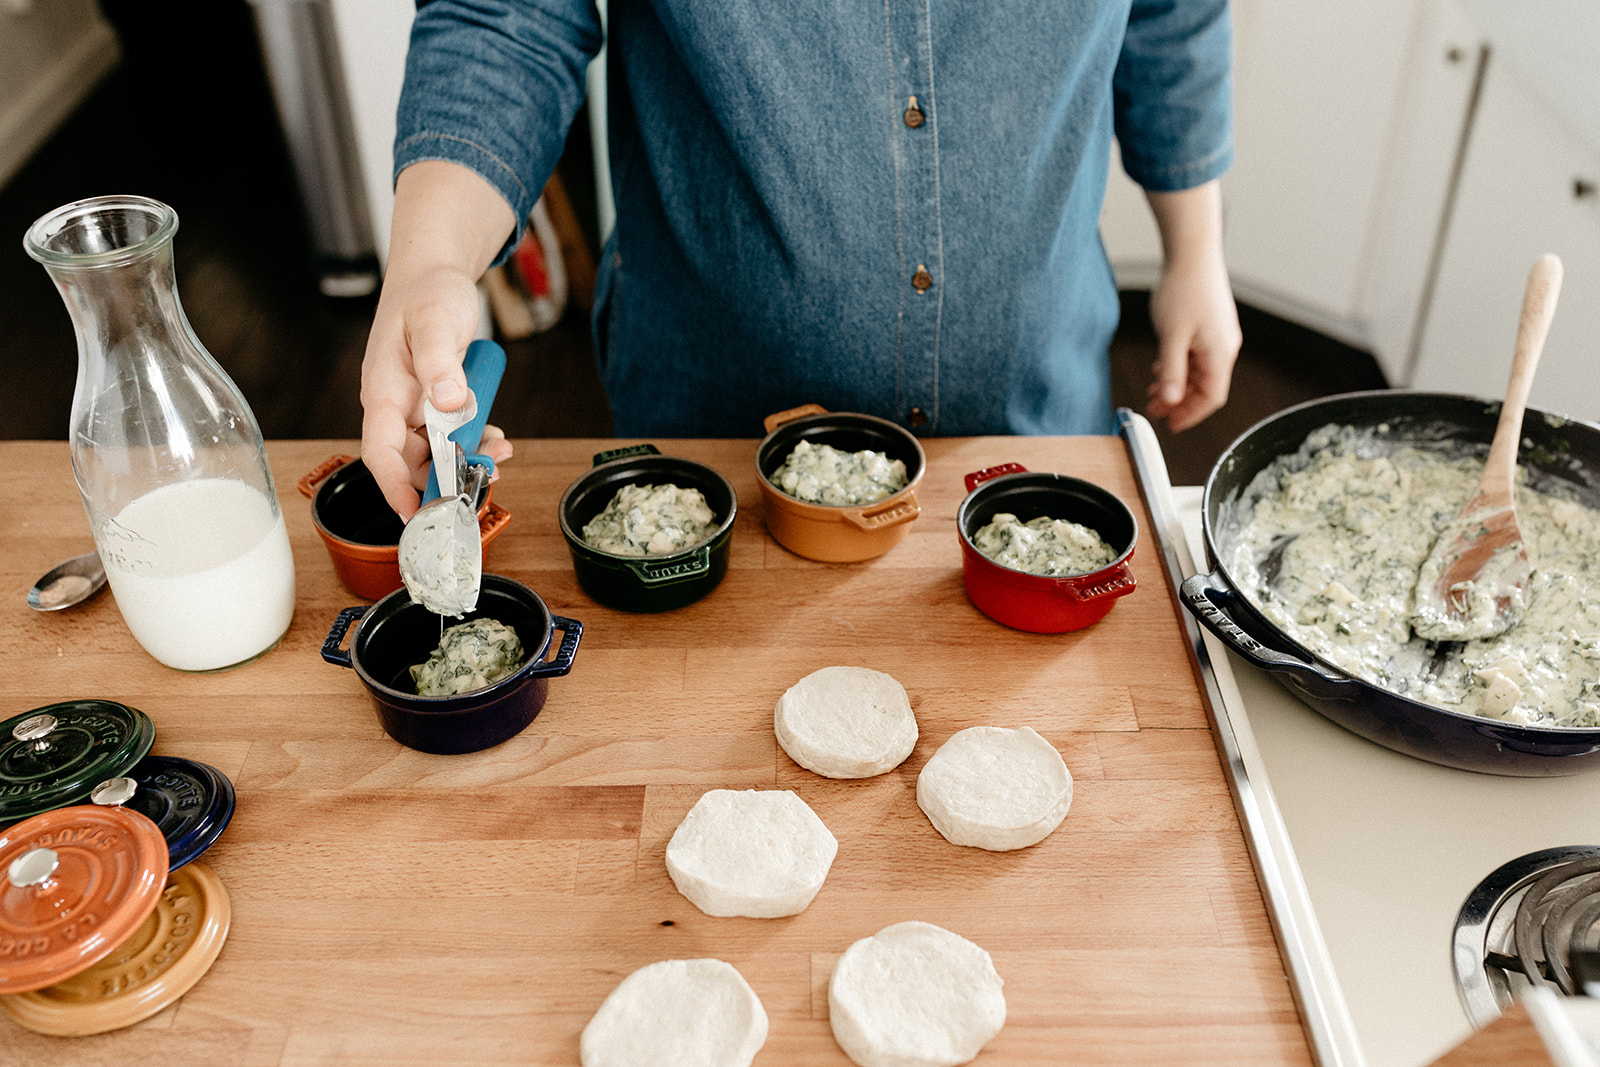
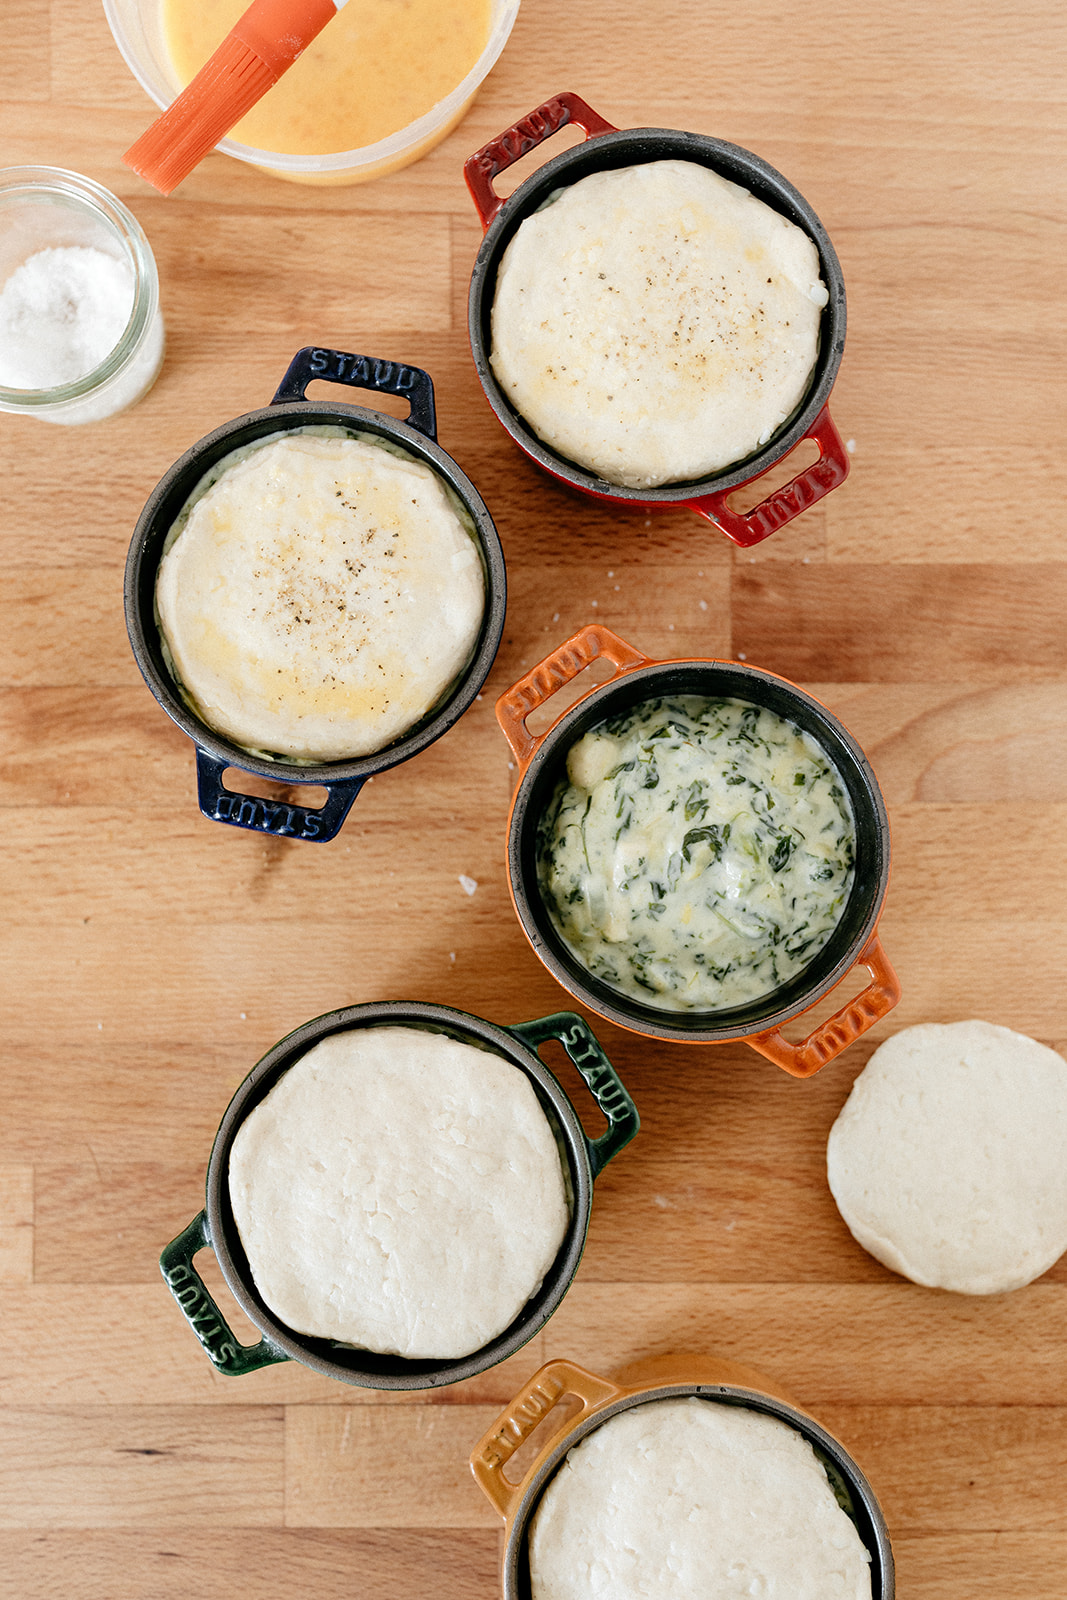
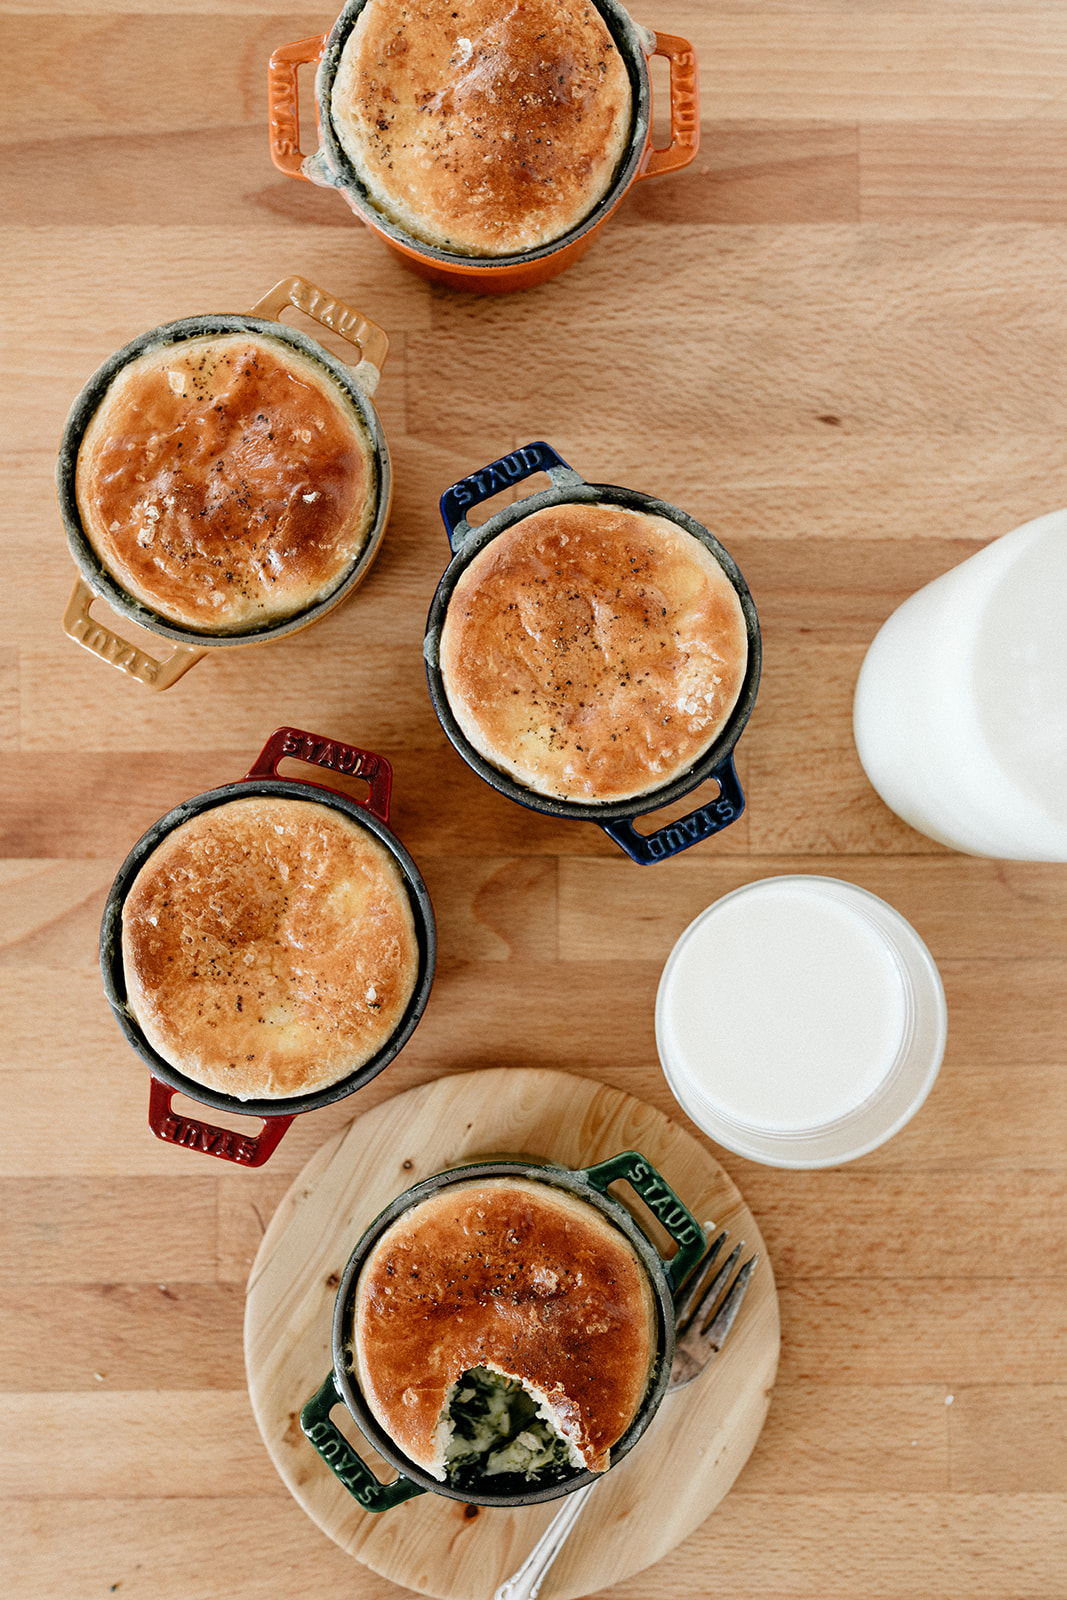
In a large skillet or pot set over medium high heat, melt the butter and add the onion and a pinch of salt and cook, stirring until soft, about 5-7 minutes. Add the garlic and cook for another minute. Stir in the flour so that it gets evenly distributed and cook for an additional minute (it’s ok if the pan looks dry at this point). Add half the milk, stirring continuously with a whisk or wooden spoon until thickened, and then repeat with the other half of the milk. You’ll know it’s thick enough if it coats the back of a spoon. Reduce the heat to medium and stir in the chicken soup bouillon and then add the chicken, thyme, and a few turns of pepper and simmer, stirring often, for 10-15 minutes, until the chicken is cooked through and no longer pink. Add the cream cheese, spinach, artichokes, parsley, a few good shakes of hot sauce, and a few turns of black pepper. Stir until the cream cheese is melted. Taste and adjust as desired.

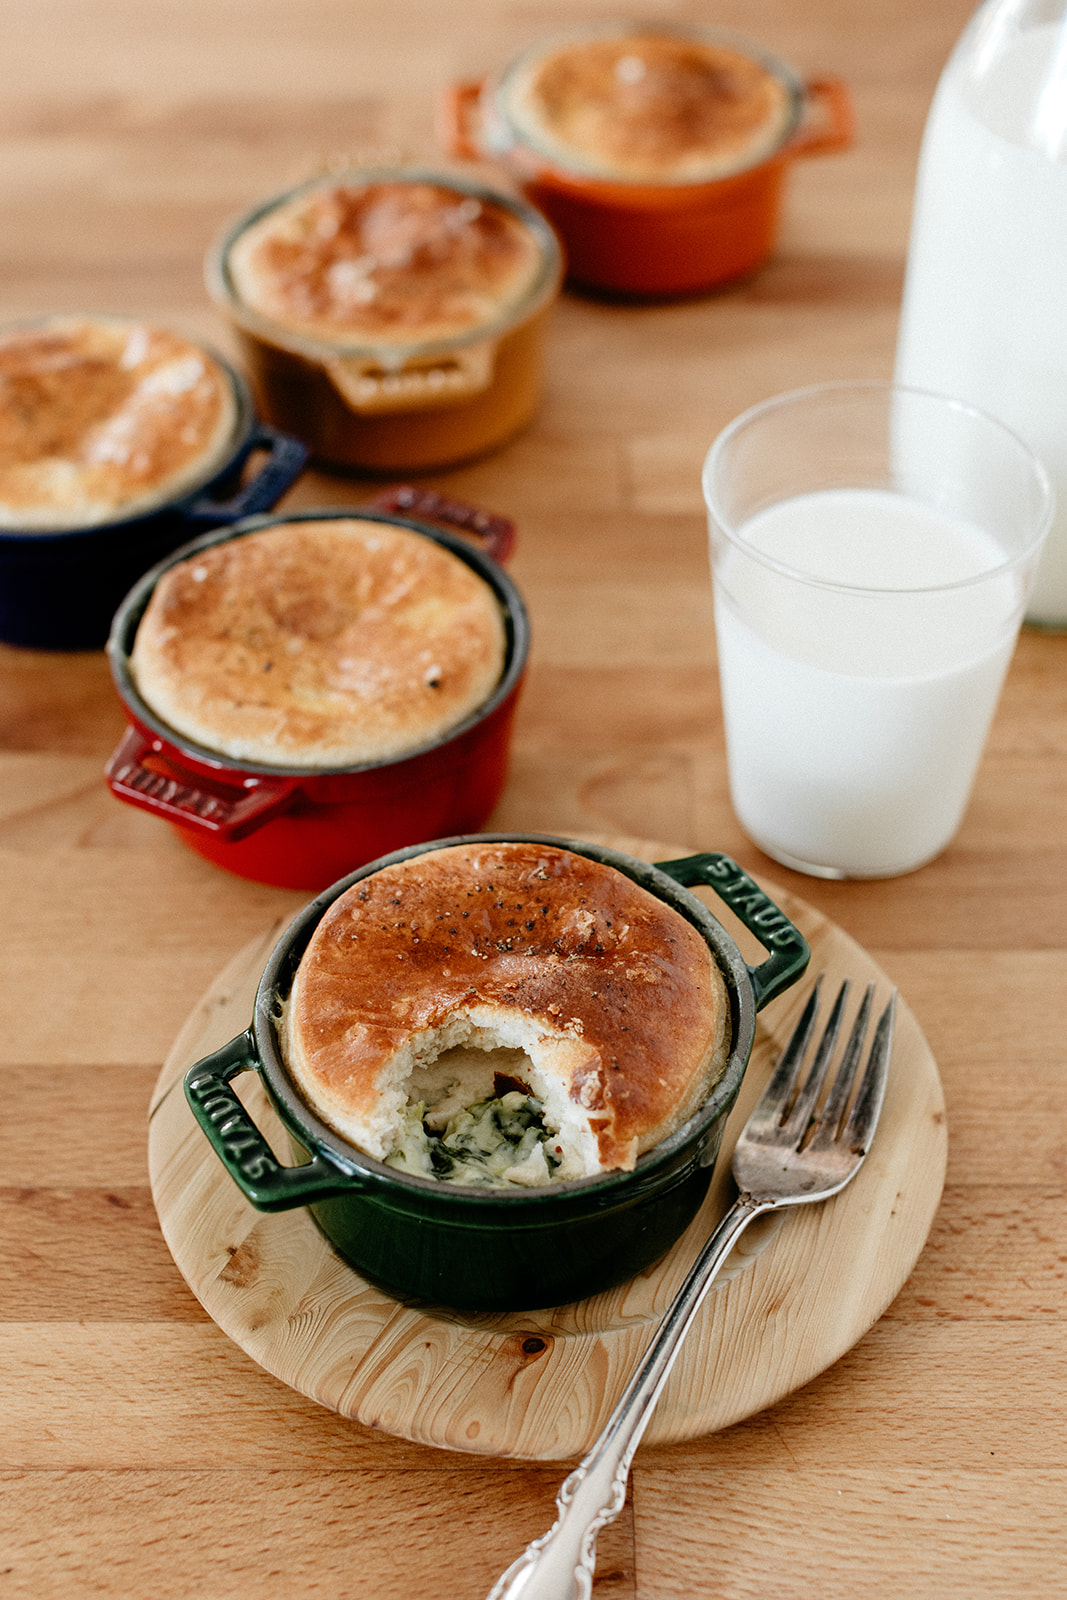
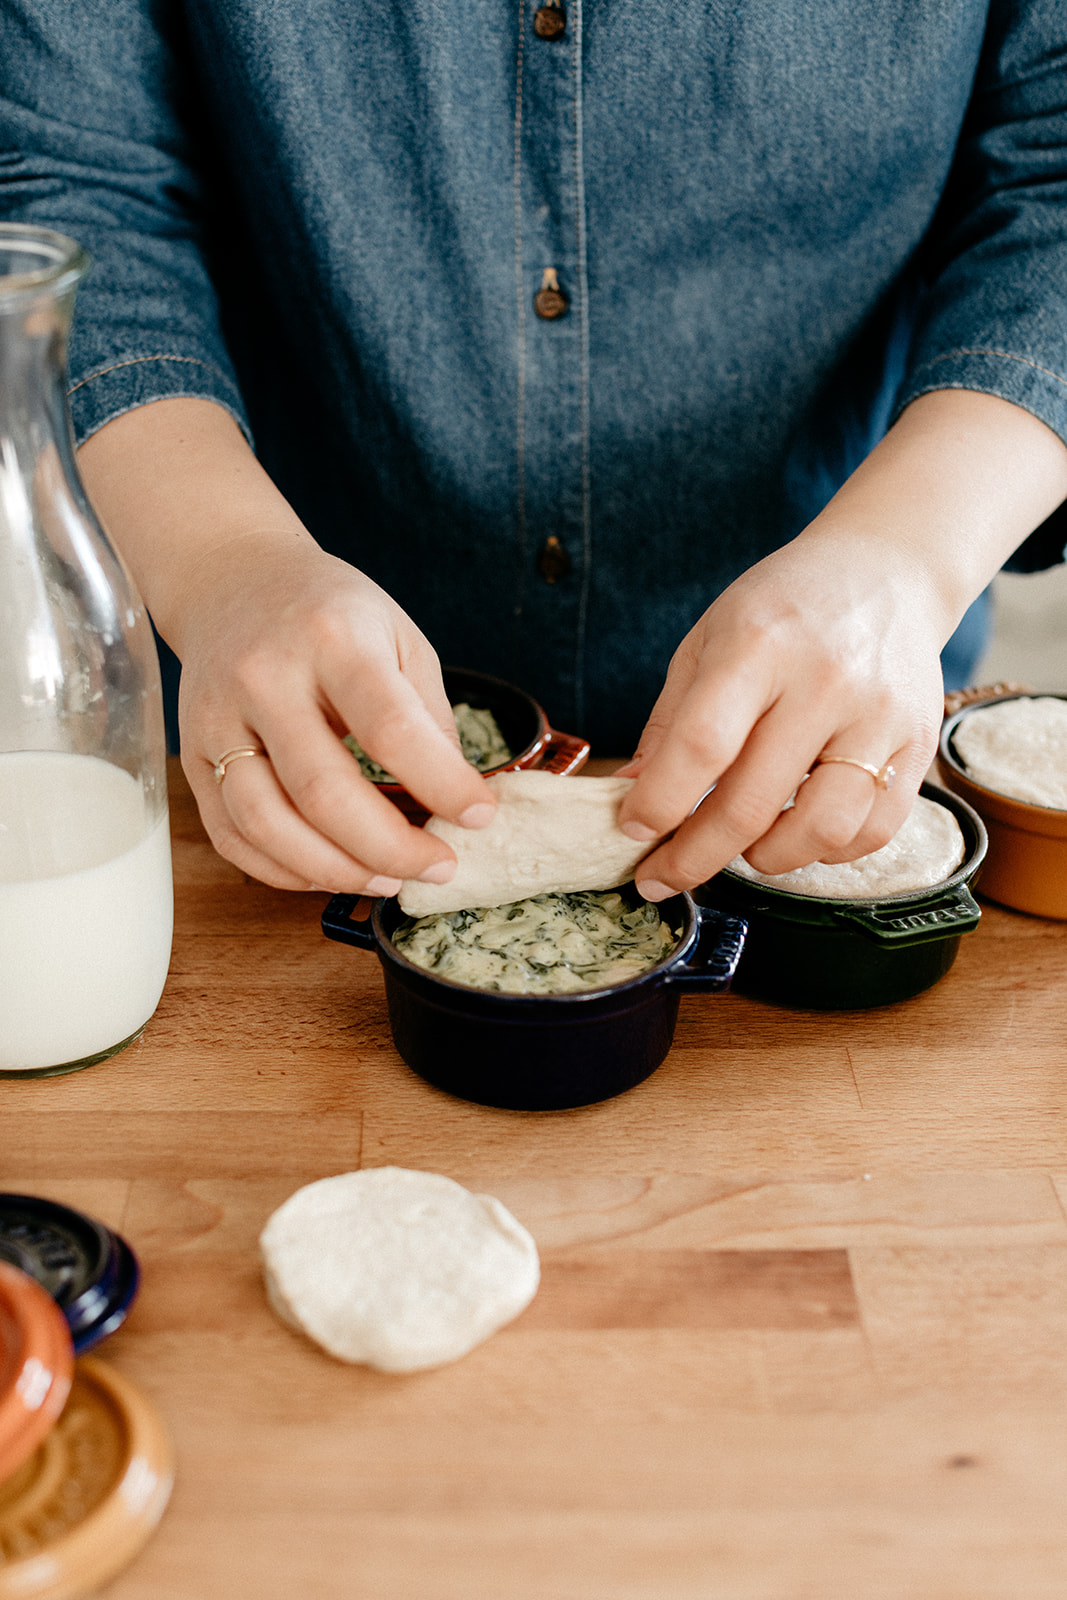
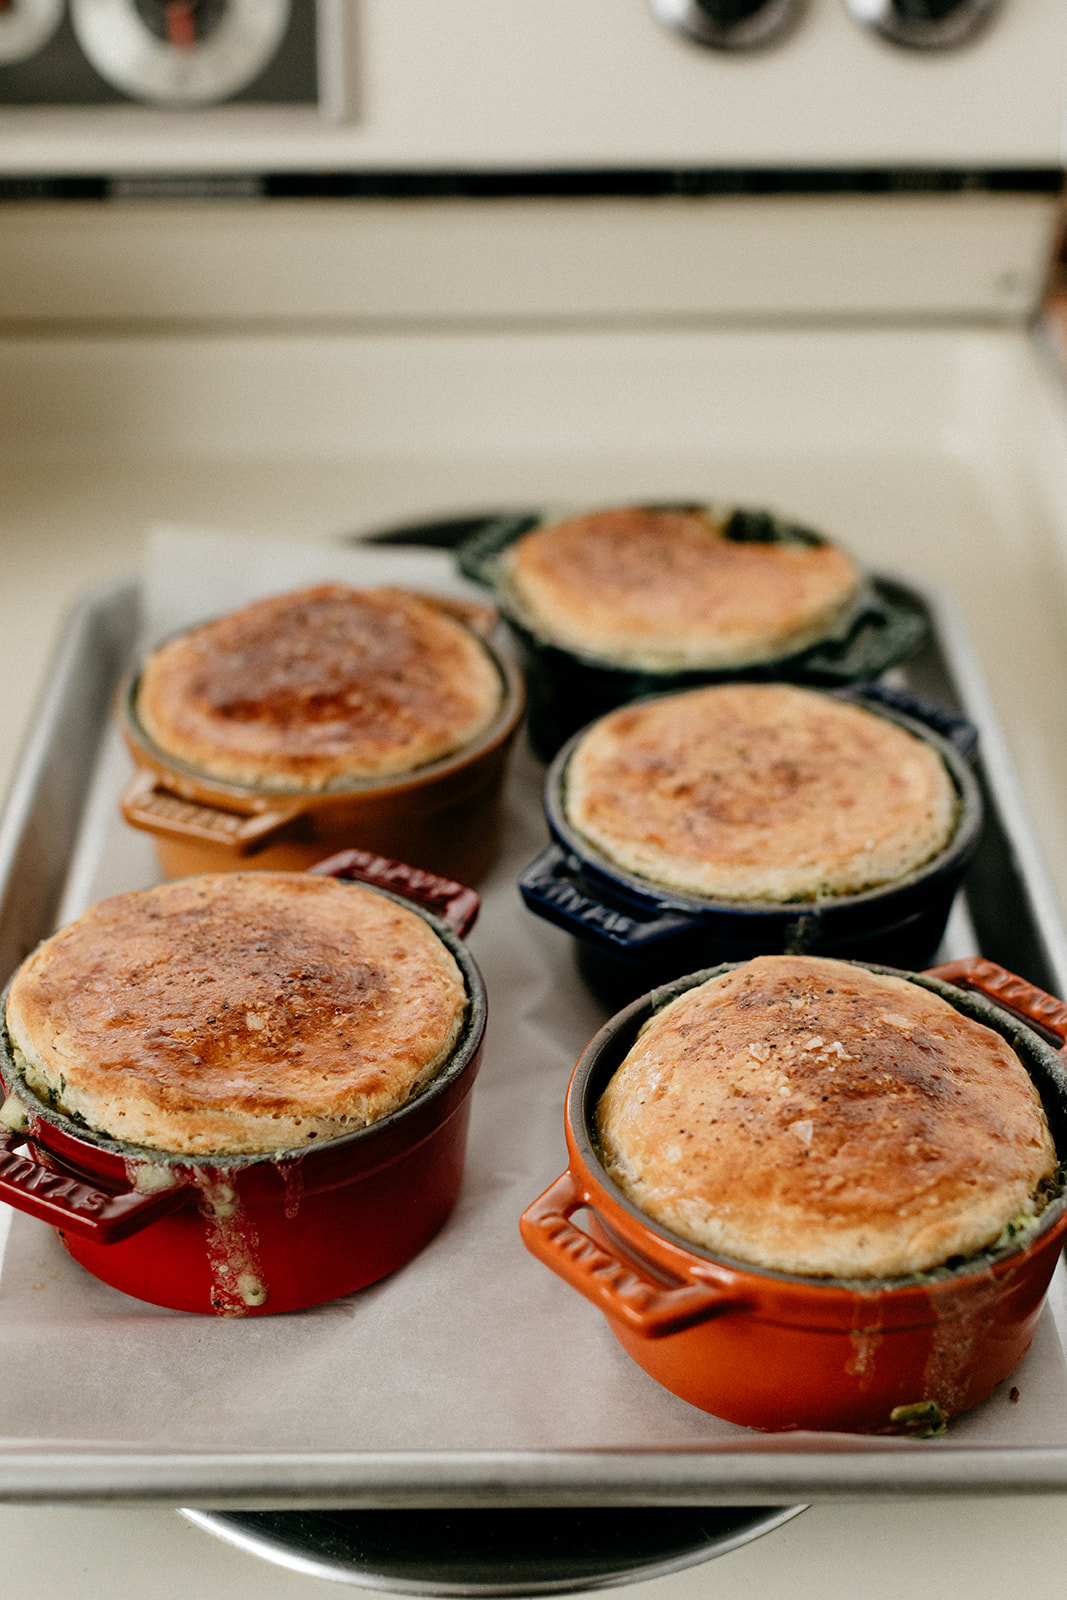
If baking immediately: divide into eight 8-oz oven-safe ramekins or foil containers and top each with a biscuit (squish the biscuits a little bit so that they’re wide enough to cover the whole top). Brush the tops of the biscuits with egg wash and sprinkle with black pepper and flaky salt. Place on a baking sheet (in case any of the mixture overflows) and bake until the biscuits are golden brown on top; begin checking for doneness at 15 minutes. Let cool slightly and enjoy!

To freeze: let the mixture cool slightly. Divide into eight 8-oz oven-safe freezer-safe ramekins or foil containers and top each with a biscuit (squish the biscuits a little bit so that they’re wide enough to cover the whole top). Brush the tops of the biscuits with egg wash and sprinkle with black pepper and flaky salt. Cover with foil and freeze for up to 3 months. To reheat, place it on a baking sheet, and bake at 400ºf covered for 30 minutes, remove the foil and continue to bake for about another 15 minutes, until the biscuits are browned and the whole thing is heated through. Let cool slightly and enjoy!


-Yeh!

Thank you, Milk Life, for sponsoring this post!

Photos by Chantell and Brett Quernemoen.

Baby Meal Prep Guide

I have been looking forward to baby prep since, like, I myself was a baby. I love making prepackaged foods with labels and stuff, it’s the same part of me that explodes with excitement whenever I remember that in a few years I’ll get to start packing cute little lunchboxes every day. I currently have enough meals prepped for a good couple of months, including specific dishes for Passover, Father’s Day, Mother’s Day, and my birthday. (You’re going crazy, says Eggboy. But we’ll see who the crazy one is when he’s eating a nice hot burrito at 3am while holding a screaming baby!) Not every aspect of my impending life as a mother is as ready as my freezer, of course, seriously how do I change a diaper, but since I’ve learned so much and had so much fun preparing all of these meals, here is a post about it!

As soon as I learned of Poppy Seed’s existence, I started a list on my phone of prep-ahead-able foods that I wanted to make and also blog about, since I figured this would be a great way to organize all of the recipes that I wanted to post during my maternity leave. (So a lot of the recipes that are mentioned here will be posted over the next 3-4 months.) My goals for this list were to find foods that were comforting and delicious, but that were also going to pack some nutrition and not be too heavy. I didn’t want to just fill my freezer with hotdishes and mac and cheese, so I made sure to also add things like smoothie packs, veggie dumplings, and spinach-packed meatballs. I also asked Instagram for suggestions and the most suggested things were:

-Handheld foods

-Oatmeal muffins, to aid with lactation

-Everything on Pinch of Yum’s freezer meal guide

-Carby/comforting things like mac and cheese, lasagna, and chicken pot pies (and individual portions of them)

-Soups

-Breakfast sandwiches and burritos

So I compiled my master list! Here it is. Not everything is frozen, some of it is just shelf stable, and there are also lists of other grocery store items that I plan to have on hand as well. I’ve prepped most of these things so far. I have another week before my due date to try to get to the rest of it, but if I don’t we’ll be ok.

Oh and here’s a confession: we recently bought a new freezer that was on sale at Sam’s Club on the premise that it’ll definitely get put to use in the future for cakes, preserving rhubarb, and meal prep for my next 12 kids. So between that, the chest deep freeze that we inherited from Egggrandma, the little shoebox-sized freezer in my Smeg fridge, and the other fridge/freezer that we inherited from other Egggrandma, we have four freezers. 4! Here’s the new one that’s holding most of the meal prep stuff, the other ones are too messy for a photo op.

My Meal Prep Master List

* = recipe coming soon. I’ll post links here as they get posted!

Breakfast:

Green smoothie packs

Cocoa berry smoothie packs (the recipe is in my Instagram Meal Prep story highlights)

Potato bagel breakfast sandwiches*

Chocolate peanut butter oatmeal muffins

Sarah’s peanut butter granola

Other things I plan to have on hand: avocados, oranges, apples, berries, yogurt, ezekiel/seedy bread, matzo, peanut butter, jam, sliced cheese

Lunch:

Black bean sweet potato burritos*

Mini veggie pizzas

Kale and white bean soup

Veggie dumplings

Egg and chive dumplings

Everything bagel mac and cheese

Mozzarella pesto mac and cheese

Other things I plan to have on hand: salad kits, sandwich stuff (COLD CUTS GET @ ME), baby carrots, celery

Dinner:

Wild rice soup

Chana masala

Turkey bean chili and cornbread 

Chicken pot tater tot hotdish

Knoephla soup

Spinach and artichoke chicken and biscuits

Other things I plan to have on hand: salad kids, broccoli/other quick cooking vegetables, Rao’s marinara sauce (my fave!), pasta, rice, frozen cauliflower/sweet potato rice

Desserts, snacks, and occasion things:

Sausage and pancakes on a stick

Taco pizza

Sarah's chocolate chip cookie dough

Alana’s Furikake snack mix

Cookie salad ice cream

Homemade peanut butter cake mix

Passover:

Spring veggie white matzo lasagna

Chicken soup

Turkey spinach meatballs

Meatless meatballs (recipe in Molly on the Range)

Lily’s Charoset ice cream

Passover chocolate chip cookie dough

Brisket: I’ll probably only get to this if Poppy Seed is like 2 weeks late, but braised meats, including brisket, do freeze and reheat incredibly well. 

Here are some general rules for freezing and reheating certain types of foods! They might not be exact for every single recipe (use your nose/your best judgment) but consider this a roadmap to help get you started.

Mac and cheese

How to freeze: Prep up to the baking step, transfer to containers, let cool, cover, label, and freeze for up to 3 months.

Ideal container: Containers that are both oven safe and microwave safe (these 10oz kraft paper cups are my favorite). Glass would also work but you want to be careful with drastic temperature changes, like going from the freezer to the oven immediately (check the manufacturer’s notes) or defrost in the fridge overnight before baking. Foil or metal containers, either individually sized or casserole sized will work but that eliminates the option of reheating in the microwave.

How to reheat individual portions: Oven at 375ºf for 25 minutes covered with foil + 20 minutes uncovered, or until heated through. Microwave for 4 minutes, stirring halfway through. 

How to reheat full casseroles: Oven at 375º for about an hour covered with foil + 15-30 minutes uncovered, or until heated through. 

Example recipes: Everything bagel mac and cheese, all of the mac and cheeses in Molly on the Range

Etc: Here are printable labels for individual portions, they are for Avery labels #6570.

Hotdishes, casseroles, lasagnas, matzo lasagna

How to freeze: Prep up the baking step, transfer to containers, let cool, cover, label, and freeze for up to 3 months.

Ideal container: Foil or metal, either individual 8oz or 10oz sized or larger casserole sized. Glass would also work but you want to be careful with drastic temperature changes, like going from the freezer to the oven immediately (check the manufacturer’s notes), or make sure to defrost in the fridge overnight before baking. Individual kraft paper cups would also work

How to reheat individual portions: Oven at 375ºf for 25 minutes covered with foil + 20 minutes uncovered, or until heated through. 

How to reheat full casseroles: Oven at 375º for about an hour covered with foil + 15-30 minutes uncovered, or until heated through. 

Example recipes: Chicken pot tater tot hotdish, paprikash hotdish, turkey wild rice hotdish, classic tater tot hotdish

Etc: Here are printable labels for individual portions, they are for Avery labels #6570.

Smoothies

How to freeze: Put all ingredients (minus any liquid) in a freezer safe container, label, and freeze for up to 3 months.

Ideal container: Ziploc bags are the most efficient because you can squeeze all of the air out of them and store them flat. I use quart sized because I make two at a time, one for me and one for Eggboy, but sandwich size will work for just one. Deli containers or other freezer-safe containers will work too.

How to prep: dump into blender, add liquid (water, juice, milk), if you have a few minutes let it sit so it can thaw just for a bit, gently break up any larger chunks that have stuck together with a butter knife, and blend on high until very smooth. You’ll likely have to use the tamper to help it along.

Example recipe: apple and peanut butter green smoothie

Potstickers

How to freeze: Prep dumplings up to the cooking step and place them on a parchment lined sheet pan that’s dusted with a little flour. Freeze them on the pan for an hour or so until solid and then transfer them to a Ziploc bag or other freezer safe container, label, and freeze for up to 3 months.

Ideal container: Ziploc bags are the most space efficient, but any freezer safe container will do.

How to reheat: Steam or fry! This is the ultimate dumpling reheating guide!

Chocolate Chip Cookies

How to freeze: Prep dough, scoop into balls, and place them on a parchment lined sheet pan. Freeze them on the pan for an hour or so until solid and then transfer them to a Ziploc bag or other freezer safe container, label, and freeze for up to 3 months.

Ideal container: Ziploc bags are the most space efficient, but any freezer safe container will do.

How to reheat: reheat pretty much exactly how you would bake them if they weren’t frozen, just add on a few minutes to the baking time.

Example recipes: Sarah’s Chocolate Chip Cookies, Tahini Chocolate Chip Cookies

Soup (my old fashioned way)

How to freeze: Cook it fully, let it cool, transfer to a container, label, and freeze for up to 3 months.

Ideal container: Any freezer safe + microwave safe container. I use these quart deli containers.

How to reheat: Microwave on defrost for a few minutes until soft and then microwave on high or pour into a pot and heat on the stove until heated through. Or defrost in the fridge overnight and microwave on high or reheat on the stove until heated through.

Example recipes: Knoephla, Kale and white bean soup, pita ribollita

Soup (if you’re working with an Instant Pot or slow cooker)

See Pinch of Yum’s post. These recipes are so clever and delicious looking!

Meatballs

How to freeze: Cook them fully, let cool, transfer to a container, label, and freeze for up to 3 months.

Ideal container: Ziploc bags are the most space efficient, but any freezer safe container will do.

How to reheat: Stovetop- Simmer in red sauce until heated through. Oven- place on a sheet pan and cover with foil. Bake at 350º for about 15-20 minutes, or until heated through.

Burritos

How to freeze: Cook them fully (err on the side of keeping a bite in your veggies since they’ll continue to cook when reheated), wrap in parchment held together with tape or a rubber band or in plastic wrap, place them all in Ziploc bag, label, and freeze for up to 3 months.

How to reheat: Wrapped in parchment (remove tape or rubber band if that was on there) or a paper towel, microwave for about 2-3 minutes (for a burrito made in a standard 10” tortilla), flipping once, until heated through. If you have the time/energy, it’ll be even better if you then grill it in a pan on both sides until browned and a little crisp. 

Pizza

How to freeze: Prep up to the baking step and place on a parchment lined sheet pan. Freeze for an hour or so until solid and then wrap in plastic wrap, label, and freeze for up to 3 months.

How to reheat: Remove plastic wrap, place on a baking sheet, and bake at a slightly reduced temperature (about 25º lower than the regular/non-freezer directions) until cheese is splotchy and the crust is golden. It will be a good few minutes longer than the regular/non-freezer directions, keep a close eye on it. 

Example recipe: Mini veggie pizzas

Muffins

How to freeze: Bake them fully, let cool, transfer to a container, label, and freeze for up to 3 months.

Ideal container: Ziploc bags or plastic wrap are the most space efficient, but any freezer safe container will do.

How to reheat: Microwave until heated through or defrost at room temp.

Breakfast Sandwiches

Breakfast sandwiches are hard!! I have one that I’ll be making on Girl Meets Farm in a few weeks that literally kept me up at night because figuring out a pre-cooked egg situation that would heat up at the same rate as the bread was a journey. Basically, if the egg is too thick, then the bread will be rock hard and overcooked by the time the egg is heated through. My solution: use a bagel, which is very sturdy and can withstand a longer amount of time in the microwave, and a layer of egg that is on the thinner side. Also go with bacon or Canadian bacon instead of a thick pieces of sausage. Reheat wrapped in parchment. My full microwaveable breakfast sandwich recipe is coming soon!!! 

Another option: the breakfast bourekas from Molly on the Range. They freeze and reheat in the microwave or toaster oven beautifully. 

Cauliflower Fried Rice

This is still in testing mode for me but as I was making some for dinner the other night I realized that cauliflower fried rice would be a really easy and healthy dinner to have in the freezer. I buy Green Giant’s cauliflower/sweet potato rice mix from the freezer section and all it needs is about 5 minutes in a skillet, so I figure that combining it with other finely chopped or small vegetables (alliums, kale, broccoli, peas, corn), pre-cooked proteins (scrambled eggs, cooked chopped bacon, chopped ham, cooked ground sausage, etc.), and flavorings (grated fresh ginger, soy sauce, kimchi brine, sesame oil, sriracha, black pepper, etc.) would make an easily reheat-able meal in a bag that you could just dump in a skillet, heat, and eat. That makes logical sense right? I’ll tell you how it goes!

Resources

Labels- It’s important to label everything with the date and the contents! Even if you’re 100% positive that you’ll remember, you want to be prepared for sleep deprivation brain and also make it easy for visiting friends/family members to heat stuff up if they’ve offered to help. A sharpie marker and masking tape does the trick, or you could make labels on the computer (Avery makes it really easy to make customizable labels).

Containers- The Webstaurant Store is my go-to for deli containers and kraft paper containers because they have tons of options and you can buy them in bulk. Most grocery stores also have a wide selection of foil containers. And of course trusted brands like Pyrex and Rubbermaid make great covered containers and covered casserole dishes.

Freezer guides- Pinch of Yum’s freezer guide! Also the Kitchn has a lot of freezer tutorials, and if you Google “how to freeze such and such,” you’ll usually find tons of results!

My Instagram meal prep story highlight- I’ll be posting more recipes and tips over the next few months here!

Phew! Ok I think that’s it! Since I’m about to go on maternity leave, I might not be able to answer many prep-related questions but I hope this guide helps!!!!

-Yeh!

photos by chantell and brett quernemoen

Blueberry Cream Cheese Hamantaschen

Poppy Seed is currently kicking up a gigantic storm and I think it’s because she/he a) wants to play on the rocking hippo, b) wants to play in tomorrow’s snow storm in her (his?) new cute puff-ball outfit, or c) knows that Purim is around the corner and wants to party hard. According to this past week’s doctor’s appointment though it sounds like baby’s first Purim isn’t going to be until next year. That’s ok, best to avoid those loud groggers on newborn ears. And best to not have my first big act of mom guilt come from not having the cutest ever Purim costume lined up. Also best to give me more time to nest and prepare and google how to change a diaper!!!

Here is another ode to my number one pregnancy craving of cream cheese! Sure, a poppy seed filling might have been more fitting this year but… I have never really been moved to risk getting poppy seeds stuck in every single one of my teeth in the interest of eating a poppy seed hamantasch over a fruity one. Also eating poppy seeds these days is actually kind of awkward, like I’m eating my child. Which is also the reason why we’ve officially eliminated “Marzipan” as a baby name…. What was I talking about again. Cream cheese! I have six blocks of it in my fridge right now and its sourness just gets the job done. It adds such nice creaminess and oomph to these hamantaschen. Blueberries have also been high on my cravings list so I’ve wrapped them up in a wheaty cinnamony crunchy hamantaschen shell. The shell here is loosely based on Leah’s, which I love because the dough is so smooth and easy to work with and it doesn’t require softened butter or a stand mixer. I added some whole wheat flour, cinnamon, and a little lemon zest since I love those flavors with blueberry (they make them blueberry muffin-like!) and I also played around with using coconut oil, which adds the loveliest hint of coconut flavor. This is a very low-maintenance, yet extremely flavorful hamantaschen recipe.

Just don’t (DON’T!!!) forget the egg wash on the inside. Egg wash will improve the success rate of these keeping their shape in the oven and not exploding open by one million zillion percent.

Chag almost Purim, fronds!

And I’m using Our Family cream cheese here! Which has been sustaining my wild cream cheese craving!!


Blueberry Cream Cheese Hamantaschen

makes about 24 cookies

Ingredients

Dough

2/3 c (86g) whole wheat flour

1 3/4 c (228g) all-purpose flour, plus more for dusting

1 tsp baking powder

1/2 tsp kosher salt

1/2 tsp cinnamon 

1/4 c (50g) vegetable oil or unrefined coconut oil, melted and slightly cooled

2/3 c (132g) sugar

2 large eggs

1 1/2 tsp vanilla

zest of 1/2 lemon

Filling

8 oz Our Family cream cheese, softened

1 c (325g) blueberry jam

Flaky salt

Assembly

Egg wash: 1 egg beaten with a splash of water 

Coarse sanding sugar or turbinado sugar, or powdered sugar

Directions

To make the dough, combine the flours, baking powder, salt, and cinnamon in a medium bowl. In a large bowl, whisk together the oil and sugar. Add the eggs, whisking after each, and then whisk in the vanilla and lemon zest. Using a wooden spoon or spatula, mix in the dry ingredients to form a dough. Divide the dough in half and pat out into discs. Wrap in plastic wrap and refrigerate for 2 hours or up to a day or two. 


Preheat the oven to 350ºf and line two baking sheets with parchment paper and set them aside.

On a floured surface, working with one dough disc at a time, roll it out until it is 1/8” thick, adding more flour as needed to prevent sticking. Cut out 3” circles, re-rolling scraps as needed. Place a 1 teaspoon schmear of cream cheese in the center (I find it easiest to smoosh it on with my fingers) and top with a heaping teaspoon of jam, allowing a 1/2” border around the edges. Brush the border with egg wash and fold the edges up to form a triangle shape, pinching the corners firmly to seal. Sprinkle the jam with a tiny pinch of flaky salt. An optional fun step for added crunchiness: brush the outside edges with egg wash and cover with coarse sanding sugar or turbinado sugar, if using. Place on the baking sheets, 1” apart and bake until the bottoms are lightly browned, begin checking for doneness at 13 minutes. Let cool slightly and enjoy! If you didn’t go the sanding sugar route, you can dust with powdered sugar or just leave them plain! 


-yeh!

photos by chantell and brett quernemoen

this recipe was created in partnership with our family!

monster cookie cake

I am officially 9 months pregnant and officially in major freakout nesting mode!!!!! I am of the textbook vibe: please-move-the-crib-there-no-please-move-it-there-or-maybe-this-wall-needs-to-be-painted-a-dark-mustard-color-ohmyguhhhhhh-we-don’t-have-enough-toys!!! *Sits in the gym parking lot and orders the playpen in the most frantic manner* *Can’t decide on any of the nursing bras so buys all of them* *Cries in the Old Navy baby department!!!!*

The good thing is that I’ve had the energy to get worked up about everything. Aside from the average two nights a week when I’m up all night long obsessing about things like rocking chairs versus gliders, I’ve been sleeping like a rock. I was totally bracing myself for the return of first trimester fatigue during my third trimester, as I’ve read is often the case, but I truly do not have the time to be tired right now. I have a list of meals to be prepped (I’ll blog about this soon!), a bunch of furniture to rearrange (or rather, direct Eggboy to rearrange), and a slew of recipes to edit for both Girl Meets Farm and blog posts that I’ll schedule to go live during my maternity leave. And I need to stay current on the Bachelor which is taking up so much time, gosh geez. Luckily I’ve been able to focus a lot of this energy into keeping up with my workouts which have consisted of lifting itty bitty weights and doing resistance stuff and also waddling quickly around the track (while listening to Unorthodox, obviously). Which I think has been key in not driving everyone around me too crazy. I think. They haven’t told me otherwise. But then again what monster calls a 9-month pregnant lady crazy to her face?

Speaking of monsters, I made a monster cookie cake! It was for Eggmom’s birthday! I didn’t know what a monster cookie was until I moved here and kept hearing about the gigantic gooey ones at the UND cafeteria. I’ve never actually had one because I’m afraid of getting caught sneaking onto campus but I’ve had others and they are sooo good: peanut butter, oatmeal, and M&M’s all folded into a soft chewy delicious cookie. It occurred to me that it needed to be turned into a cake when I was brainstorming cakes for Eggmom’s birthday earlier this year. She loves M&M’s. And has oatmeal every morning. And ate peanuts by the handful when she was pregnant with Eggboy. So a monster cookie cake seemed perfect!! The oats and peanut butter in the batter here make it extra dense and moist, and the chocolates (I went with Trader Joe’s naturally colored candy coated chocolates) add good textural excitement. This is a super heavy cake! It’s slathered with peanut butter cream cheese frosting which drives home the peanut flavor and also adds a hint of sourness that’s the perfect balance to the cake. This frosting is sooooo goooood, you might want to make extra so you can just eat it with a spoon. You can totally bake this batter into cupcakes (it’ll make a lot, like 40!) and if you’re really feeling the monster energy, I feel like a few marzipan monsters around the sides would be cute. Or you can just go the normcore rainbow route like I did!

I made this cake using Our Family ingredients, which was especially fitting since I made it for family!! <3


monster cookie cake

makes one 3-layer, 8-inch cake

Ingredients

Cake

2 c (472g) boiling water

1 1/3 c (106g) rolled oats

2 c (260g) all-purpose flour

1/2 c (64g) whole wheat flour, or more all-purpose flour

1 1/2 tsp kosher salt

1 1/2 tsp baking powder

1 1/2 tsp baking soda

1 1/2 tsp cinnamon

1 c (200g) granulated sugar

1 c (200g) brown sugar

1/2 c (100g) flavorless oil, like canola

1 c (256g) creamy unsweetened peanut butter

2 large eggs

1 tb vanilla extract

1 c (240g) buttermilk 

2 c (320g) candy coated chocolates, plus more for decorating

Frosting

1/2 c (113g) unsalted butter, room temperature

1 c (226g) our family cream cheese, room temperature

1/4 c (64g) creamy unsweetened peanut butter

3 c (360g) powdered sugar

A pinch of kosher salt

1 1/2 tsp vanilla bean paste or extract

2 tb (30g) heavy cream

clues

Preheat the oven to 350ºf. Line the bottoms of three 8” round cake pans with parchment, grease the parchment and sides of the pans and set aside.

In a medium bowl, combine the boiling water and oats, cover, and let sit for 20 minutes.

In a separate medium bowl, whisk together the flours, salt, baking powder, baking soda, and cinnamon. 

In a large bowl, whisk together the sugars, oil, and peanut butter. Add the eggs one at a time, whisking after each. Whisk in the vanilla and buttermilk and then stir in the dry ingredients and then the oats. Fold in the candy chocolates (quickly, to prevent the colors from bleeding), and then transfer to the cake pans. Bake until a toothpick inserted into the center comes out clean; begin checking for doneness at 30 minutes.

Let cool in the pans for 10 minutes and then transfer to a wire rack to cool completely.

To make the frosting, beat together the butter, cream cheese, and peanut butter until smooth. Add the powdered sugar, salt, and vanilla and beat to combine. Beat in the heavy cream.

Stack up the cake layers with a layer of frosting between each and then frost all over. Decorate with candy coated chocolates. Enjoy!


-yeh!

This recipe was developed in partnership with Our Family!

photos by chantell and brett quernemoen