rhubarb rose jam

Happy Sunday!!! It feels weird to have my computer open on a Sunday but Cousin Elaine and I made this rhubarb rose jam yesterday that I am first-day-of-summer-camp excited about. I wanted to write it down ASAP so I wouldn’t forget it and also so that we can all have time to make it over and over before rhubarb season ends. 

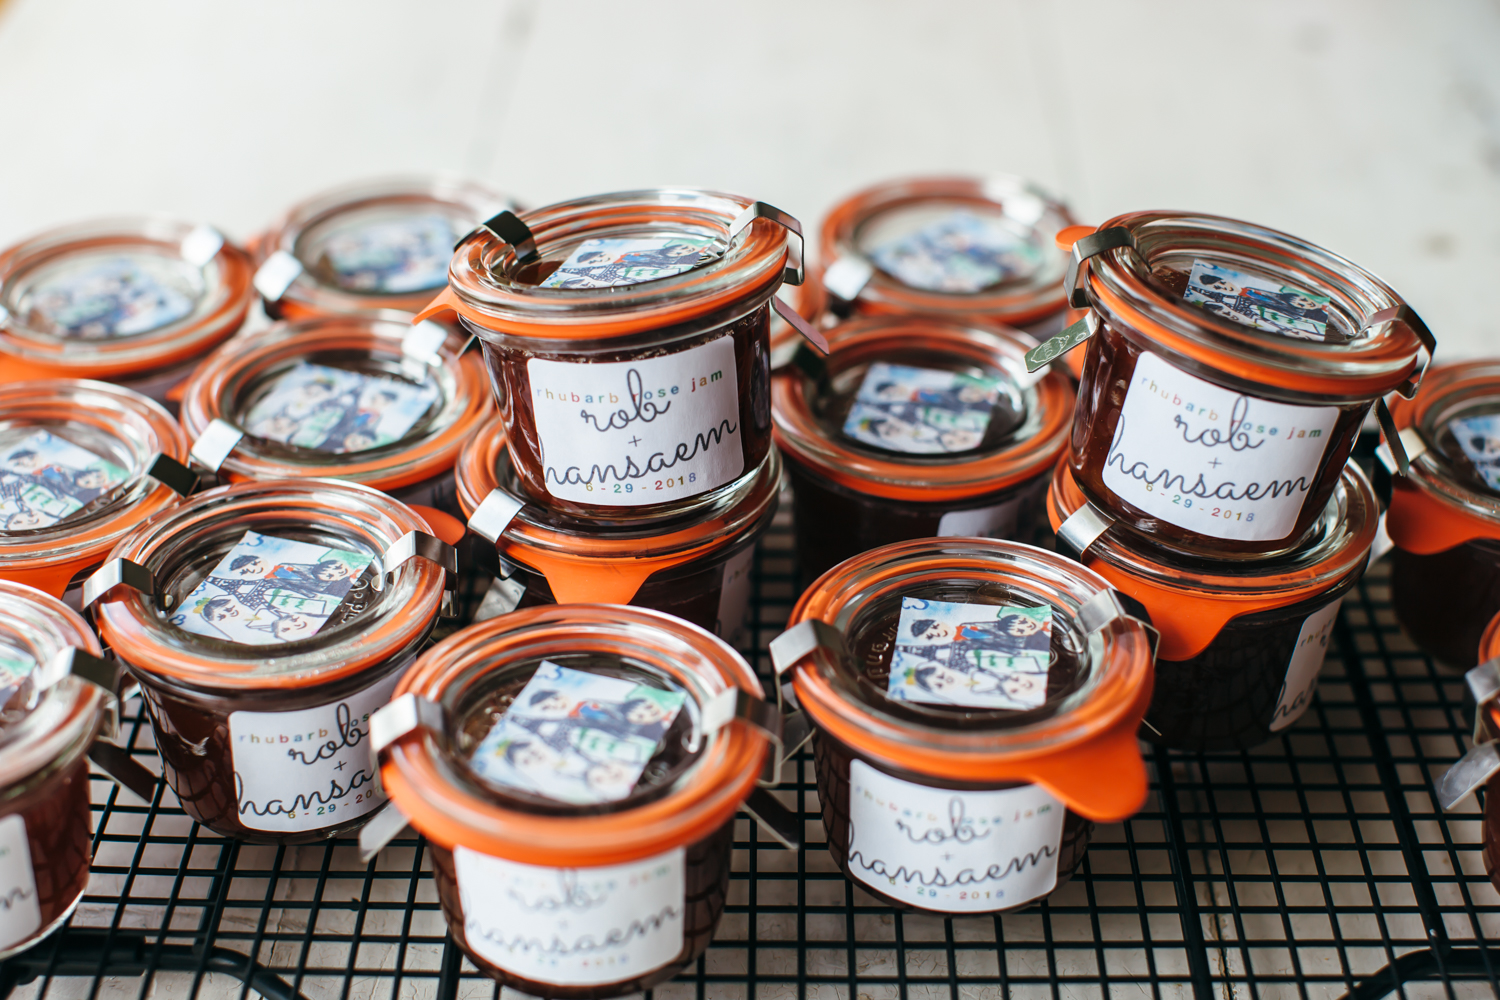
It is based on Claire Ptak’s rhubarb and angelica jam from The Violet Bakery Cookbook, only I’ve swapped out angelica and added vanilla bean and rosewater. Rosewater might be my favorite friend of rhubarb and because I was making this jam as party favors for Rob and Hansaem’s very elegant wedding in Paris later this month, I figured rosewater would be the perfect addition. And the vanilla bean just kind of gives the whole thing a luxurious hug. 

The measurements below are for a very big batch (triple of Claire’s), this made enough to fill 25 cute 2-oz Weck jars, and my 5.5 quart dutch oven was the perfect size to hold everything. If you don’t have a jungle of rhubarb in your yard that you need to use up or a zillion party favors to make, you can either get your calculator out and calculate a third of these ingredients (the timings stay the same), or come over and take some of my rhubarb. 

In a good container with a tight fitting lid, this will keep in the fridge for up to a month, but of course you can also can it with sterilized jars and seals and the whole bit. Yesterday was my first time doing the latter! Cousin Elaine is the canning expert of the family, so she and I spent the afternoon sterilizing jars and dipping things into boiling water to kill the cooties. Canning always seemed intimidating to me when I read about it on paper but when Elaine walked me through the process it all made complete sense. So if you’re considering canning for the first time, my biggest recommendation would be to get yourself a Cousin Elaine.

Happing Jamming!!


Rhubarb Rose Jam

Makes enough to fill 25 cute 2-oz jars

ingredients

1,500g (3 lb 6 oz) rhubarb, chopped into small pieces

1,125g (5 1/2 cups + 2 tb) sugar

juice of 3 lemons

1 tsp rosewater

1 tb vanilla bean paste or 1 vanilla bean, scraped

clues

In a large heavy pot, combine the rhubarb and half of the sugar. Cover and macerate at room temp for 1 hour. 

Add the remaining sugar and lemon juice to the pot and bring to a boil over medium high heat, stirring until the sugar has dissolved. Once it comes to a boil, let it boil rapidly over medium high heat, stirring occasionally, for 15 minutes. It might get a little spitty, so be careful and wear an apron, and if it gets too wild you can reduce the heat a little bit. It’s ready when most of the rhubarb is translucent and the consistency has thickened (it will continue to thicken as it cools). Reduce the heat to low and stir in the rosewater and vanilla bean. Carefully give it a taste to see if the rosewater is where you want it. 

Spoon into sterilized jars and seal or transfer to containers and keep in the fridge for up to a month. 


-yeh!

blintz baked french toast

Hi! We are back from our Passover trip to Whistler and catching up on all of the missed pita and pizza, with stretchy pants for the assist!! But enough about bread for now because we first need to talk about how Whistler is the supermodel of… the Earth??? How come none of you told me to go there sooner?? Its beauty literally almost brought me to tears (Me! Your least mushy friend!). Every time we found ourselves cruising along a mountain, by ski or snowshoe, I thought I was dreaming or dead or on the set of Captain Fantastic. Sure, I’ve seen mountains and evergreens before, but these mountains were covered with the tallest, greenest, handsomest trees and happy little streams that flowed everywhere. All they were missing were baby brown bears sitting near these streams, fishing for lunch.

The skiing was way better than I could have imagined. We started off on the green paths and enjoyed the long winding coasts to the bottom but then worked up the gumption to go down some blues. My favorite path was called Burnt Stew. It started way above the tree line and had that same sort of whoosh whoosh sound that you hear anytime the camera cuts to Jon Snow standing on top of The Wall. I thought it was going to be scary but then most of the run was just like zooming down into a big ass bowl of powdered sugar. Anytime there was a steep bit I just did my thing of saying “Lindsey Vonn” out loud to myself and then it was ok. 

When we weren’t skiing, we hung out with Lyndsay and Stephanie who drove up from Vancouver <3 <3, walked around the cute as a button Whistler Village, chilled out at the silent amazing Scandinave Spa, and après-skied with the Pesach on the Mountain crew who hooked it up with the chocolate fountains and k for p s’mores. Our hardest decision every day was should we begin our après-ski with the chocolate fountain or the hot tub? Which is the sign of a dope trip. 10/10 would recommend getting your butt to Whistler (and I also hear that it is equally fantastic if not *prettier* in the summer time?!) and 10/10 would also recommend Pesach on the Mountain if you're in the market for a Passover program!

Here are a few photos from our trip. I really didn't take too many because I was busy being ~present~ and also afraid that I'd drop my phone off the side of the ski lift or into the hot tub.

And now for the chametz!! I’ve been sitting on this recipe since summer camp last year when we featured it as one of the breakfasts. We had to make enough for 150 people and it was miraculously easy! So if it’s easy to make for 150 people, you can deduce how easy it is to make for eight. It is a delicious prep-ahead brunch situation that is basically the innards of a blintz poured over thick eggy challah. I love blintzes because they straddle that line between savory and sweet. You can add sugar and fruit to make them totally sweet, or caramelized onions to go the savory route (see: Molly on the Range for that one)! My fave blintz filling ingredients like ricotta, nutmeg, and a bit of lemon zest here make this french toast extra special. It's sweet, but not too sweet (although we should probably do a savory version soon covered in caramelized onions and some sharper cheeses, right??), and it can all be prepped the day before and popped in the oven the morning of your brunch for a meal that doesn't mind if you're totally hungover.

Here I've used a half batch of the basic challah recipe from Molly on the Range and baked it in a pullman loaf pan because I love those perfectly square edges. But if you have access to a good store-bought challah (or even a bad one! the egg mixture will moisten it up and bring it back to life!) then totes do that.


blintz baked french toast

serves 8

ingredients

1/4 c (57g) unsalted butter, melted

12 thick slices day old challah

6 tb (75g) brown sugar

1 t cinnamon

1/8 tsp ground nutmeg 

1/8 tsp ground cardamom

6 large eggs

1 c (240g) whole milk

2/3 c (165g) whole milk or part skim ricotta

1/2 tsp kosher salt

1 1/2 tsp vanilla

zest of 1 lemon

Blueberries, for serving

Powdered sugar, for serving

clues

Pour the melted butter in a 9x13 casserole dish and layer in 6 slices of bread. Sprinkle on half of the sugar, cinnamon, nutmeg, and cardamom. Layer on remaining slices of bread. In a large bowl, whisk together the eggs, milk, ricotta, salt, vanilla, and lemon zest and pour it on. Sprinkle with remaining sugar, cinnamon, nutmeg, and cardamom. Cover and refrigerate overnight. Bake covered at 350ºf for 30 minutes, and then uncovered for 15 minutes, until browned. Top with berries and powdered sugar and serve!

Note: You can also arrange the bread slices as pictured, in an 8x12 casserole, sprinkling each slice with some of the sugar and spices before lining them up domino style. The custard won’t get as evenly distributed (the top parts will be a little crisper and the bottom will be super custardy), but it looks cool!!!


-yeh!

pictured: mugs by marian bull, plates and casserole dish from ikea, butter warmer from dansk

hawaij apple pie with cardamom whipped cream

it's a video!! 👇🏼👇🏼👇🏼👇🏼 (and turn the sound on, it's my pops playin!) 

I have some personal news… I make pie now. 

Which is awkward since my whole life is basically a display of loyalty to #teamcake. I even wrote a whole thing in my book about kondo-punting homemade pie dough out of my life and didn’t even feel bad. 

But now here I am in 5778 and I not only make pies but I also post near daily pictures of Sven, a cat. Which is weird because I come from a long line of dog people and so genetically I am a dog person. I just can’t help it with the fluffy ball of glee that is Sven and with the pies, well, I suddenly just can’t get enough of them. (What’s next? You think I’ll eat a banana?) I think this pie thing actually started when Erin posted a few pie videos last year. That is when the crimping thing suddenly made sense and seemed like something that would actually be fun and not miserable to do. I had just gotten home from my book/#teamcake pride tour where a bunch of you urged me to just give pie making another chance, one of you even brought me a jar of lard about it, and from there I slowly started ruling out the idea of never making a homemade pie crust again. 

I also couldn’t really stop thinking about a few bites of peach and apple pie that Sarah fed me like two years ago while she was testing recipes for her book and grew this desire to not have to drive all the way down to the cities anytime I wanted a Sarah-quality pie. 

So I took a seat in back, reached across the aisle to #teampie, and began my research. I sat with a stack of all of my favorite baking books and flipped to the very shiny, untouched pages with the pies. It felt like going down an unexplored aisle of the grocery store but I was ready to just rip the band-aid off. Here were some takeaways:

1. At first I resented the fact that when the pie comes out of the oven you can’t level off the top and have a few scrap snacks, as you would a cake. But then! I learned the satisfaction of egg washing the pie dough scraps, salting the bejeezus out of them, and then baking them into little crackers. I even made some cat shapes. 

2. I have become such a rabid pie maker that I won’t even turn the heat on in our house for fear that the crust will get too warm. Have you any long underwear recommendations?

3. You can really pile those apples into the crust since they bake down quite a bit. But, as I learned in Stella’s book, it’s important not to over-bake them, lest they get mushy and prevent you from getting a clean slice. Baking until the apples are 195ºf is what Stella recommends and that ensures that the apples are fully cooked but still retain their structure. 

4. All-butter pie crust (Pâte Brisée) recipes are all pretty much the same and consist of 1 1/4 c flour, a bit of salt and sugar, 1/2 c butter, and 3-4 tb water. There are a lot of small variations out there, like adding an egg or some dairy. I found that I prefer subbing a tablespoon of the water for a tablespoon of vinegar, as vinegar helps prevent the development of gluten, which will result in an even flakier crust. I also like using Land O Lakes® European Style Unsalted Butter here which has a fat content that is 3% higher than American butter and more fat = more flavor. 

5. A good pie has a thick golden crisp crust and innards that sing with flavor. It’s important that when you’re rolling out the dough you don’t make it too big and that when you’re trimming the edges you don’t trim off too much because you want that crust to be as thick as possible. Sarah suggests baking on a pizza stone to help the bottom crust get crispy, which is great because I like letting my pizza stone live in my oven. And as for the innards, I like amping up the apple flavor with a bottle of boiled cider that’s been in my cabinet for forever and Hawaij, which as we discussed a few falls ago, is what happens when pumpkin spice goes swimming in cardamom. It is so very good. (You can order boiled cider here but if you just can’t wait, omitting it will not be the end of the world. And you can make Hawaij with this quick lil recipe.) This baby is topped with cardamom whipped cream which only makes the Hawaij more… Hawaij-y and the whole situation more celebratory. 


6. I’m sorry, I am not sure what kind of apples are growing on our trees out back (they might be McIntosh??) but they are not too sweet, pretty crisp, and great for baking since they hold up and taste good. Here’s some literature on apple pie apples in case you don’t have a tree in your yard

Ok I can’t actually get over how satisfying pie making is and I have a feeling that I’m about to start making up for lost time as a cake snob. Molding pie crust is just so soothing. Let the crispy fall air roll in, put on the Sufjan, and omg, let me crimp the edges. That’s my favorite part. And can we just take a moment to enjoy giving it that little hug at the end to make sure his crust stays on the pie pan rims?? I don’t plan on getting into all of those fancy pie crust art productions that I see around the internet but I do plan on latticing through the winter and beyond. 

Hello, #teampie!!!! 
 

it's another vid!! 👆🏼👆🏼👆🏼👆🏼👆🏼


hawaij apple pie with cardamom whipped cream

makes one 9-inch pie

Ingredients

Filling

8 apples (1000g), washed and dried
Juice of 1 lemon
1 c (200g) dark brown sugar
2 tsp Hawaij
1/4 tsp cinnamon
3 tb cornstarch
3/4 tsp kosher salt
1 tsp vanilla extract
2 tb boiled cider 

Crust

1 tb apple cider vinegar
6 tb water
2 1/2 c (318g) all-purpose flour, plus more for dusting
1 tb sugar
1 tsp kosher salt
1 c Land O Lakes® European Style Super Premium Unsalted Butter, cold and cubed

Assembly

2 tb Land O Lakes® European Style Super Premium Unsalted Butter
1 egg, lightly beaten
1 1/2 tb turbinado sugar
Flaky salt, optional

Cardamom Whip

1 c Land O Lakes® Heavy Whipping Cream
1/4 c powdered sugar
1/4 tsp ground cardamom
 

Clues

Chop the apples into 1/4” slices, place them in a large bowl, and toss with the lemon juice. Add the brown sugar, hawaij, cinnamon, cornstarch, and salt and mix to combine. Mix in the vanilla and boiled cider. Cover the mixture and let it sit at room temperature for an hour or so (while you make the pie dough). 

To make the dough, combine the cider vinegar and water in a measuring cup and stick it in the fridge (or the freezer even) to get really cold. In a large bowl or food processor, combine the flour, sugar, and salt. Add the butter and either use your hands to toss it with the flour and pinch the butter into flat sheets or pulse in the food processor, incorporating the butter so that about 75% of the mixture is mealy. The rest of the mixture should have some slightly larger, pea-sized bits of butter. Drizzle in the vinegar and water and mix with your hands or continue to pulse in the food processor just until the mixture comes together to form a dough. If it seems dry or is having a hard time coming together, add a bit more water a few drops at a time until it comes together. Turn it out onto a clean surface, using your hands to press on any stray crumbs, and divide the dough in half. Pat the halves into discs, wrap with plastic wrap, and refrigerate for 30 minutes. 

Adjust a rack to the lower third of the oven (with a pizza stone if you have one) and preheat the oven to 400ºf. On a floured surface roll out one of the discs to a circle just larger than 12 inches. Place it in a 9” pie plate and refrigerate it for 15 minutes. Meanwhile you can roll out your top crust. For a basic top crust roll out the remaining dough disc on a floured surface until it’s a little larger than 10”. For a lattice crust, divide the remaining dough disc into two and roll out two 10” circles. Cut the circles into 2” strips. 

Fill the pie crust with the apples (it will seem like a lot but they bake down!) and pour the juices over it. Chop the 2 tablespoons of butter into small pats and distribute it all over the top. For a basic crust, place the top crust over the pie, pinch the edges to seal, trim any stray bits with kitchen sheers and then fold the edges over and crimp. Cut 4 slits in the top. For a lattice crust, refer to the video above for how to assemble. Pinch the edges to seal, trim, fold the edges over, and crimp. Give the edges a little hug to make sure they are sitting snuggly on the rim of the pie pan otherwise they could fall off in the oven. 

Freeze the pie for 15 minutes. Brush it with egg wash, sprinkle with turbinado sugar and flaky salt, if desired, and then place it on a baking sheet and bake until the internal temperature reaches 195ºf. Begin checking for doneness at 45 minutes. Let it cool slightly.

To make the cardamom whip, combine the heavy cream, powdered sugar, and cardamom in a large bowl or stand mixer fitted with a whisk attachment. Beat on medium high to stiff peaks. 

Serve pie with a large dollop of cardamom whip and enjoy! 


Thank you so much to Land O’Lakes for providing me with the butter and heavy cream for all of my pie baking adventures and for sponsoring this post. Their European style butter is so gosh darn good and rich and perfect for pie crust.

Additional thanks to Eggboy for his videography and to pops, Jim Stephenson, Patrick Godon, and Cedille Records for the soundtrack on that first vid!

chocolate sheet cake with pistachio butter frosting

Sugar beet harvest is well underway!!!! It’s one of the most wonderful times of the year. It’s by far the busiest and the sleepiest, but also the most exciting. Eggboy has a weird, vaguely nocturnal sleep schedule which has me waking up way before him (this has been a little nerve wracking since he’s the only one who knows how to operate our very complicated coffee grinder) but it means that I can make a big breakfast when he wakes up in the afternoon. Tonight will be my first night home during harvest since I was away over the weekend and I intend to just binge Pretty Little Liars and restock the freezer with pita and soup for quick harvest break snackees. Good thing there are enough PLL seasons to take me through even the longest of harvests, which luckily this doesn’t seem like it’s going to be. Based on my extremely limited knowledge, I’m gonna bet you a dollar that this harvest will take shorter than last year’s verkakte muddy harvest but longer than the easy breezy beautiful year before that. Which affects you and me in the sense that it determines how many baked goodies I make for the crew. I filled our deep freeze with pumpkin bread, blueberry scones, and a sprinkle cake last week before I scampered off for a quick trip to Harbor Springs, Michigan, for a Molly on the Range event and then to Boston for the Forbes Under 30 summit. 

Wow, Harbor Springs is one of the prettiest cutest places in the world! I could eat it all up. Or at least see myself going back again and again to crash the book festival and look at the beautiful houses. I got to stay with Maureen, who wrote one of my favorite cookbooks, Rose Water and Orange Blossoms, and we made raw kibbeh!! It was a dream come true. I’ve been wanting to make raw kibbeh since reading about it in her book but was never confident enough in my butcher finding skills to get clean enough beef that could be eaten raw. So I waited until I got to Harbor Springs, and then we feasted on raw kibbeh, baked kibbeh, fattoush, hummus, knafeh, and this amazing sticky date cake with orange blossom caramel. I also got to hang with Nicole and a whole bunch of new sweet people. It was heaven! 

After Michigan I zipped on over to Boston for a quick day and a half at the Forbes Under 30 summit, surrounded by break fast at Mamaleh’s (with a truly inspirational kasha varnishkes), brunch time tahini buns, sofra with family, and then sofra again with friends, and some hardcore catching up with old college homies. I was in a cloud of congestion and snotty tissues (ew gross sorry forget I said that) but came home with a full heart and a full suitcase of saffron gummies, aleppo pepper, the la boîte halva mix, and Maureen’s nougatsA+ souvenirs

Ok one last thing before we get to cake: Molly on the Range turns one today!!!!!! I can hardly believe it! This last year has been a year filled to the brim with your sweet posts and messages about recipes you’ve made from MOTR and they make me the happiest bean in the world. I love seeing you guys celebrate birthdays and holidays with MOTR cakes and challah and schnitzel and I am so freaking happy that I've gotten to meet and hug so many of you at book events. I cannot thank you enough for how much joy your support of Molly on the Range has brought me over this past year. I am going to try and express all of my gratitude by making some of your favorite foods though!! Since so many of the recipes in MOTR were homemade versions of my childhood favorite foods (lunchables, pigs in blankets, you know…), I want you to hop over here and tell me some of your crazy childhood favorite foods and then I’m going to pick a few to recreate from scratch! If yours gets picked, you’ll get a special one of a kind edition of Molly on the Range :) Head to Instagram for more details.

Alright, cake time!!!! Because all of this harvesting and book birthdaying is calling for celebration. Eggboy put this cake out for all of our harvest helpers on the first day of harvest and from what I can tell, it got gobbled up immediately. It’s your basic super rich chocolate sheet cake covered in a buttercream that has my current obsession, pistachio butter, all up in it. It’s the same pistachio butter that was in these pudding pops but now that it’s getting a little colder I’m giving you a more weather appropriate use for it. Pistachio butter, the fanciest of the nut butters (?), is so great in this buttercream. Just think of how great peanut butter frosting is and then... make it pistachio. This frosting is rich, pistachio-y, a little lemony, and almondy. AKA basically perfect and greenish, the best color. Hooray!   


chocolate sheet cake with pistachio butter frosting

makes one 9" x 13" sheet cake

ingredients

for the cake:

1 3/4 c (350g) sugar

1 3/4 c (223g) all-purpose flour

1 c (85g) unsweetened cocoa powder

1 1/2 tsp kosher salt

1 1/2 tsp baking powder

1 1/2 tsp baking soda

2 large eggs

1 c (240g) buttermilk

1 tb vanilla extract

1/2 c (100g) flavorless oil

3/4 c (178g) boiling water

for the frosting:

1 c (128g) roasted pistachios (preferably unsalted)

1 c (225g) unsalted butter, softened

3 c (360g) powdered sugar

1/8 tsp kosher salt (omit if pistachios are salted)

2 tsp vanilla extract

1/2 tsp almond extract

zest of 1/2 a lemon

2 tb heavy cream

clues

for the cake:

preheat the oven to 350ºf. grease and line the bottom of a 9" by 13" pan with parchment paper.

in a large bowl, whisk together the sugar, flour, cocoa powder, baking powder, and baking soda. in a medium bowl, whisk together the eggs, buttermilk, vanilla, and oil. add the wet ingredients to the dry ingredients and stir to combine. whisk in the boiling water.

pour the batter into the cake pan and bake until a toothpick inserted into the center comes out clean. begin checking for doneness at 25 minutes. let cool in the pan.

for the frosting: 

first, make the pistachio butter. in a food processor, blend the pistachios, scraping the sides occasionally, until very creamy and spreadable, about 5-10 minutes.

with an electric mixer, beat together the butter and pistachio butter until creamy. add the powdered sugar and mix to combine and then mix in the salt, vanilla, almond extract, lemon zest, and then heavy cream. 

spread all over the cake, decorate as desired, and enjoy! 


-yeh!